• Steel Soldiers now has a few new forums, read more about it at: New Munitions Forums!

  • Microsoft MSN, Live, Hotmail, Outlook email users may not be receiving emails. We are working to resolve this issue. Please add support@steelsoldiers.com to your trusted contacts.

goldneagle's M923 recovery and modification thread

goldneagle

Well-known member
4,434
868
113
Location
Slidell, LA
Thank you so much for all the Birthday wishes! (sarcasm)

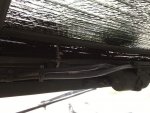
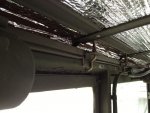
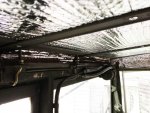
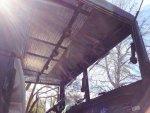
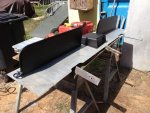
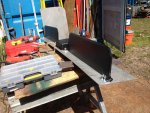
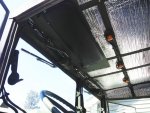
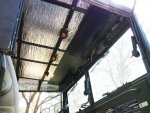
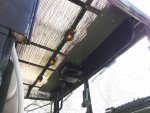
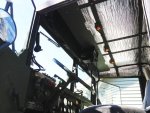
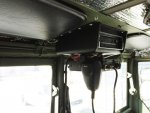
I received the radio, speakers and antenna today. They look nice! Been thinking a lot about how to proceed with the overhead console in the M923 truck. I checked out what one member did in his Deuce. Unfortunately that will not work in the M939 series due to a fat windshield wiper motor size. I called several members for advise and I think i came up with the design I am going to try. I will have to notch the shelf for the wiper motors. The bottom of the wiper motors will hang below the bottom of the shelf. I will fabricate a separate sheet-metal cover to cover the protruding wiper motors. I also plan to piece the shelf and screw the individual together so it will be easier to access the wiper motors for servicing. This way I don't have to remove the entire shelf to access components on or behind the shelf.

I plan to mount the radio, CB and speakers on top of the shelf (console). Also a spot to hold my iphone. I will also hang the fan I just purchased up side down under the shelf. I will also mare some type of storage compartments above the shelf as well. Can store CD's and light personal items there on trips. I also ordered some large sun visors for the cab. 28" by 8". I can mount them under the console as well. Will need to also install power outlets to keep the iphone or MP3 player charged. Also need power up there for the CB, radio and fan.
 
Last edited:

350TacoZilla

Member
263
0
16
Location
Hancock MD
Happy B-day! :cool: I have been checking in on your thread but had nothing useful to post, love the work your putting into storage (I plan to fill every corner I can with lockable weather resistant storage)
 

goldneagle

Well-known member
4,434
868
113
Location
Slidell, LA
Happy B-day! :cool: I have been checking in on your thread but had nothing useful to post, love the work your putting into storage (I plan to fill every corner I can with lockable weather resistant storage)
Thank you. Compliments are useful too. They give encouragement. Wait until you see the overhead console I am gonna build! Just waiting for dry weather since I have to work outdoors.
 

goldneagle

Well-known member
4,434
868
113
Location
Slidell, LA
Looks like the console fabrication will have to wait until I fix the top weatherstripping above the door. The hard-top we installed is slightly off alignment for the door glass. I think the sides of the hard-top are slightly flared out above the doors. When the windows are all the way up the top weatherstrip pushes the window out about 1/4". The window does not seal on the side weatherstripping because of the misalignment.

I looked at the way the top weatherstrip is attached and found a way to fix the alignment without damaging the hardtop. The weatherstrip is connected to the top with small nuts and machine screws. If I oval out the holes in the metal strip and the hardtop I can move the weatherstrip inward until it lines up with the side weatherstripping. That should make a better seal and keep the rain out and wind noise down. Hard part will be getting those screws loose.
 

Danger Ranger

New member
2,253
23
0
Location
Roland, IA
I'm sorry I didn't wish you happy birthday, but if it makes you feel better I had a few beers and they can be in your honor GE. Put up some pics of this CB install. I bet it will be awesome.
 

goldneagle

Well-known member
4,434
868
113
Location
Slidell, LA
Update: Yesterday I got a little work done between rain drops. I took the top and side weatherstripping off the driver's side door frame. I used a drill to elongate the screw holes in the frame. this allows me to push the reposition the weatherstripping further into the cab so it will not push the door glass out at the top. I applied sealer to the area before reinstalling the weatherstripping. Once I adjust the spacing i tightened the small machine screws and tested the window fit. I adjusted the window using the small brackets at the bottom of the window assembly. After I got it aligned as best as I could I closed the access panel and locked the door. It rained after that!

Today I tackled the passenger side. The door opening was off so I had to loosen up the bolts that secured the hard-top in place and try to adjust the fit. I got it a bit better. Tightened the bolt again. Then did the same procedure as the driver's side door. Took a lot of time but the door glass fits better now.

I did not take any pictures of the project. Not much to see. Unless someone looked closely I don't think anyone could tell I did anything today.

Tomorrow I will be busy -so no updates until Thursday or Friday.....:tank:
 

goldneagle

Well-known member
4,434
868
113
Location
Slidell, LA
It was a cool but dry day today. I was intending to start the overhead console project. As I sat in the driver's seat and looked at the area above the windshield I saw the lousy job they did on the air hoses going to the wiper motors and the way the angles attached to the J-bolts are sagging down. I also measured the dimensions of the sun visors I bought and realized I could not install them if I fabricated a door to door overhead console. It is too long and would block my vision. it has to be mounted at the hard top ceiling height. Therefore I am only building the console in the middle on the span.

I removed the old rubber hoses and replaced them with 1/4" diving air hoses I have in stock. I cut some flat iron pieces from my scrap collection and forced it behind the angle lip of the hardtop securing point. I had to adjust the bends on the j-bolt to allow enough room for the flat iron piece to fit behind it. It took al ot of work to get that small piece behind the J-bolt and still get the J-bolt into the hole in the windshield frame. I did it for all 4 J-bolts. The results were worth the effort. The angles no longer sag when i tightened the nut to secure the top to the windshield frame. Pictures added....

I am going to install 1/16" thick aluminum sheet all the way across the front of the hardtop ceiling and measuring 12" towards the back. So the dimensions of the sheet is 72" long by 12" wide. Since I only had a 48" by 48" sheet available I used two 36" long strips spliced together to make it. I measured and pre-drilled the holes in the aluminum that lined up with the support ribs in the hard top. This will make it easier to install later using self tapping screws.

The sun visors will be attached to this aluminum sheet. So will the radio and CB housing.
 

Attachments

biggun

New member
5
0
0
Location
Myrtle Beach, SC
Today was LED day. Went out this morning and replaced my stock headlights with the new LED headlights we ordered from an SS member. Very easy installation! (Removed 3 wires, 3 nuts, replaced fixture, installed 3 nuts, installed wires in the same pattern and test.)

The marker lights in the front were a pain! The wire ends were buried inside the metal protective cover and were hard to extract. I am glad I decided to upgrade those lights! They were dry-rotted and rusty inside. I had to cut the wire to remove the fixture. To install the new one I took apart the end connector so i could get the wire through the small gap in the wires. Reinstalled the connector once i got it through to the inside of the hood. The rest of the process was easy. Reinstall 4 bolts and nuts and plug the wire into the other connector.

The other amber marker lights were easy to replace. Unplug, remove 4 small bolts, install new fixture, reinstall 4 small bolts, reconnect wire. DONE.

Very nice lights. Very good quality and look awesome!

I did find out the reason my ABS light was on! It was off when we left the base on recovery but came on shortly after. It has stayed on ever since! I drove the truck to my friend Billy's hous to show him the LED lights. Decided to turn off the truck so we could talk (too much noise). As we stood by the truck talking I heard air escaping. Tracked it to the front driver's side glad hand. The **** valve was on! Turned it off and all was quiet! On the way home the ABS light stayed off. WOOHOO!

Pictures attached!


View attachment 400248View attachment 400247View attachment 400246View attachment 400245
GE could you direct me to the SS member that sells the LED headlights and markers please. Had a headlight go out and want to give these a try how you like so far?
 

goldneagle

Well-known member
4,434
868
113
Location
Slidell, LA
GE could you direct me to the SS member that sells the LED headlights and markers please. Had a headlight go out and want to give these a try how you like so far?
Please check the classifieds for the headlights. I can sell you amber LED marker lights for $20 each plus shipping. PM if interested.
 

FUBIJAR

New member
41
0
0
Location
NJ
WOW, I started reading this thread at 1am its now 4:18 am, could not stop reading. Great job on all your mods, wish I had your skill and expertise, if you ever want to make sme extra cash c'mon up to NJ for a long weekend and do some of those mods on my truck. Again great job and I look foward to your future posts!
 

goldneagle

Well-known member
4,434
868
113
Location
Slidell, LA
WOW, I started reading this thread at 1am its now 4:18 am, could not stop reading. Great job on all your mods, wish I had your skill and expertise, if you ever want to make sme extra cash c'mon up to NJ for a long weekend and do some of those mods on my truck. Again great job and I look foward to your future posts!
Thank you for the compliment. Where in NJ are you located. I lived in Cherry Hill most of my life until the tax burden forced me to go somewhere cheaper.
 

FUBIJAR

New member
41
0
0
Location
NJ
Northwest in Warren County about 15 minutes from PA border, exit 19 off of route 80. Yes the taxes here are killing me about $9000.00 for a 3 bedroom on one acre. Due to job situation its impractical to move, but someday we hope to escape like you did! Do you still have any family back this way?
 

goldneagle

Well-known member
4,434
868
113
Location
Slidell, LA
Today was a nice day out. Got a lot done! Set up the saw horses to use as a work table. Started putting one of the cut aluminum sheet piece up on the cab ceiling so i can mark the location for the sun visor. Once I marked it on the aluminum piece I removed the piece and took it to the work table. I marked and drilled the holes for the bolts to secure the sun visors. I also cut a piece of flat 1/8" aluminum to reinforce the mounting area for the sun visor. Went through several lengths of bolts before I got the right length bolt to attach the visors properly. They needed the following combination of bolt and washers: Bolt from the back, aluminum reinforcement plate, two 5/16" washers, lock-washer, nut, visor bracket, lock-washer, nut. These sun visors are 28" long and 8 wide. Supported by two 5/16" bolts on each side.

I decided to cut a curved notch in the aluminum sheet edge to make it easier to grab and pull down the sun visor. I repeated the same procedure for the other sun visor. Then I placed the radio enclosure and marked the screw holes. I pre-drilled the holes for later ease of installation. I also attached the CB radio to the bottom of the radio enclosure.

Once I had everything fitted I used some flat rate enveloped to cover the sun visors for priming and painting the aluminum. I used acid etch primer on the aluminum and then Gillespie Green CARC substitute paint.

I let it dry a bit. Then I installed the assemblies to the ceiling of the hardtop. Once I got the aluminum and sun visors secured, I reattached the radio housing and CB radio to the aluminum ceiling panel I just installed. I still have to run a power feed and install the speakers. That should be a lot easier than this project. I still have to touch up the paint on the screw heads.

Pictures attached.
 

Attachments

350TacoZilla

Member
263
0
16
Location
Hancock MD
Looking good man, where did you get that radio housing? I plan on doing some sound deadening mat then maybe headliner and that radio setup would look great.
 
Top