• Steel Soldiers now has a few new forums, read more about it at: New Munitions Forums!

  • Microsoft MSN, Live, Hotmail, Outlook email users may not be receiving emails. We are working to resolve this issue. Please add support@steelsoldiers.com to your trusted contacts.


goldneagle's M923 recovery and modification thread

goldneagle

Well-known member
4,428
858
113
Location
Slidell, LA
Here is what is left:

1-Finish installing steps. (tomorrow)

Looks great.
I would turn the 4 bolts head IN, so that if someone steps near the side, the threaded shank does not gouge their footwear. Anyhow - that's me
I am planning to trim the access threads sticking out of the nuts. Ran out of time yesterday and I didn't want to rush it. (paint was not completely cured) Glad someone was observant. I am trying to keep the outside as snag-proof as possible. I even rounded the corners of the bottom angle-irons to achieve that. This way if the step does hit something (offroad) it will just deflect -instead of getting snagged and torn off. There is madness to my method. :gimp2:
 
Last edited:

goldneagle

Well-known member
4,428
858
113
Location
Slidell, LA
Today I finished fitting the upper angles and installed the steps today. I decided not to go into the details. I had to custom fit each angle based on the location under the existing step. When I tested them they did tilt towards the truck frame. However I was able to use them to climb up on the truck and then step down off the truck. Here are some pictures of the finished product...
 

Attachments

goldneagle

Well-known member
4,428
858
113
Location
Slidell, LA
Another nice day out to work on the truck. I had some things to take care of in the morning -so i didn't get started until early afternoon. I got a lot done today. I applied seam-sealer on the two seams in back of the hardtop. I also sealed the back window shut. I have seen signs of water leaking through the seams and window during the rainy weather we had this winter. I decided to seal the seams once we had enough dry weather that all the water had evaporated away.

While the seam-sealer was drying I started to install the CB antenna. I drilled 1 hole in the back wall of the cab and fed the wire out. I installed a rubber grommet to protect the wire and sealed it with seam-sealer. Once I installed the (4) 3/8" bolts to the antenna base I attached the wire from the cable to the antenna base with the provided screws. Then I lowered the antenna with the custom base adapter over the bolts and tightened it down with lock washers and 3/8" nuts.

Since the seam-sealer was dry to the touch I started to do the touch-up painting of the hardtop. Got the painting done and scraped the paint off the glass of the back window with a razor scraper.

I reinstalled the front bow and then the cargo cover. Put all the tools away. Closed up the cargo area. In order to keep the 102" whip antenna down I used a small u-shaped steel cable clamp to attach a piece of #12 stranded THHN wire to the end of the antenna. The other end of the wire went to one of the super rope hold down hooks. I hooked the antenna cable up to the CB radio temporarily to check the connection. Works fine!

Tomorrow all i need to do is some touch-up painting, adjust the driver door window glass alignment, Secure the antenna wire in the cab and power wash the cargo cover. Almost done!
 
238
0
16
Location
Las cruces nm
Just out of curiosity did your truck have a blow out on the front drivers side tire? Your hood looks like its kind of wrinkly like someone just hammered out the dammage but didn't use any bondo. It may just be the light. The picture was in post #284. Just an observation.:jumpin:
 

goldneagle

Well-known member
4,428
858
113
Location
Slidell, LA
Yes the driver's side fender is a bit rough. Not sure what happened, but they painted over it during the restore process. It gives the truck character. I am gonna leave it alone. :driver:
 

goldneagle

Well-known member
4,428
858
113
Location
Slidell, LA
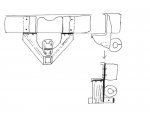
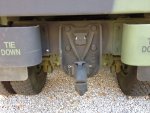
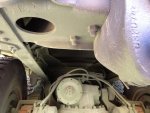
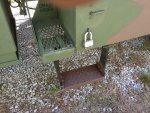
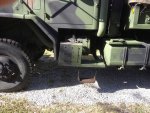
I went to NAPA today to return the Dexron transmission fluid and a few brass fittings. I picked up a Pressure Protection Valve, KN-31000 . I came up with a cleaned way to do the tap-in of the air line that feeds the air-ride seat. Here is the previous install: Tap_Air_1.jpgair_feed.jpg


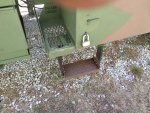
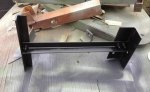
Here is the improved design:air_regulator.jpg


After the install was complete i tested the system. Everything works fine. I also installed wire clamps to secure the CB radio antenna cable and the light feed wires. Then I adjusted the window on the driver's door again.

I took the ruck out for a ride on the Interstate to hear how the radio and speakers sounded on the road. It was a little hard to hear with the window down. I turned up the volume and I could hear the music enough to enjoy it.

As far as I am concerned the truck is done! If I think of anything else I will add it later.

Hope everybody enjoyed the ride! I will be starting a new thread for my latest project a M923 and M109 hybrid. Also known as my new camper project.
 

M920

Member
892
24
18
Location
chama/nm
As far as I am concerned the truck is done! If I think of anything else I will add it later.

Hope everybody enjoyed the ride! I will be starting a new thread for my latest project a M923 and M109 hybrid. Also known as my new camper project.
Great thread, thank you for sharing it with all of us! I really enjoyed watching you do all the clever and inovative improvements to your truck and I'm certainly looking forward to seeing the "Camper Project"!!
:popcorn:
 

FUBIJAR

New member
41
0
0
Location
NJ
Thanks for including us on your build, I learned alot from just "watching" you make your modifications. Great Job!
 

goldneagle

Well-known member
4,428
858
113
Location
Slidell, LA
Ok I still had one repair to do. I noticed that it was difficult to close and lock the door on the lower tool box. The lid was misaligned causing the bottom of the latch to hit the bottom edge of the tool box opening.

I took the stored supplies and basket out of the left side of the tool box to give me some working room. I used a 20 ton jack (already in the tool box) and a heavy metal plate to jack the center of the tool box in the middle near the front. I tried the door to the tool box and it not functioned properly. That told me that the top tool box was bending the lower tool box in the center of the front span.

To fix the problem I decided to put a column in that area to prop up the front top edge of the bottom tool box. Checking my scrap metal pile i found some short pieces of angle to use. I used 1 piece of 2" by 2" angle for the bottom of the support. I used a 13-3/4" long piece of 1" by 1" angle for the vertical piece and a leftover piece of 1" by 1" angle as the top brace. I used two 1/4" bolts to attach the bottom angle to the vertical piece and one 1/4" bolt to attach the vertical piece to the top 1" angle.

I primed and painted the new brace. When the paint dried it was ready to install. I used seam-sealer as an adhesive to glue the support brace to the top and bottom of the tool box. (I had used it to seal the perimeter of the top tool box to the bottom one -so water would not get in-between the layers. it ended up being such a strong bond that I did not need to bolt the 2 tool boxes together!) Once the brace was in place I lowered the jack. The brace held the center of the tool box. I tried the lid and it functioned properly. I was able to lock the latch without much effort.

I reinstalled the basket and all the bottles of supplies back in the tool box. Problem solved!

The reason i am including this repair in my thread is because some members here have stated intentions of installing a battery box on top of the existing tool box. That box is going to put a lot of pressure on the bottom box. From my experience, i do not think the bottom box can support the upper one with batteries installed- without additional bracing or modification. Another option would be to install the battery box on the bottom and the tool box on top.

I am not sure how the military installed the battery box on top of the tool box. Maybe it's not a problem since the battery box spans the entire top of the tool box (less pressure in the middle if the battery box is stiff enough).
 

Attachments

FUBIJAR

New member
41
0
0
Location
NJ
LooksTop Notch, BTW where did you get that wire basket in the toolbox thats holding all of your stuff?
 

goldneagle

Well-known member
4,428
858
113
Location
Slidell, LA
LooksTop Notch, BTW where did you get that wire basket in the toolbox thats holding all of your stuff?
Those are organizers for SUVs. They were supposed to insert into a larger container. I got them at Home Depot a few years ago when they went on Clearance. I have one unopened box that I will add the Mfg. and part number later.
 

FUBIJAR

New member
41
0
0
Location
NJ
Those are organizers for SUVs. They were supposed to insert into a larger container. I got them at Home Depot a few years ago when they went on Clearance. I have one unopened box that I will add the Mfg. and part number later.
Thanks! Or sell me the one you have left lol
 

goldneagle

Well-known member
4,428
858
113
Location
Slidell, LA
Just when you think the truck project is done something else comes along. Looks like i will be adding a custom trailer hitch to the truck. I had to rent a trailer the other day to move my 5000# Kabota tractor to my other property to clean of 30 yards of trash and debris left by the previous tenant when he left. I had a Curtis Hitch on the Deuce so I used it to pull the trailer. You talk about work! It was like a wrestling match trying to turn the steering wheel in order to make a K-turn with the truck and trailer. After a day's work it was exhausting! So I decided the Deuce has to go! So now i need the M923 to be able to tow a civi trailer. I am in contact with one of our SteelSoldiers members about fabricating a custom trailer hitch for the truck.
 

caliber1

New member
995
8
0
Location
Elcho, Wisconsin
Little late to this thread. Do you by chance have any pics of you're CB antenna mount? Had mine attached to my mirror frame, but following Vinny down some goat path down here ripped the cable off, and snapped the fiberglass whip off. :driver:
 

goldneagle

Well-known member
4,428
858
113
Location
Slidell, LA
Here is a sketch for a hitch assembly for my M923 truck that I came up with. It utilizes 8 existing bolts already on the cross-member of the truck (2 bumperett bolts and 2 bolts under the cross-member on each side of the pintle mount). It is designed to fit around the existing Pintle mount.
 

Attachments

Top
AdBlock Detected

We get it, advertisements are annoying!

Sure, ad-blocking software does a great job at blocking ads, but it also blocks useful features of our website like our supporting vendors. Their ads help keep Steel Soldiers going. Please consider disabling your ad blockers for the site. Thanks!

I've Disabled AdBlock
No Thanks