• Steel Soldiers now has a few new forums, read more about it at: New Munitions Forums!

  • Microsoft MSN, Live, Hotmail, Outlook email users may not be receiving emails. We are working to resolve this issue. Please add support@steelsoldiers.com to your trusted contacts.

goldneagle's M923 recovery and modification thread

goldneagle

Well-known member
4,434
868
113
Location
Slidell, LA
Looking good man, where did you get that radio housing? I plan on doing some sound deadening mat then maybe headliner and that radio setup would look great.
Sorry i forgot to mention that I got the radio housing from AMAZON.COM. It's a METRA 99-9000 Turbo kit. (Universal Under-Dash Housing.) $13.78 with free shipping. MADE IN USA woo hoo! The sun visors are sold on Ebay. I got mine for $36 a pair plus $13 shipping. They are brand new!
 

goldneagle

Well-known member
4,434
868
113
Location
Slidell, LA
is that radio housing sealed?
2 large holes in the back or there is a scored line you can cut to remove the entire back section. If you mean sealed as in weather resistant then no it is not. The radio/CD player in Marine Duty. The face is not installed yet. Will do that when I finish the wiring.
 

goldneagle

Well-known member
4,434
868
113
Location
Slidell, LA
Today was a bit chilly out, but at least it didn't rain! Decided to install the dash fan as a starting point for today. I used a piece of scrap aluminum left from the overhead console/sun visor project. First I figured where to install the mount for the fan. There were air hoses in the way. They were way too long for the location. I cut them shorter and re-secured. Then I measured the location for the mount. First I cut a wide slit in the aluminum so the the mount would go around the air hose coming from the top of the dashboard. Then I used my vise and hammer to bend a 90 degree bend in the base mount. I then drilled the two 5/16" holes in the short part of the brackets. That part will attach to the window frame. I also marked and drill 3 hole for mounting the fan base to the mount bracket. Once the holes were drilled I used a jigsaw to cut a curved node on the mount bracket. I used the angle grinder with sanding disc to smooth the edges of the mount bracket. Took the bracket and drill to the truck and drilled two #7 holes in the window frame. Then I tapped them for 1/4" bolts. I then primed and painted the bracket.

Once the bracket was dry I used two short 1/4" bolts and lock-washers to secure the mount bracket to the dash. Then I used some short #10 screws and nuts to secure the fan to the mount bracket. Plugged the fan in a tested. Worked great!
 

Attachments

goldneagle

Well-known member
4,434
868
113
Location
Slidell, LA
Once I finished the fan installation I started to work on the speaker mounts. I used some more of the scrap aluminum sheet to fabricate the speaker mounts. Once I bent on bracket to fit the top inside corner of the hardtop I duplicated it in reverse to fit the other side. (I like to do it freehand without a template). I used the bench vise and hammer to do all the bends. Once I got both pieces fitted I used self-tapping screws to attach the mount brackets to the lattice-work of the hardtop. I then cut some more aluminum to make the mounting brackets that held the speakers in place. The U-shaped bracket that came with the speakers is too flimsy! (very thin sheet-metal that flexes too much) These brackets will attach to the mounts I just made and hold the speakers in place. I cut 4 pieces of aluminum for the brackets. Two for each speaker.

I used the bench vise and hammer to bent each of the brackets into a 90 degree bracket. I drilled two holes in the smaller part an one hole for the speaker in the larger area. I used the angle grinder to round the corners and finish the edges of the aluminum. I then primed and painted them flat black.

Once they were dried I installed the brackets with 2 self tapping screws on each side and mounted the speaker with the wire attached. I repeated the work on the other side of the cab.

Speaker_Mount_1a.jpgSpeaker_Mount_1.jpgSpeaker_Mount_1b.jpgSpeaker_Mount_1c.jpgSpeaker_Mount_1d.jpgSpeaker_Mount_1e.jpgSpeaker_Mount_2.jpgSpeaker_Mount_2a.jpg

After getting the speakers mounted I decided to attempt to cut the 4 ply conveyer material I received yesterday. I am going to cut it into 3 inch strips and use them to support the steps I am adding to make it easier to climb up to the cab. I marked the line with a grease pencil and used the electric angle grinder with cut off wheel to try and cut the thick conveyer material. Well It was a success! Since the rubber is a lot softer than the rubber conveyer piece, it did not ware out the cutting blade. I managed to cut 4 pieces so far for the steps. It takes quite a few passes to cut through the rubber but with patients I got great results. Nice clean cuts. After that I packed up the tools for the night.

Step_Support_1.jpgStep_Support_1a.jpg
 

goldneagle

Well-known member
4,434
868
113
Location
Slidell, LA
Did some serious thinking about cup holders last night. I searched Ebay, AMAZON.COM, and the internet for heavy duty cup holders. Most of them out there are plastic. They break too easy! Found a Stainless Steel version of the folding cup holder offered in the classifieds. Price was $30 each. Not gonna spend $60 for 2 cup holders! So i start thinking what can i use to make some heavy duty cup holders for the truck? What doe I have in inventory that I can use? Then it came to me! Filter canisters! I did some spin-on filter upgrades on my Deuce, M923, and Diesel Generator set. I knew I had some old canisters out in the shop the i will not need. It was too late last night to go look.

Went out this morning and found a double canister assembly from my generator set. The canisters looked good. There was one short and one long canisters. I removed the short canister from the housing. Went and grabbed a empty soda can to see how the fit would be. It was perfect! Using a tap I threaded the bottom hole for a fine thread 3/8" bolt. There was no drilling required.

Cup_Holder_1.jpgCup_Holder_1a.jpg

I had thought about using some of the green sleeping bag foam mat as insulator. I cut a piece and tried it for fit. It fit perfect.

Cup_Holder_1b.jpg

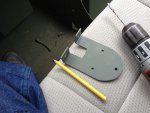
Next I decided to see how my new spill-proof cup would fit. It was too tight with the green foam insert. So I brought out some thin insulation I had left over from insulating the Deuce cab. I tried it and it was a good fit. I also wanted to add a bottom drain grate and insulation inside the cup holder. Since the canister had a drain valve I figured I can use it to drain any dripping that ran to the bottom of the canister. I found an old aluminum data plate that had the wiring diagram for the old 15k Generator Head. Using the canister as a template to draw the circle and cut it with some tin snips. I used a punch to make (5) 3/8" holes in the round aluminum piece I just cut. I also punched the holes in the round piece of insulation. I used Scotch 77 spray glue to attach the insulation to the thin aluminum bottom piece.

Drain_1.jpgDrain_1a.jpgCup_Holder_1c.jpg

I took the long canister and marked it to match the short canister height. I used a cut off wheel on my angle grinder to cut the canister. I used a Dremil tool with a sanding drum to sand the sharp edge on the cut. I did that to both pieces of the canister I cut. I finished smoothing the edges on both pieces. I tapped the bottom hole for the fine thread 3/8" bolt. I cut another round piece of aluminum for the bottom of the canister. This one will go on the passenger side for the wife to use. Here travel mug is bigger so no room for insulation.

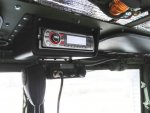
I found one piece of heavy angle and used it for one cup holder. I ran the 3/8" bolt, lock-washer and washer through the bottom of the bracket into the thread hole on the bottom of the cup holder. Looked good and fit nice. I removed it and primed and painted it flat black.

Cup_Holder_1d.jpgCup_Holder_2.jpg
 
Last edited:
238
0
16
Location
Las cruces nm
I need cup holders in mine and this would be a "unique" cup holder. I was also thinking of getting some pistons maybe from a shot nhc 250 or similiar and round out the inside of it so it could hold a cup. I REALLY like your set up though!
 

goldneagle

Well-known member
4,434
868
113
Location
Slidell, LA
I found a piece of metal that was removed from the bench seat back support corner bracket. I duplicated the bracket from the first cup holder using the angle grinder to cut and sand it. Drill out the holes the same pattern as the first one. I painted it flat black as well. Inserted the screw assembly to the bottom of the canister (as I did to the first one).

I located a good spot on the top right edge of the dash panel and secured the bracket to the metal with 4 self-tapping screws. I reattached the canister to the bracket with the 3/8" bolt and tightened it up. I put the travel cup into the new cup holder. Wow nice!

Cup_Holder_2a.jpg

Now it was time to install the cup holder for the driver's side. I chose the left side of the shifter housing. I took the (4) 1/4" bolts out of the side of the shifter housing and raised the shifter assembly. I could see inside the housing. The self tapping screws would interfere with the shifter assembly. I left the shifter up high and screwed the bracket into place. I went and cut 4 self-tapping screws just short enough to go through the sheet-metal but not long enough to interfere with the shifter assembly. I replaced the long self-tapping screws, one at a time, with the short ones I just cut. Bracket is solid! Reinstalled the shifter assembly and tightened the bolts. I reinstalled the canister to the bracket and tightened the bolt. 2nd cup holder done.

Cup_Holder_2b.jpgCup_Holder_2c.jpgCup_Holder_2d.jpgCup_Holder_3.jpgCup_Holder_3a.jpgCup_Holder_3b.jpg

The leftover canister piece can be used as a cup holder if a flat piece of metal can be welded to it as a bottom. So you can get 3 cup holders from a generator fuel filter canisters.
 

goldneagle

Well-known member
4,434
868
113
Location
Slidell, LA
I need cup holders in mine and this would be a "unique" cup holder. I was also thinking of getting some pistons maybe from a shot nhc 250 or similiar and round out the inside of it so it could hold a cup. I REALLY like your set up though!
A lot less work with the canisters. If you need a larger cup holder for a big gulp try the Multi-fuel oil filter canisters or the NHC 250 Oil filter canister.:tank:
 

M920

Member
892
24
18
Location
chama/nm
A lot less work with the canisters. If you need a larger cup holder for a big gulp try the Multi-fuel oil filter canisters or the NHC 250 Oil filter canister.:tank:
Very nice work on your truck! I love the cup holders....those are awesome!!!!!!
 

goldneagle

Well-known member
4,434
868
113
Location
Slidell, LA
love the cup holders! i may steal that idea, only thing wont your knee hit the one on driver side of shifter?
No it does not hit at all. Already tested yesterday when i drove it down the street to show it off to my friend Billy. You are not stealing the idea. I posted all my ideas as freeware. If i were guarding the designs I would not give so much detail about how I make them. I am glad some of the members think my designs are useful!

I have learned a lot since I joined the web site. I have adapted many good ideas from reading the threads on this site. Thank you!
 

goldneagle

Well-known member
4,434
868
113
Location
Slidell, LA
Today I worked on wiring in the radio, speakers and CB. Lucky for me i already had a spare line in the ceiling when i ran the wires for the dome lights. All I had to do was tap into it in the battery compartment and run it to the fuse panel and install a 15 amp fuse. I am sharing the ground with the ceiling lights. Since they are LED and the ground wire is 14 gauge it should be more than enough of the radio and CB. The fuse on the radio is 10 amp.

It's not an optimal installation because the cut off switch kills all power to the radio and it looses all the memory and settings. It's not a big deal. i only have 2 stations programmed in my car radio. All i need to do is remember the frequencies. Still need to take the truck out on the interstate to test the quality of the sound.

I only took one picture today...
 

Attachments

Danger Ranger

New member
2,253
23
0
Location
Roland, IA
That looks great. I am diggin the cupholders too. That little Cobra should work great for you, they actually are pretty good for being so much cheaper than a fullsize. I had one and loved it, but I wanted to upgrade, and did so later. Cool setup, nice and clean.
 

goldneagle

Well-known member
4,434
868
113
Location
Slidell, LA
Went to Home Depot today and returned the aluminum angle i had not used on the Console project. I also picked up some 1'x1" x 1/8" steel angle, some 1/8" flat stock, and some 2" x 2" x1/8" angle. I already had a piece of 1/4" thick 6" by 24" aluminum diamond plate and 5/8" 4 ply conveyor material.

Step_Support_1.jpg

I started to fabricate my add-on steps for the cab. i am making 2 steps. One for each side. I started by cutting the aluminum diamond plate to two 6" x 12" pieces. Then I cut 4 pieces of 2" x 2" angle 6" long with 45 degree corners. I cut 4 pieces of 1"x 1" angle 12" long with 45 degree corners. I drilled two 5/16" holes in the 2" x 2" angles. Then i used the angles as templates to drill two 5/16" holes on the 6" edges of the aluminum diamond plates. I drilled three 1/4" holes in the 1" x 1" angles. Then i used the angles as templates to drill three 1/4" holes on the 12" edges of the aluminum diamond plates. i used a countersink bit to countersink the 1/4" holes in the diamond plate -so I can use 1/4" flat head screws on top of the diamond plate steps.

Step_1.jpgStep_1a.jpgStep_1b.jpg

Once the angles were secure to the 2 aluminum diamond plates I welded the iron angle in the corners. I drilled two 3/8" holes in the bottom of the rubber conveyer strips. I then drilled two holes in each 2" x 2" angles on the side of the steps using the holes in the rubber strips as templates. Once the holes were completed i used those holes as templates to drill two holes in 4 of the 1" x 3" flat stock pieces.

When the welds cooled off I removed the screws and sanded the metal clean. I used Acid etch primer to prime all the prepared metal pieces. Then I painted the metal pieces with brown CARC substitute paint. When the paint dried I reassembled the steps and rubber conveyer pieces.

Step_1c.jpgStep_1d.jpgStep_1e.jpg

I cut 4 pieces of 2" x 2" by 6" long iron angles. I also cut 4 pieces of 1" flat stock 6" long. I cut 4 pieces of 1" flat stock 3 " long. I marked and drilled two 5/16" holes in the 3" long flat stock pieces. I then used them as templates for drilling two 5/16" holes in the 2" x 2" angles. I sanded the metal pieces and set them aside for tomorrow -when i will continue with my project.

Step_1f.jpg
 

goldneagle

Well-known member
4,434
868
113
Location
Slidell, LA
My list of projects for the truck is getting short. I hope to have most of the tasks done this week.

Here is what is left:

1-Finish installing steps. (tomorrow)

2-Seam-seal hardtop seams and around back window

3-Touchup painting over sealed areas

4-Install CB antenna and run wire to CB-Radio

5-Adjust Driver-Side window.

6-Test ABS system.

7-Oh ye pressure-wash the cargo cover. :tank:
 
Top