• Steel Soldiers now has a few new forums, read more about it at: New Munitions Forums!

  • Microsoft MSN, Live, Hotmail, Outlook email users may not be receiving emails. We are working to resolve this issue. Please add support@steelsoldiers.com to your trusted contacts.


HMMWV A2 Project

Bart

Member
110
0
16
Location
Netherlands Europe
TedG said:
Thanks Bart for comps!

I strongly recommend that you send your refurbished hmmwv to my location for pre-shipping testing! :lol: I have access to: clay, muck, water, sand, gravel, and asphalt! I would even provide this service free of charge 8) .

I run the radials on all my hmmwvs due to hwy driving (larger diameter means a little faster speed and the stock 6.2 needs all the help it can get, just ask Joel) and ride nicer. There is nothing wrong with bias off road but are not suited best for hwy driving (my .02cents).

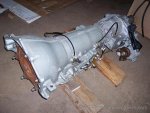
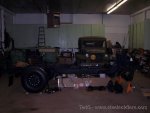
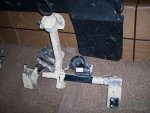
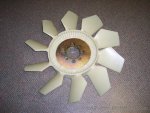
On my project, I just located the A2 fan prop! It should be in next week. Getting closer to firing date!
thanks Ted, and I must say a very interesting recommendation.....will consider.....ehh...there's a Harley Davidson Road King Classic in the container as well, is there any possibility of testing this bike for a friend of mine.....?? :wink: :wink:
got your message on the MT's..makes sence...
keep me posted on the " firing date" .....
CU
Bart
 

TedG

Well-known member
1,133
38
48
Location
MI USA
Today the new A2 reverse rotation fan blade arrived and this weekend I pick up a new hydraulic fan clutch! The one I picture a few posts up is a civilian unit...you can tell by the number of holes (civi 4, mili 8) and the center hole for the civi much larger. Anyway, I have it and hope to have it spinning soon.

The only things left prior to firing is: engine prelube, install radiator and finish piping the power steering system. Oh and installing the pyro!
 

Attachments

TedG

Well-known member
1,133
38
48
Location
MI USA
Well I did a lot this weekend but ran out of time to fire the engine. I did however prelube the cylinders and with glow removed used the starter to turn over the engine. With no back pressure, it spins nice and fast and builds oil pressure plus primes the ip system. Pictures are of the new fan clutch, new prop, and new rad (what a tank!). I just need to finish the power steering circuit, fill rad with h2o and recheck all fluids. I also found out about pyro mounting...one for each manifold and locate prior to flex pipes that feeds the turbo. More on this after the engine fires.

Thanks for the off-line help you guys! Enjoy the pictures.
 

Attachments

TedG

Well-known member
1,133
38
48
Location
MI USA
Thanks guys! And no the golden colored ps pulley is not actually gold!

Lane, you get a ride if I get to drive Argyle again! If all goes well this truck should be at Ft. Custer (best case) but not finished, Clare (most likely) and Grayling (better darn well be done by then)! I like long term goals so I feel I have time to do something...

More pictures in a week or so.
 

dilvoy

Member
733
25
18
Location
San Francisco, Ca.
Wow Ted! That serpenting belt setup looks really great. It does a better job around the Alt and PS pump area that my older style setup does. I hope mine works well enough and dosen't throw belts. Do you have the spacers for lifting the body a little higher than a N/A equiped Humvee/Hummer? The turbo models are lifted 1/2" higher than a N/A truck to clear the center intake manifild. I did a 3" lift on my truck because I wanted to be a little higher for side impact reasons and to make rear brake jobs easier.
 

TedG

Well-known member
1,133
38
48
Location
MI USA
Hi George,

Thanks. Yes, this serp setup seems to be nicer and should not have belt slap ( :oops: 
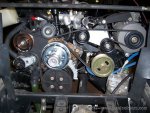
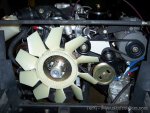
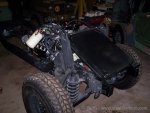
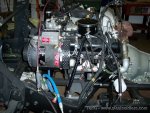
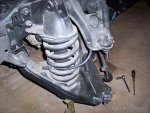
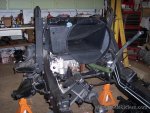
). I am trying to locate a new bracket for a/c compressor and if I find one, I will install that setup. I am going to lift the tub either 0.5" or 1.0". The intake manifold that sits above the turbo is machined for clearance with tubs cross over beam. I have heard that they did this prior to lifting the tub, but I still will lift it since every little clearance I can get I will take! I installed my predator rapboost for turbo and set it to 2.5" instead of the 2" (11-13psi) paper says. Once my pyros are installed, then I can do as you said and fine tune the engine. Will post once engine fires and with Joel, will try to do a digital video of the engine comming to life!

Regards,
 

kcimb

Well-known member
1,336
212
63
Location
Fort Worth, Texas
Lookin' Good!

Now I want one.

I saw a Hummvee project on ebay over the summer..the frame, engine wheels, etc for 3k$. Was this it?

Where do you go about getting a restore project like this?
 

TedG

Well-known member
1,133
38
48
Location
MI USA
Update...work has gotten in the way of fun (east coast, west coast, southern border, across northern border). Plus when I am home, I have been working on my Unimog. I have been getting it ready for the global warming snow here in Michigan (know locally as lake effect snow). Since Lane bought Argyle, I need to make sure I can move snow (my wife warned me about this as Argyle was towed away), but more importanly, stop the mog. The air brake booster went out and I finally got that removed, repaired and installed (if you ever turned a wrench on a 406, you will understand the complexity of working under the hood). It now holds 7.5bar for days!!! Now I have to bleed the brakes, connect plow, add seat belts and then wait for snow...

The hmmwv project has hit a snag but I should be back on it before Christmas. Sorry...I miss working on it also but work happens.

Regards,
 

TedG

Well-known member
1,133
38
48
Location
MI USA
Well I finally got to turn wrenches on the project last Saturday. Joel G showed up and we spent about 8 hours on it. I jerked the 10300 pound hubs and half shafts and replaced with 12100 pound ctis ready hubs and half shafts. I am not going to install the ctis system but I wanted the truck to equipped with the correct hubs. We set the rear hubs and then put on the new a2 tires and rims so I could reposition it in my shop to make room for the m1037 and mog (if need be). Power plant has been removed for access to the frame and frontal area. Vent lines and cooling lines have been installed. The big radiator was fitted with it big shroud and set in place. Now I am fitting the snout and have prep'd the splash guards. Lots of work! I dropped the pan on the tranny and replaced filter and inspected lower end (very clean) and pulled/inspected torque converter and seals. Snag: Engine is in shop having a teardown party...more on that later. Shall be good as new when finished :wink:

Merry Christmas! Enjoy the pictures...
 

Attachments

offroaddiesel

New member
409
0
0
Location
western maine
looks like a nice project ted,we missed out ,a few years ago on getting a hmmwv, some one ,not far from me bought alot of them to sell, my wife wanted to get one ,but as usual i drag my feet so i lucked out. at the time i was into powerwagons and really did not want anther project.but now things are differnt. so the next will most likly be a duece.. steve
 

TedG

Well-known member
1,133
38
48
Location
MI USA
Again, in between work travels and home time, I finally got around to placing the snout/splash sheilds on the truck. Looks simple but a LOT of things need to be lined up just right for it to fit and have proper clearances. I also fitted the rear half shafts and found that you need to trim the rear brake bracket to allow clearance for the 12100's bigger cv. I also received a big shipment of parts including a new style spare tire carrier (no more gut busting tire lifting) and gerry can holder and several other things. To do list: set permanently the engine/tranny/tcase/exhaust/oil cooler and then place the front hubs and half shafts. I will then add the hydraulic winch system and then mount the brush guard. If this all goes good, then on to the tub (I did finally get a .5" lift kit)! Should be a lot warmer outside by then so I can spray the carc outside.

Regards
 

Attachments

maddawg308

Well-known member
Steel Soldiers Supporter
10,852
723
113
Location
Front Royal, VA
From what I gather listening to guys who have worked on HMMWVs before, it is a very Lego-like vehicle to build. Meaning: it MUST be assembled in order, A B C D E and so on. Mixing up the assembly order of even what most would consider to be minor parts will throw everything off in the end, and you'll have to go back and do it in correct order. I believe you are finding this to be the case.
 

TedG

Well-known member
1,133
38
48
Location
MI USA
Hi Mike,

This is mostly true. However what I keep running into is the po had a hired wrench turner who did not take the time to read and then install. So I am cleaning up their work plus moving the project forward. Once the running gear is finished to my standards, then the tub assembly will be easier. It should look nice with an opened turret with MA sitting up there!
 

AMTAK

New member
145
1
0
Location
Elizabeth PA
Looks good ted. Did you use the stock caliper hangers for the 12k upgrade? I heard about the rubbing, thanks for the pic of the problem. (if thats the only one).
I'm glad I can watch and learn from your A2 build. Mine should go a little smoother.
 

TedG

Well-known member
1,133
38
48
Location
MI USA
Hi AMTAK,

Yes, I did not change them since only a small amount of material has to be removed and it does not compromise the safety of the brakes. If you are starting with a complete frame build up, then you should have an easier time. You are more than welcome to come visit, turn wrenches and learn :lol: and since you would be driving, you could bring me one of your flatbed 101a3 trailers! :lol: Also, did you notice the mud flaps that were once yours! 8)

I also got a new Luvern brush guard! :D ...it is in the box behind the mud flaps.

Regards,
 
Top
AdBlock Detected

We get it, advertisements are annoying!

Sure, ad-blocking software does a great job at blocking ads, but it also blocks useful features of our website like our supporting vendors. Their ads help keep Steel Soldiers going. Please consider disabling your ad blockers for the site. Thanks!

I've Disabled AdBlock
No Thanks