• Steel Soldiers now has a few new forums, read more about it at: New Munitions Forums!

  • Microsoft MSN, Live, Hotmail, Outlook email users may not be receiving emails. We are working to resolve this issue. Please add support@steelsoldiers.com to your trusted contacts.


MEP-004a Generator runs but shuts down no fuel pumps run

rorub

Member
38
21
8
Location
VA
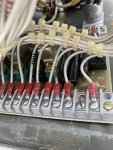
I've read the process twice and have been in contact with Ray on the IP. Hopefully, after the rebuild I can successfully get her to run. Once I have someone to help, I will test S9-3 per your instructions. I will check the main tank's connection as well.

I know the guy said he got it to run on ether...later found the rusted empty can. That only tells me the engine wasn't seized. He runs a trucking/container yard so I'm hoping he only shot quick bursts and didn't damage the engine.

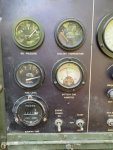
I checked the oil level and it's at. the correct level on the dip stick. Should I be concerned that the gauge isn't working?

I'll let you know if I get the pumps to run tomorrow.
 

Guyfang

Moderator
Staff member
Moderator
15,909
22,185
113
Location
Burgkunstadt, Germany
a. Oil Pressure Gauge.

(1) Removal.

(a) Tag and disconnect electrical leads to oil pressure gauge.

(b) Remove nuts (1, Figure 4-38), lockwashers (2) and clamp (3).

(c) Remove oil pressure gauge (4) from panel.

(2) Inspection and cleaning.

(a) Clean oil pressure gauge with filtered compressed air and a soft bristle brush or wipe with a

dean, lint-free cloth lightly moistened with an approved solvent.

(b) Visually inspect oil pressure gauge for corrosion, cracked casing, cracked or broken glass,

stripped or otherwise damaged threads, and evidence of other damage.

(3) Testing.

(a) Connect a multimeter across the terminals of a rheostat.

(b) Adjust rheostat until multimeter indicates 30 ohms resistance.

(c) Disconnect multimeter, but do not disturb rheostat adjustment.

(d) Connect rheostat to terminal of oil pressure gauge marked SEND.

(e) Connect rheostat and oil pressure gauge in series with a 24 Vdc source with negative lead to oil pressure gauge terminal marked IGN.

(f) Oil pressure gauge should indicate 60 PSI.

(g) Replace oil pressure gauge if it does not function properly.
 

rorub

Member
38
21
8
Location
VA
Haven't had time to test the fuel pumps since my baby was sick all week. Spent the long weekend with family, but I finally had a long enough break from the rain to remove my IP. Shipping it off tomorrow to get rebuilt.

This should give me some time to fix the fuel delivery issues before the IP comes back.
 

rorub

Member
38
21
8
Location
VA
Finally reinstalled my rebuilt IP and she runs. However, she won’t stay running without battle short on. I think it may be related to oil pressure gauge/sensor not working.

Now that I know she runs I will take the time to address all issues. Thanks everyone, especially Ray and Guy.

Surprised how quiet she runs compared to my 003 and DJE.

I disconnected the low oil pressure harness and jumped pins A and B. Once I put S1 to Run, my fuel pumps started running. I assumed that this would allow me to run without Battle Short, but it did not (low oil pressure light is off when jumped).

ENGINE STOPS SUDDENLY.
Step 1. Defective fuel injection pump (Figure 3-21).
Repair or replace fuel injection pump (para 3-22).
Step 2. Defective speed switch (figure 3-15).
Repair or replace speed switch (para 3-7).
Step 3. Defective protective relay assembly (24, figure 3-119). Test and replace relay assembly (para. 3-90).

After reading in the TM, it looks like I'm back to testing the speed switch like Guy suggested a while back. If that doesn't work, I'll try step 3. Do y'all suggest replacing the low oil pressure? Why would my pumps run with jumped harness, but not run when battle short is on?
 
Last edited:

rorub

Member
38
21
8
Location
VA
Hopefully, I successfully take it apart and put it back together. It was just sitting there not bolted down.

Didn’t realize it was only two screws and took off all the mounting screws…

R3 and R8 look a little burned up
 

Attachments

Last edited:

Chainbreaker

Well-known member
1,749
1,839
113
Location
Oregon
I'm sure those resistors get hot but they don't look that bad. However, I would inspect the backside traces of the A5 printed wiring board circuit (its a single sided board) for possible opens/breaks on bottom of card. You can probably just remove the PCB mounting screws and lift it up enough to inspect without removing the wiring harnesses that connect to terminal blocks.

Also seems a bit odd that diode CR3 had its lead clipped and soldered to a lead soldered to board on that one end. Shouldn't be an issue as long as CR3 is good and that solder joint has continuity which it appears it does from photo.
 
Last edited:

rorub

Member
38
21
8
Location
VA
I didn’t see anything glaring when I inspected it. I put it back together and put it back inside the unit. I don’t work with circuit boards often so I may have missed something.

I found one thread where someone repaired their board. Does it happen often and is there a common failure point?

The low oil pressure switch works per the test I followed in the TM. That explains why the low oil light doesn’t come on when the unit is running.
Also tested the oil pressure sender; unfortunately, I don’t get the exact readings from the TM, but resistance does fluctuate when I blow air on it. Tested the oil pressure gauge and it's no good. I'm on the hunt for a new gauge.

Are there any risk running the machine with battle short on? I would like to fix it 100%, but I think it will be a while until I can source an A5 card. CR3 does have continuity. I think I'm on the last part of testing per TM. Step 3. Defective protective relay assembly (24, figure 3-119). Test and replace relay assembly (para. 3-90). It looks like it goes through a list of testing in the Special Relay box 3-247 (TM 9-6115-464-34).

I believe the speed switch is working properly because I'm able to start the machine and flash the field with any grinding.
 
Last edited:

Scoobyshep

Well-known member
914
989
93
Location
Florida
I didn’t see anything glaring when I inspected it. I put it back together and put it back inside the unit. I don’t work with circuit boards often so I may have missed something.

I found one thread where someone repaired their board. Does it happen often and is there a common failure point?

The low oil pressure switch works per the test I followed in the TM. That explains why the low oil light doesn’t come on when the unit is running.
Also tested the oil pressure sender; unfortunately, I don’t get the exact readings from the TM, but resistance does fluctuate when I blow air on it. Tested the oil pressure gauge and it's no good. I'm on the hunt for a new gauge.

Are there any risk running the machine with battle short on? I would like to fix it 100%, but I think it will be a while until I can source an A5 card.

CR3 does have continuity. I think I'm on the last part of testing per TM. Step 3. Defective protective relay assembly (24, figure 3-119). Test and replace relay assembly (para. 3-90). I believe the speed switch is working properly because I'm able to start the machine and flash the field with any grinding.
I repaired my A5, had a burnt trace.

Running with the battle short on will bypass the safeties (low oil hi temp etc) so its up to you if you want to run that risk. Before throwing parts at it I would try to find where you are loosing the circuit.
 

rorub

Member
38
21
8
Location
VA
I repaired my A5, had a burnt trace.

Running with the battle short on will bypass the safeties (low oil hi temp etc) so its up to you if you want to run that risk. Before throwing parts at it I would try to find where you are loosing the circuit.
I will open the special relay box up again and check the board once more. It's a lot easier now that I know it's only two screws on top....instead of removing all the nuts holding everything together. Only hard part was moving all the wires so they wouldn't get damaged stuffing them back in the enclosure. Did you just test continuity on the board?

Since I finally have the set running and producing power, I figured I'll go ahead and get a set of batteries and replace all the filters and fluids. I was holding off just in case I wasn't able to get this running. I'm pretty sure this lived most of it's life in the desert. There is still so much sand every where. Looks like a mouse or mice nested here; fortunately, I don't see any damaged wires.

Once I get this working 100%, I'll have to decide wether to keep my 003s or this 004. My primary is a NG Onan 12.5kW JC which runs really strong, but I've already had a scenario where NG supply was interrupted during an outage and I had to switch over to my 003. It's nice having a backup to a backup.
 

Ray70

Well-known member
2,379
5,100
113
Location
West greenwich/RI
I would say, just to be on the safe side... If you decide to run a bit with the battle short on at lease rig up a mechanical oil pressure gage so you can be sure what you have for pressure. Definitely would suck to come this far that cause a problem while troubleshooting!
 

Scoobyshep

Well-known member
914
989
93
Location
Florida
I will open the special relay box up again and check the board once more. It's a lot easier now that I know it's only two screws on top....instead of removing all the nuts holding everything together. Only hard part was moving all the wires so they wouldn't get damaged stuffing them back in the enclosure. Did you just test continuity on the board?

Since I finally have the set running and producing power, I figured I'll go ahead and get a set of batteries and replace all the filters and fluids. I was holding off just in case I wasn't able to get this running. I'm pretty sure this lived most of it's life in the desert. There is still so much sand every where. Looks like a mouse or mice nested here; fortunately, I don't see any damaged wires.

Once I get this working 100%, I'll have to decide wether to keep my 003s or this 004. My primary is a NG Onan 12.5kW JC which runs really strong, but I've already had a scenario where NG supply was interrupted during an outage and I had to switch over to my 003. It's nice having a backup to a backup.
I had a very obvious burn (trace was clearly damaged)
 

rorub

Member
38
21
8
Location
VA
Didn't have enough time to pull the special relay box apart, but I did replace the fuel hose from the day tank to the 2nd filter ($28 NAPA). Jumping oil pressure safety harness A-B did not run pumps to fill day tank. Before, if I had the start switch to Run and Battle Short on the pumps would run with it shorted.

I manually filled the day tank, shorted the safety harness and the pumps kicked on. Also, I know my low fuel safety works as well (light on). I think my A5 might have some damage. All the individual components I have tested good so far.
 

Guyfang

Moderator
Staff member
Moderator
15,909
22,185
113
Location
Burgkunstadt, Germany
Didn't have enough time to pull the special relay box apart, but I did replace the fuel hose from the day tank to the 2nd filter ($28 NAPA). Jumping oil pressure safety harness A-B did not run pumps to fill day tank. Before, if I had the start switch to Run and Battle Short on the pumps would run with it shorted.

I manually filled the day tank, shorted the safety harness, (What is a safety harness?) and the pumps kicked on. Also, I know my low fuel safety works as well (light on). I think my A5 might have some damage. All the individual components I have tested good so far.
 

rorub

Member
38
21
8
Location
VA
Got my new oil pressure switch installed. It’s not the exact match that I thought it would be, but it’s working. Anyone else have a 004 with oil pressure at 60 psi? Might get a oil pressure tester from harbor freight and test it against my gauge.

Now when my set shutdowns without putting battle short on, I get an overload light. Overload relay in tactical box? Feels like I’m getting some where.
 

Attachments

Top
AdBlock Detected

We get it, advertisements are annoying!

Sure, ad-blocking software does a great job at blocking ads, but it also blocks useful features of our website like our supporting vendors. Their ads help keep Steel Soldiers going. Please consider disabling your ad blockers for the site. Thanks!

I've Disabled AdBlock
No Thanks