-
Steel Soldiers now has a few new forums, read more about it at: New Munitions Forums!

My BIG M925A2 Project Truck Is Home
- Thread starter steelsoldiers
- Start date

More options
Who Replied?") Having it on this side of the pond does mean its worth at least 4 times as much though.
Having it on this side of the pond does mean its worth at least 4 times as much though.- 5,278
- 4,128
- 113
- Location
- Charleston, WV
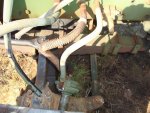
UPDATE: I spent half a day working on the truck yesterday. My plan was to get the get the air brakes fully operational and then try and move the truck a little to test them.
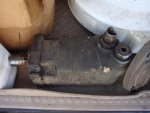
I started out by installing my rear relay valve. It went back in a lot easier than it came out with some new plated hardware. I then disconnected the vent lines from the front-rear relay valve and dropped the guts out of it. It was a little crusty inside so I gave it the emory paper and white grease treatment.
I got it back together and then moved on to the secondary air tank. It had been hit with something from behind and shoved into the inner fender. I loosened the holding clamps and beat it back into position with a block of wood and a BFH.
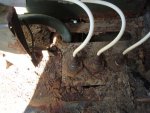
After that I went to work on the t-case linkage. The pivot was still stuck really tight even after drilling it and soaking it with oil. Closer inspection of the left side of the pivot revealed some gouges in the bracket and pivot where someone had used a chisel, prybar, pickle-fork, or something else to get the left linkage arm off of the pivot. Metal from the bracket was pushed down into the pivot binding it tightly. I will probable have to beat the pivot out with a hammer and then clean the bracket up with a file in order to get it moving freely.
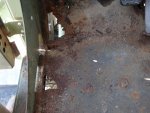
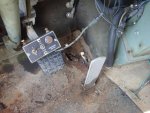
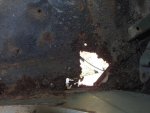
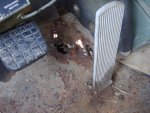
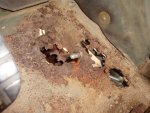
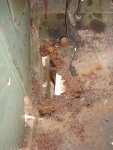
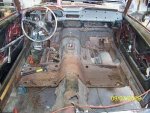
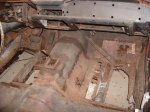
Next up was the throttle linkage. The link end by the firewall had rusted solid. I sprayed some Kroil on it and tried to get it to move, but the linkage bracket was flexing the whole floor. That's not good. I headed to the cab to remove the floor mat. I knew there was some rust in the floor, but I was shocked by how much I found. Me and the Miller MIG are going to be very busy unless I can find a clean A2 cab. I had to abandon the linkage project and my hopes of moving the truck since the floor around the throttle linkage looked like swiss cheese.
Well, I least wanted to work on the brakes some more so I borrowed the trusty 817 to jump my truck off. Once I got it started the air gauges began to move. It was building air! The bad news is it started blowing constantly out of the expeller valve on the air dryer. It turned out that I had hooked the expeller valve up to constant air rather than the signal from the governor. Ah-ha! I pulled those lines and I was back in business.
The air began to rise some more. Secondary systems like the wipers and washer bottle kicked in. It was time for the moment of truth as I stepped in the brake pedal. The brakes charged and when I released the pedal they vented. The good news is they stopped venting after I let off so my relay valve fixes worked!! Uh-oh, the air gauges are falling as I hit the brakes and not coming back up! WTH?? I walked around the truck looking and listening for a leaking hose, fitting, etc... It turned out to be the vent line from the treadle valve!!! Dang!!!
I shut the truck down to examine the treadle valve. I unscrewed the plugs out of the unused ports on the valve body and was shocked by the amount of crusty crap that was coming out of them. I started the truck again to blow the crud out of the holes. That worked, but didn't stop the leak. I filled the holes with Kroil, put the plugs back in, let it soak for 5 minutes, and then worked the pedal like crazy. I fired the truck back up and it was still leaking!!! Argghhhh, looks like I am in the market for a treadle valve. I thought about removing and rebuilding, but with something as important as a brake pedal valve I figured I would go new.
I did put the tranny in gear a few times with the spring brakes released and nothing happened. Hmmm. I looked under the truck and could see the tranny-to-t-case prop shaft spinning happily. Looks like the t-case is in neutral, but with no linkage or button to actuate the shift rail lock, I was stuck.
I took the last few minutes to retrieve what's left of the winch motor mount so I can send the bits to an SS member who is going to machine me a new one. I'll get the motor cleaned up in preparation for the new mount.
In the meantime I will shop for a treadle valve and come up with a plan to fix the t-case shifter and throttle linkage.
More pics of course!!
I started out by installing my rear relay valve. It went back in a lot easier than it came out with some new plated hardware. I then disconnected the vent lines from the front-rear relay valve and dropped the guts out of it. It was a little crusty inside so I gave it the emory paper and white grease treatment.
I got it back together and then moved on to the secondary air tank. It had been hit with something from behind and shoved into the inner fender. I loosened the holding clamps and beat it back into position with a block of wood and a BFH.
After that I went to work on the t-case linkage. The pivot was still stuck really tight even after drilling it and soaking it with oil. Closer inspection of the left side of the pivot revealed some gouges in the bracket and pivot where someone had used a chisel, prybar, pickle-fork, or something else to get the left linkage arm off of the pivot. Metal from the bracket was pushed down into the pivot binding it tightly. I will probable have to beat the pivot out with a hammer and then clean the bracket up with a file in order to get it moving freely.
Next up was the throttle linkage. The link end by the firewall had rusted solid. I sprayed some Kroil on it and tried to get it to move, but the linkage bracket was flexing the whole floor. That's not good. I headed to the cab to remove the floor mat. I knew there was some rust in the floor, but I was shocked by how much I found. Me and the Miller MIG are going to be very busy unless I can find a clean A2 cab. I had to abandon the linkage project and my hopes of moving the truck since the floor around the throttle linkage looked like swiss cheese.
Well, I least wanted to work on the brakes some more so I borrowed the trusty 817 to jump my truck off. Once I got it started the air gauges began to move. It was building air! The bad news is it started blowing constantly out of the expeller valve on the air dryer. It turned out that I had hooked the expeller valve up to constant air rather than the signal from the governor. Ah-ha! I pulled those lines and I was back in business.
The air began to rise some more. Secondary systems like the wipers and washer bottle kicked in. It was time for the moment of truth as I stepped in the brake pedal. The brakes charged and when I released the pedal they vented. The good news is they stopped venting after I let off so my relay valve fixes worked!! Uh-oh, the air gauges are falling as I hit the brakes and not coming back up! WTH?? I walked around the truck looking and listening for a leaking hose, fitting, etc... It turned out to be the vent line from the treadle valve!!! Dang!!!
I shut the truck down to examine the treadle valve. I unscrewed the plugs out of the unused ports on the valve body and was shocked by the amount of crusty crap that was coming out of them. I started the truck again to blow the crud out of the holes. That worked, but didn't stop the leak. I filled the holes with Kroil, put the plugs back in, let it soak for 5 minutes, and then worked the pedal like crazy. I fired the truck back up and it was still leaking!!! Argghhhh, looks like I am in the market for a treadle valve. I thought about removing and rebuilding, but with something as important as a brake pedal valve I figured I would go new.
I did put the tranny in gear a few times with the spring brakes released and nothing happened. Hmmm. I looked under the truck and could see the tranny-to-t-case prop shaft spinning happily. Looks like the t-case is in neutral, but with no linkage or button to actuate the shift rail lock, I was stuck.
I took the last few minutes to retrieve what's left of the winch motor mount so I can send the bits to an SS member who is going to machine me a new one. I'll get the motor cleaned up in preparation for the new mount.
In the meantime I will shop for a treadle valve and come up with a plan to fix the t-case shifter and throttle linkage.
More pics of course!!
Attachments
-
 85.9 KB Views: 91
 -
 63.1 KB Views: 103
 -
 81.4 KB Views: 100
 -
 88.3 KB Views: 99
 -
 88.5 KB Views: 98
 -
 72.4 KB Views: 94
 -
 95.1 KB Views: 90
 -
 100.4 KB Views: 93
 -
 91.1 KB Views: 94
- 10,350
- 94
- 48
- Location
- Meadows of Dan, Virginia
Oh boy, looks like your project is growing each time you work on it...
The cab on the m925 in Mt airy is in much better condition IIRC, problem would be transportation...
Those images really make me appreciate the aluminum cab on the 757.
The cab on the m925 in Mt airy is in much better condition IIRC, problem would be transportation...
Those images really make me appreciate the aluminum cab on the 757.
Last edited:
- 5,278
- 4,128
- 113
- Location
- Charleston, WV
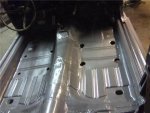
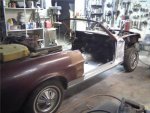
Yeah, I wish the cab was aluminum. That would save me a lot of work. I am proficient with my Miller and a break so it shouldn't be too hard to fab some patch panels. The only thing that must be fixed is the area around the throttle pedal so I can get it on the road and moved to my house where I can work on the body at my leisure. I will probably just screw it to the metal below with some self tapping screws to get it going and then come back later to weld it in right. I may strip the whole floor out of the cab and use it for a pattern to make all new floor pans. At least that way I would know it was solid all the way through.
jwaller
Active member
- 3,724
- 20
- 38
- Location
- Columbia, SC
I have a used treddle valve on egay. got it from gi joe. btw the ones he sells on ebay dont come threaded for the vent line.
- 5,278
- 4,128
- 113
- Location
- Charleston, WV
Thanks. I'll check it out. What kind of condition is it in on the inside? Any crusty corrosion?I have a used treddle valve on egay. got it from gi joe. btw the ones he sells on ebay dont come threaded for the vent line.
jwaller
Active member
- 3,724
- 20
- 38
- Location
- Columbia, SC
it's in very good shape with no crude I can see.Thanks. I'll check it out. What kind of condition is it in on the inside? Any crusty corrosion?
BTW there are more pics on egay
Attachments
-
![DSCF7398[1].jpg](/data/attachments/97/97804-f193b31d52213e2d08d36c1a99d04e98.jpg) 33.5 KB Views: 62
33.5 KB Views: 62 -
![DSCF7396[1].jpg](/data/attachments/97/97805-f2089f813d4918c1078abfc51fdbdb05.jpg) 42.7 KB Views: 59
42.7 KB Views: 59 -
![DSCF7397[1].jpg](/data/attachments/97/97806-fc423ad35b986f906f98d3131234afa0.jpg) 35.2 KB Views: 53
35.2 KB Views: 53
Last edited:
- 10,350
- 94
- 48
- Location
- Meadows of Dan, Virginia
You may want to add some variations to the spelling (treadle) in the description to make it easier to find....it's in very good shape with no crude I can see.
Just curious, does it have a patent number on it?
jwaller
Active member
- 3,724
- 20
- 38
- Location
- Columbia, SC
I was wondering how it should be spelled and my dictionary didn't find the right way.You may want to add some variations to the spelling (treadle) in the description to make it easier to find....
Just curious, does it have a patent number on it?
it prob does. lemme look at it when I get home.
- 4,812
- 1,255
- 113
- Location
- Gaithersburg, MD
Chris, you are doing a great job. I am sure the project often looks and feels intimidating. Keep your head up. You are restoring a truck like few of us in the hobby have!
Last edited:
- 5,278
- 4,128
- 113
- Location
- Charleston, WV
Thanks Bruce. I can't wait for you to see it in person. It's going to be a neat Seabee truck in the end.Chris, you are doing a great job. I am sure the project often looks and feels itimidating. Keep your head up. You are restoring a truck like few of us in the hobby have!
I'm not too worried about the body work. I did new rockers, the tailgate skin, and most of the floor pans in my old 1009 blazer and it turned out really clean. The good news is the area where the driver's seat bolts in is solid so I won't fall through. I should be able to drive it while I am working on it once I fix the area around the throttle pedal.
The battery box and the floor underneath is a little rotten, but I got one of those battery relocation kits that puts the batts in the toolbox and turns the space under the seat into the toolbox. I plan on cutting out the bottom and welding in a fresh piece of heavy steel. Then, I'll weld a hasp on the seat bottom so I can lock up my new storage space.
- 4,812
- 1,255
- 113
- Location
- Gaithersburg, MD
Chris, there is a guy on this list who can produce the Seabeas stencil in paint mask. If you don't know who I am referring to, I will find out. I may even have the paint mask stencils for the doors and the below the tailgate if you can't find them.
EZFEED
Member
- 880
- 0
- 16
- Location
- Lafayette, LA
HAHAHAHA! This made me chuckle a bit....been there bubba!The good news is the area where the driver's seat bolts in is solid so I won't fall through.
I wish I still had pics of my 1982 "flintstones mobile" GMC S-15 LOL!
EZFEED
Member
- 880
- 0
- 16
- Location
- Lafayette, LA
You know the cool thing is that at least your floor pans are flat, unlike a civy vehicle with all of the bumps and ridges in them. Should be easy if you can get the whole thing out. Can you???? If not then looks like you'll be stitching them in. I vote fix yours if its not too much trouble, you can put thicker stuff in. Just did this with my pony.
Thought you had rust problems....check this out!
Thought you had rust problems....check this out!
Attachments
-
 20.7 KB Views: 92
 -
 20 KB Views: 47
 -
 17.9 KB Views: 41
 -
 19.9 KB Views: 45
- 5,278
- 4,128
- 113
- Location
- Charleston, WV
Bahaha, yep, you were pretty well hosed there!
It shouldn't be too hard to cut out all of the bad floor and replace it with a couple of new panels. I'll have to take my time separating it from the support structure below and take careful measurements for all of the captured nuts. There is a good bit of wiring and air lines running across the bottom of the cab that will have to be taken down and protected before any cutting or welding.
When I look at all of the stuff that would have to be removed to swap the cab, it makes me really lean toward just replacing the floor boards and inner rockers. I can any other rocker rust from the inside while I am at it. At least there aren't any compound bends or radiused curves like my dang Blazer.
EZFEED
Member
- 880
- 0
- 16
- Location
- Lafayette, LA
That’s what I'm saying too, looks to me that its all pretty much just flat panels and simple bends that can be done with a brake.
Are there any parts I (or any of us) should be on the lookout for when we go junkyard hopping? There's only one place close to me that has military stuff in their salvage yard, although I don’t know if they have anything new like this. I haven’t been all over it and they possibly may. Any parts that would swap with the older stuff?
Are there any parts I (or any of us) should be on the lookout for when we go junkyard hopping? There's only one place close to me that has military stuff in their salvage yard, although I don’t know if they have anything new like this. I haven’t been all over it and they possibly may. Any parts that would swap with the older stuff?
- 5,278
- 4,128
- 113
- Location
- Charleston, WV
Thanks for keeping your eyes peeled for parts. I need the clamp, t-bar and nut that hold the spare tire in place. I also need the chain hoist for the spare tire davit boom. Those parts are all specific to the 939A1/939A2 trucks except for the nut.
That's all I can think of for now.
That's all I can think of for now.
EZFEED
Member
- 880
- 0
- 16
- Location
- Lafayette, LA
HEY! Lemme get back to you on this chain hoist you are talking about. Its not like a little hand operated crank thingy with a little short boom on it is it???? I have something like this that I picked up with a lot of junk.
Also...if you see something for sale at one of our locations like Polk or Beauregard here in LA then bid and lemme know so I can pick it up for you and find a way to ship. I have a camp on Toledo Bend lake and either one are on the way and I do run up there and back once or twice a month. I'm sure everyone here would do the same for each other too I would hope.
Lemme see if I have that hoist. I wanna say its a cable though???
- 10,350
- 94
- 48
- Location
- Meadows of Dan, Virginia
Chris, I notice some tags on the lines in this and other pictures, are the separate air systems labeled by numbers like the electrical wiring is? They did that on my 8x8 and was wondering if by chance the numbering was standardized. The TMs don't help here, at least not the ones I have.
Attachments
-
 99.6 KB Views: 49
- 114,251members
- 167,171threads
- 2,353,456posts
- 6,433online users