• Steel Soldiers now has a few new forums, read more about it at: New Munitions Forums!

  • Microsoft MSN, Live, Hotmail, Outlook email users may not be receiving emails. We are working to resolve this issue. Please add support@steelsoldiers.com to your trusted contacts.


My M35A2 Project aka Big Betty

TMNT

New member
789
6
0
Location
Canton, Ga
I mostly finished the left rear set of wheels and hubs. There were some distractions, but mostly I was just taking it easy and enjoying this great 65 degree sunny weather. ImageUploadedByTapatalk1394329434.726780.jpg
ImageUploadedByTapatalk1394329584.947170.jpg
ImageUploadedByTapatalk1394329595.738334.jpg

This is what they looked like before. I still have the right rear and both fronts to do. The winter mud, snow and salt really did a number on the wheels.
ImageUploadedByTapatalk1394329607.971128.jpg
 

TMNT

New member
789
6
0
Location
Canton, Ga
Nice job, what kind paint?
I scrubbed the tires and wheels with degreaser, a good brush, and then pressure washed with a 25* tip. After they dried a bit, I hit the old paint with a rotary wire brush and used a die grinder with 80 grit on a couple of spots that needed extra attention.

After blowing off the dust with compressed air and wiping them down with alcohol, I brushed some Rustoleum Rust Reformer to the spots that had light rust and bare metal, especially the spots that I couldn't get into with the wire brush. The reformer goes on a bluish-white but dries to a flat black.

The reformer needs 3-4 hours to dry before applying oil based paint, so I let them stand in the sun for a good three hours while a did some other stuff.

I used Rustoleum oil-based semi-gloss black, applied with an HVLP sprayer dialed down to a small pattern light fog. I applied 4 coats with about 20 minutes between each coat. The light coats dried quickly with the warm, dry air and sunshine.

It was the first time I've sprayed oil-based paint so it took me a bit to get the sprayer dialed in. It was spitting paint globs at first but a little bit of Flotrol and dialing the air up and the flow down I found a good setting that gave me the fog I wanted. The gun still slobbered a bit so I had to be careful to wipe the tip clean every couple of minutes.

I like the results. I did the inside and outside of each wheel so they're good now for whatever position I use them in.
 

TMNT

New member
789
6
0
Location
Canton, Ga
Sorry about the long-winded answer. You ask me what time it was and I told you how to make a clock!

Anyway, I found a couple of hours this afternoon to get a little more done. The left rear set is all mounted up again and the left front is off, washed, and touched up since it was painted back in August, so it wasn't bad after I got the mud off of it. I need to replace the grease boot, so that's where I'm stopping for now.

The outside part of the wheels will get one more dose of paint after I get them all done and back on to cover the scratches on the hubs and the lug nuts. I think it's impossible to mount these up without scratching the crap out of the hub.

ImageUploadedByTapatalk1394403652.071609.jpg
ImageUploadedByTapatalk1394403668.582169.jpg
 
Last edited:

TMNT

New member
789
6
0
Location
Canton, Ga
I found the detail interesting but was surprised you used Floetrol (for latex/acrylic) instead of Penetrol (for alkyd.)

Steve
So that was a mistake. I had Floetrol sitting on the shelf from my last paint project (Behr house paint) and like I said, I've never sprayed oil-based paint before. I didn't even think to re-read the label because my mind was telling me that it was for all types of paint. Your post prompted me to go back out there and look again. Lesson learned and thankfully, on a relatively small and easily corrected project. I'll wait and see if the small amount of Floetrol has any negative effects on the oil-based paint that I used. The wheels tend to get stripped and painted about once per year anyway. Thanks for pointing that out.
 

TMNT

New member
789
6
0
Location
Canton, Ga
I spent a solid 12 hours on the deuce today. The left front hub and wheel is clean and painted. I got the right rears off and cleaned, but painting will have to wait for another day. I did get both hubs cleaned, primed and painted. While I had the pressure washer out, I washed the whole truck and did a bit of rust abatement on 3 spots on the bed.

Hopefully one more week of evening labor and I'll have the paint work done.


Last edited:

TMNT

New member
789
6
0
Location
Canton, Ga
Finally finished all the wheels and hubs. Still have more "spring cleaning" to do, but the rest is a lot easier than than those wheels were.

ImageUploadedByTapatalk1395614076.030464.jpg
 

TMNT

New member
789
6
0
Location
Canton, Ga
I started a new job back in February. It had been 18 years since I started a new job and I've spent much of the last 2 months being the FNG and just trying to figure out where they hide the coffee and which website to go to for which web-based meeting, training, reporting, bidding, or to request that someone re-fill the toilet paper in the men's room.

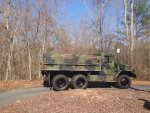
By the pictures on my wall, some of the guys developed an interst in seeing Big Betty, so I drove her in to work today. Needless to say, she's creating quite a distraction around here.

I did have one problem though:

As I made a left hand turn on to the freeway ramp this morning (in the dark), I heard a sizzle noise, saw a puff of smoke from the 3-way switch area, and I lost my instrument lights. I was in traffic and rolling onto the ramp, so I did a quick rolling assessment that I still had all external lights (headlights, tail lights, turn signals), scanned the instruments and cab with my pocket flashlight, and kept on going.


After I arrived and parked at work, I inspected the switch and wiring and found no visible sign of a problem. I tried the switch again and the instrument lights were working again! The 3-way switch is a new one that I bought from Erik's about a year ago and it has been working flawlessly until this little event. I'm worried about it now as that switch has power to it at all times. I don't want a fire for sure. I plan to take the 3-way out tonight and take a closer look at everything, but I think I'm going to need a new switch.
 

bonedoc

New member
502
1
0
Location
Bangor, PA
I spent a solid 12 hours on the deuce today. The left front hub and wheel is clean and painted. I got the right rears off and cleaned, but painting will have to wait for another day. I did get both hubs cleaned, primed and painted. While I had the pressure washer out, I washed the whole truck and did a bit of rust abatement on 3 spots on the bed.

Hopefully one more week of evening labor and I'll have the paint work done.


Looks great, one question? Are you missing a couple of nuts on top of the steering arm? I'm sure it was just the timing of the photo but it was the first thing that jumped out at me.
 

TMNT

New member
789
6
0
Location
Canton, Ga
Looks great, one question? Are you missing a couple of nuts on top of the steering arm? I'm sure it was just the timing of the photo but it was the first thing that jumped out at me.
At the time of that photo, yes. I had the boot guard off at that point. The boot guards were hanging on a wire so the paint could dry. All the nuts and bolts went back on/in when finished. Good eye.
 

TMNT

New member
789
6
0
Location
Canton, Ga
Over the long weekend, I fixed the wooden slats on my troop seats that have been peeling and flaking for a couple of years now.

ImageUploadedByTapatalk1398036484.169911.jpg

I removed the two boards, scraped and sanded them to get rid of any loose paint:

ImageUploadedByTapatalk1398036573.546953.jpg

Encapsulated them in fiberglass resin:

ImageUploadedByTapatalk1398036612.254175.jpg

Sanded them, primed and painted:

ImageUploadedByTapatalk1398036646.685906.jpg

ImageUploadedByTapatalk1398036662.568788.jpg

I also cleaned all the hardware, including thread chasing:

ImageUploadedByTapatalk1398036710.218873.jpg

And reinstalled.

ImageUploadedByTapatalk1398036740.039405.jpg

ImageUploadedByTapatalk1398036753.206400.jpg

That was a lot of work for just those two boards, but I bet I don't ever have that problem again!
 

Attachments

Last edited:

TMNT

New member
789
6
0
Location
Canton, Ga
The wood was healthy, it was only the paint that was bad. The wood had some weather cracks, but nothing too bad. I thought about just filling the cracks with wood filler, but I spied a can of resin sitting on my shelf and I said,"Why not?"

It rained all day Friday and Saturday, so I needed a garage project anyway. The only problem I had was the resin fumes getting in the house. Boy, the wife was not happy about that!
 

TMNT

New member
789
6
0
Location
Canton, Ga
I picked up a cargo cover kit from clintogf while at Zout's cookout. I found enough energy today to figure out how to install it, I think. Kind of tough to figure out the front and back thing, but I think I got it right.


ImageUploadedByTapatalk1398624470.863190.jpg
ImageUploadedByTapatalk1398624484.059917.jpgImageUploadedByTapatalk1398624497.513469.jpgImageUploadedByTapatalk1398624506.850660.jpg
 

TMNT

New member
789
6
0
Location
Canton, Ga
Road tested the new cover and it seems I've got it secured properly. It stayed on at least.

Other than a few extra "pop" noises when the air pressure pops the cover in our out, I don't notice any driving difference. Visibility is actually the same as I very rarely look out the back window. Now it's coming a good rain so we can rain test it.
 

1crook

Member
221
0
16
Location
Bethlehem, GA
Top
AdBlock Detected

We get it, advertisements are annoying!

Sure, ad-blocking software does a great job at blocking ads, but it also blocks useful features of our website like our supporting vendors. Their ads help keep Steel Soldiers going. Please consider disabling your ad blockers for the site. Thanks!

I've Disabled AdBlock
No Thanks