• Steel Soldiers now has a few new forums, read more about it at: New Munitions Forums!

  • Microsoft MSN, Live, Hotmail, Outlook email users may not be receiving emails. We are working to resolve this issue. Please add support@steelsoldiers.com to your trusted contacts.


Post your m37 pictures

m37CDN

New member
Wow, Lots of good work, and some really good looking rigs here. I got mine going just enought to throw it into a parade and some car shows. It is good to see all the other vehicle owners have "do not touch signs", and me telling the kids to climb all over it. Really, what type of damage are they going to a brush painted 1952 solid steel army truck?
 

rtk

Well-known member
Steel Soldiers Supporter
1,181
418
83
Location
Lockport N.Y.
LOL , That's the best part of owning a MV , no wax on wax off for these babies ! get a scratch , just get my rattle can of Rapco !! Drive the "car collectors" nuts . I like to park next to the nice Corvettes and Mustangs and watch them stress out !
 

1943ht

Active member
478
94
28
Location
Batavia, OH 45103
All about supporting events like Touch A truck etc for the kids .. but man-o-man .. some of those young people have a tendency to want to climb in and break off every knob and switch in the cab .. brought both the M37 and my M818 to the event this year and it was like herding cats to keep my goodies intact .. was more than a little distressed to see how many parents just let their kids do what they wanted in my vehicles .. got more that one "dirty look" from a parent as I asked little Johnny or Suzy to please refrain from trying to break off my light switches or use my seats as a trampoline in my classic ride... Oh well

Am trying to get car clubs here to add a military class to our local car-show events as there are others here who would like to show there stuff .. did 3 car shows this fall and the rig got lots of attention and excellent comments!
 

M-37Bruce

Active member
705
59
28
Location
Midlothian, VA
Interior Shot

Here's a shot of my fire wall insulation install. I stopped a while back, August w/ a work injury, now I've had Carpal Tunnel remediation, still sore as all heck, but looking forward to finishing this job up!
 

Attachments

Last edited:

3dAngus

Well-known member
4,719
101
63
Location
Perry, Ga.
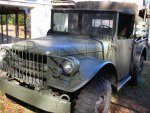
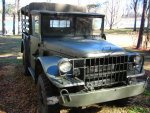
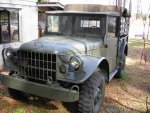
Update; I found out insurance is so much cheaper if an antique is restored and garaged, so I'm feverishly working on mine to make it look so, even if only temporary. I'm applying paint and wire brushing off any light rust, and hope to put on some stars and newer Superlug wheels and tires to make it look arguably "restored" to the point where if the insurance company comes in and takes their own pictures, I have plausible argument it is restored, even though not a body off the frame workmanship I see here so often. For now, I don't have the coin to strip it down and sandblast the frame the way I would like to. This painting is a rattle can job after wire brushing and cleaning. Nothing special, but it sure looks a lot better, for a start, then the palm frond painting in multiple colors I had on it before when it was purchased. The body is in very good condition. I hope to finish it tomorrow, then put it in the garage, where I can change out wheels and put on some star decals.

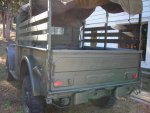
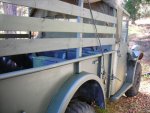
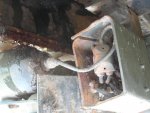
Interesting thing is, by far, the worst part of it all to wire brush down was the "inside" of the tailgate. It was amazing how many dings were on it. When wiring it down through about six layers of paint, I observed hundreds of dings, and wondered of how many transmissions, engines, tools, hammers, vices, trash, and whatever was just thrown on top of it with the tailgate down, and it being used by hundreds of different troops through it's 60 years, where they used it as a table top or slide, or whatever it was needed for.

That old tailgate has a lot of history to it. If only it could talk.

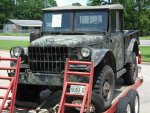
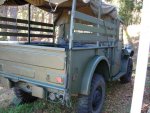
The trailer picture is a reminder of what it looked like with the palm frond painting when I recovered it from the coast of Georgia.
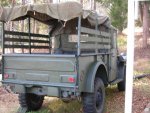
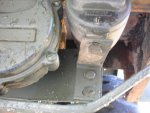
And I've done more painting since, on wheels and radiator and wheel wells, but have a full day tomorrow finishing it up.
I do plan on removing the hood completely and starting it all over. I want it to be Top Notch when done, so I'm going to strip it completely and do it all over again. Hopefully, next year I will be able to sand blast the entire thing down and start from scratch, but for now, it's one step at a time. All just a work in progress....
 

Attachments

Last edited:

rtk

Well-known member
Steel Soldiers Supporter
1,181
418
83
Location
Lockport N.Y.
When it came to the insurance pictures , my carrier told ME to take a few pictures of the vehicle and pole barn and send them in . I also put a value of $12,000 on my MV . I figured if something happens I can take my 12 grand and just bay something else green .bob k
 

Storm 51

Just a Grunt
Steel Soldiers Supporter
888
9
0
Location
Seattle, WA
Truck looks great, 3dAngus! That looks like quite a bit of work since you got it.

Hagerty Ins. had me take the pictures and only asked me if it was stored inside. They didn't even ask for pictures of the vehicle inside the garage. I don't know what insurance company you are using, but I don't think it will be as hard as you are worrying it will be.

Btw, could you take some close up pictures of your left rear tail light area for me, please? I'm trying to find or make that bracket that holds the little bullet shaped marker light back there and I'm not having any success finding pictures of it in any of the manuals. If you have a moment to get some good close ups of it I would really appreciate it.

Thanks for your help if you can.

Again, your truck is looking great!

Storm 51
 

3dAngus

Well-known member
4,719
101
63
Location
Perry, Ga.
Yep, nice pictures and better then mine. I took some this morning of the left rear for some reason, and the bullet light is on the right. :doh:
The trailer plug is on the left. Clearly, my mind was on more wire brushing and painting for the day. And yes, I did get more done. This afternoon I plan on driving it from the lake cottage to the house and changing out the wheels, while wire brushing the hubs and painting. I have some stars all layed out from the roller tube they were shipped in, and I might put them on tomorrow inside the garage. Can anyone give me some clues on how to properly do this without crinkles. I'm not the most gentle of guys with the decals and application and seem to have problems from time to time getting it on there right the first time. I take it the point of the star goes up when on the doors.

Those pictures with it (bullet light) on and off are better then anything I can make a picture of. Thanks.

So, I don't even know if that light works on mine. Can someone tell me what it is for and how to use it. I''ll check the manual if necessary, to see how to turn it on and test, but if anyone would care to give me the shortcut and tell me how, it does come appreciated.
 

Attachments

Last edited:

Storm 51

Just a Grunt
Steel Soldiers Supporter
888
9
0
Location
Seattle, WA
It is a blackout marker light. If you have the military 3 lever light switch, one of the positions is B.O. Marker (Black Out Marker Lights). It should light up along with the lower portions (the red area of the tail lights) of the other lights when the upper lever is in this position (first position to the left from vertical).

Of course, if it doesn't work, you'll have to do the usual troubleshooting: bulb, wiring, switch. Hope it works; they are cool little lights (pointless in the civilian world; but cool).

Hope this helps.

Storm 51
 

3dAngus

Well-known member
4,719
101
63
Location
Perry, Ga.
Thanks Storm. Further curious now...

In a real life military situation, can I assume black out marker lights are so you can be seen (barely) but not from a distance. Is it so no one in another vehicle, or part of a convoy runs over you at night, with lights off? It's just the way I would imagine it. Not the way it is. I have no experience in my war days using B.O Marker lights on a deuce, but I was not infantry where I might use it either. This might be a good question for PB but if anyone has any personal experience, please fill us all in.
 

Storm 51

Just a Grunt
Steel Soldiers Supporter
888
9
0
Location
Seattle, WA
Thanks for the link, Carter! I should be able to build a bracket from one of those photos (unless you know of where one might be for sale?). My trailer has one on the right rear, but that bracket will not work on the M-37. On the M-37 I have to mount the light outboard of the right tail light assembly to clear the USMC lifting brackets on the rear of the truck.

Thanks again for all your help!

Storm 51
 

Storm 51

Just a Grunt
Steel Soldiers Supporter
888
9
0
Location
Seattle, WA
Thanks Storm. Further curious now...

In a real life military situation, can I assume black out marker lights are so you can be seen (barely) but not from a distance. Is it so no one in another vehicle, or part of a convoy runs over you at night, with lights off? It's just the way I would imagine it. Not the way it is. I have no experience in my war days using B.O Marker lights on a deuce, but I was not infantry where I might use it either. This might be a good question for PB but if anyone has any personal experience, please fill us all in.
Thanks for trying to take the pictures, 3dAngus! I really appreciate it. Sorry it got confusing and wasted your time.

The black out lights are from the old, old days when you didn't want to be seen from the air on night movements. The little triangles in the red part of the light were "distance markers". If you could see 2 separate triangles it meant you were within 50 feet (I believe), if you only saw one triangle it meant you were over 50 feet away but less than 100 feet (I believe) because theoretically you could not see the blackout lights at over 100 feet. This system was supposed to help with convoy spacing or just general night driving in "black out conditions".

NB: I'm really not sure those distances are correct. It's in the old convoy manuals, if someone is interested.

Now they have so many other types of sensors for detecting movement or concentration, they are just "quaint" artifacts of a much earlier era.

Storm 51
 

Storm 51

Just a Grunt
Steel Soldiers Supporter
888
9
0
Location
Seattle, WA
Storm, are your marine lifting brackets different then mine? If the same, I'll go back and take more pictures.
My USMC lifting brackets are exactly the same as yours, down to the detail of only having 1 lifting shackle. :lol:

Why is one shackle always missing on these bracket sets? aua

Oh well, another part to add to the search list!

Storm 51
 

Storm 51

Just a Grunt
Steel Soldiers Supporter
888
9
0
Location
Seattle, WA
Thank you so much, 3dAngus! That helps immensely! Those are exactly what I was looking for. It is a rather simple attachment, but is nice to see how it was actually done and be able to know that it will accommodate the USMC lifting bracket .

The wiring modification shown in the first photo is a great bonus, and is what I expected and was planning on doing if I needed to.

Thanks again for the help!

Storm 51
 
Top
AdBlock Detected

We get it, advertisements are annoying!

Sure, ad-blocking software does a great job at blocking ads, but it also blocks useful features of our website like our supporting vendors. Their ads help keep Steel Soldiers going. Please consider disabling your ad blockers for the site. Thanks!

I've Disabled AdBlock
No Thanks