• Steel Soldiers now has a few new forums, read more about it at: New Munitions Forums!

  • Microsoft MSN, Live, Hotmail, Outlook email users may not be receiving emails. We are working to resolve this issue. Please add support@steelsoldiers.com to your trusted contacts.

Project Off-Grid M109A3 w/w log

wsucougarx

Well-known member
6,951
65
48
Location
Washington State
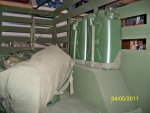
OK here's the latest I've done. I finally replaced the dry rotted oak flooring with replacement oak. I finally got around to bolting in the 900 series battery relocation box. I plan on running 4 batteries in a 24v configuration (M818 style). The rear slave will allow for charging the battery bank using a generator (in the M105A2) and will allow for emergency slaving. I still need to mount the solargizer for the battery bank. I also plan on adding a battery isolation switch to the cab of the truck. This will allow for the charging of the battery bank while on the move. I'm leaning towards the Optima Marine batteries for this application for a couple different reason. Lack of leaking battery and less chance for gases.
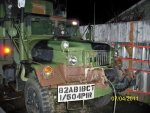
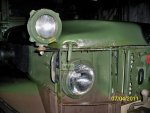
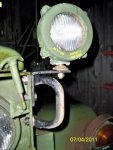
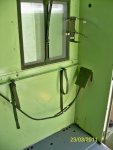
I also got around to wiring the 4th intercom station to the van, added the aux Aurora driving lights to the front end. Of course I still need to get out and take a pic.

Projects Completed:
Sealed and placed drain holes in port side/bow of van
Wired in 4th intercom station to van from AM-1780
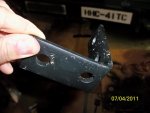
Mounted 900 series battery box in van
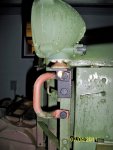
Utilized the secondary MF heater exhaust port for van wiring
 

Attachments

Last edited:

wsucougarx

Well-known member
6,951
65
48
Location
Washington State
I got off my lazy adipose and snapped some pics of the Auroras. I had the hardest time trying to figure out where to mount these lights. Didn't want to under the bumper (ripped off by the first incline), didn't want to do bumper tops (trip hazard), front of bumper (smashed with first contact with anything). I was at Home Depot and found these 90 degree brackets in the electrical dept. They were about $2 each. They are made of heavy duty metal with that yellow coating to protect from rusting (zinc plated?). I figured since I already had holes drilled in the brushguard for the "fatman" handles I might as well use them. I also upgraded the "fatman" handles to the later series chassis handles.
Not sure if I like how they look. Almost reminds me of a DOT plow truck light location or something. Oh well, I had better like where they are because they're staying;-) I will work on wiring her later on along with a ton of other wiring projects.

Project Completed:
Mounted bracket for auxillary driving lights
Mounted newer chassis grab handles
Mounted Aurora driving lights
Added second set of AS-1729 hold down ropes
Changed out front axle gear oil (water infiltration)
 

Attachments

Last edited:

wsucougarx

Well-known member
6,951
65
48
Location
Washington State
Here's some more pics on the handles;-) Time to chalk up another project Scott...haha
Ooops, just noticed the primer red in the pics:-? I suppose I need to paint them. I went with the later chassis handles because they have that nice angle to them and actually brings them about 3 inches closer to you. It helps this old guy from having to lean too far to grab the handles:-D
 

Attachments

mrsuperstition

New member
45
0
0
Location
Gold Canyon Arizona
I like the handle type and location of where you put them [thumbzup]

Those lights are on my m109 To Do list as well.
Decided on mounting them up by the windshield / cab for protection from obstacles when offroading.
Thank you again for the updates! With all your progress, you are making me feel guilty for not being outside right now working on the 109.
Chris
 

wsucougarx

Well-known member
6,951
65
48
Location
Washington State
Good job! But I have to ask...why not fender mount or cab mount?
I thought about mounting them towards the front portion of the fender and opted not to. I figured I'd trip over them for sure. I also looked at the cab and opted not to drill any more holes than I needed to. I also thought having the illumination so close to the driver might interfere with vision. I also wanted to maximize the amount of light broadcasted by these Auroras. I figured the hood and all that would diminish the light spread.

Nice looking lights - how do you like the illumination from them out there.
I haven't gotten around to wiring them up just yet. I've got a huge wiring project planned when the weather gets better. I bought two 500 ft spools of military 12g Presolite wire off ebay for only $30/spool.
 

ALFA2

Member
205
2
18
Location
Phoenix, Arizona
That is is good idea on the light mounting and location, same with the handles. For anyone looking for a similar brackets they appear to be heavy duty Uni-strut angle brackets, for connecting together of uni-strut channel. Home Depot and Lowes both carry such items as do most electrical supply houses, and Graingers.
Hope it helps.
ALFA2
 

wsucougarx

Well-known member
6,951
65
48
Location
Washington State
Thanks guys! I finally sourced some BNC connectors for the RG-213's that a great SS named AN/ARC186 provided. Thanks again Dan!! The spaghetti USGI coax cables were a bit too flimpsy and thin for my liking. I figured with some of the runs I have, I'd loose some signal had I stayed with the thin stuff. Now I just need a rainy day so I can get them completed...that shouldn't too hard for the PNW;-). I'll provide updates when I finally get something major completed. Right now it's just small busy work.
Oh, I'm also trying to source one or two sections of the work benches normally found in the M185A3's. It the units with the compartmentalized drawers etc. I figure the bench will be perfect for my radio's and other electronics.
 
Last edited:

wsucougarx

Well-known member
6,951
65
48
Location
Washington State
I did a couple little things here and there to my M105A2 cargo trailer. I've wanted to add a few jerry can holders to my trailer but needed a rainy day to do so....well I got it and then some. I added 3 can holders to the front of the trailer and six more to the inside of the trailer. I used two HEMTT metal staves as my mounting bracket on the front end. I know I went a bit overboard but hey I've got can holders all over the place. It was time to put them to use. On the inside of the trailer I have two Diesel jerry can and 4 water jerry cans (wheel wells). This M105A2 bed is unlike anything I have seen. It has several reinforcment columns added to the inside of the trailer. I figured the space in between them needed a jerry can:lol:.
I also added a MX-6707 antenna base. I plan on having the capability of adding in an RT-524a/VRC radio. Still need to figure where to put the MT-1029. I am going to put a genny in the back of the trailer as well. Would like to do somekind of sliding platform for it so it can reside outside of the trailer during operation. This trailer will kind of be a remote radio station to talk to the M109 if need be.
The next rainy day I'll get my spare tire winch added to the underside of the bed. Also need to get the M813 front loading tool box mounted and the two M818 rear toolboxes on...need more time....

PROJECT COMPLETED:
-Mounted 9 Jerry Can Holders to M105A2 (5 fuel and 4 water)
-Mounted two MX-6707 antenna bases
 

Attachments

Last edited:

wsucougarx

Well-known member
6,951
65
48
Location
Washington State
Oh and I must show a pic of my biggest MV fan...my daughter. She graduated out of a toddler chair because she is now over 40 lbs. She informed me she could now ride in my army truck. Of course I had to celebrate the occassion by taking her out for a spin;-) Her cheeks are still hurting from grinning ear to ear the entire time...I love it:p[thumbzup]
Yes that's me grinning like a Chesire Cat. My wife wanted a cheesy smile and by golly she got it.
 

Attachments

Last edited:

USAFSS-ColdWarrior

Chaplain
Super Moderator
Steel Soldiers Supporter
18,483
5,548
113
Location
San Angelo, Tom Green County, Texas USA
I did a couple little things here and there to my M105A2 cargo trailer. I've wanted to add a few jerry can holders to my trailer but needed a rainy day to do so....well I got it and then some. I added 3 can holders to the front of the trailer and six more to the inside of the trailer. I used two HEMTT metal staves as my mounting bracket. I know I went a bit overboard but hey I've got can holders all over the place. It was time to put them to use. On the inside of the trailer I have two Diesel jerry can and 4 water jerry cans (wheel wells). This M105A2 bed is unlike anything I have seen. It has several reinforcment columns added to the inside of the trailer. I figured the space in between them needed a jerry can:lol:.
I also added a MX-6707 antenna base. I plan on having the capability of adding in an RT-524a/VRC radio. Still need to figure where to put the MT-1029. I am going to put a genny in the back of the trailer as well. Would like to do somekind of sliding platform for it so it can reside outside of the trailer during operation. This trailer will kind of be a remote radio station to talk to the M109 if need be.
The next rainy day I'll get my spare tire winch added to the underside of the bed. Also need to get the M813 front loading tool box mounted and the two M818 rear toolboxes on...need more time....
Very nice [thumbzup]
Over-building is seldom a bad thing, just look at a Deuce :grd:
 

USAFSS-ColdWarrior

Chaplain
Super Moderator
Steel Soldiers Supporter
18,483
5,548
113
Location
San Angelo, Tom Green County, Texas USA
Oh and I must show a pic of my biggest MV fan...my daughter. She graduated out of a toddler chair because she is now over 40 lbs. She informed me she could now ride in my army truck. Of course I had to celebrate the occassion by taking her out for a spin;-) Her cheeks are still hurting from grinning ear to ear the entire time...I love it:p[thumbzup]

Looks like Dad is doing some SERIOUS grinning, too [thumbzup]:grin::!:
 
Top