• Steel Soldiers now has a few new forums, read more about it at: New Munitions Forums!

  • Microsoft MSN, Live, Hotmail, Outlook email users may not be receiving emails. We are working to resolve this issue. Please add support@steelsoldiers.com to your trusted contacts.


Pulling blower wheel--MEP002A

1800 Diesel

Member
768
25
18
Location
Santa Rosa County, FL
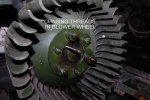
TM only mentions removal of the center bolt (with 5/8" hex) prior to pulling the wheel. Tried to search SS for relevant posts, but couldn't locate the info I'm looking for. In order words I want to be sure that the center bolt is the ONLY one I need to remove before setting up the puller. I believe the other 6 bolts are for something else like the damper & it will come off attached to the wheel--is this correct? Figure 37 in TM 24P seems to indicate this but wanted to be sure before I damage something.

Also, for those of you who have already done this job, I wanted to ask about the amount of force needed to pull the wheel. Is it an interference fit, a slip fit or what? I've applied PBB to the crankshaft and started to pull pretty hard but no movement. Also, on the unit I'm working on I noticed 2 of the other bolts are finger tight. Will I be able to get to the "back side" of these once I remove the wheel?


Thanks.
 
Last edited:

gimpyrobb

dumpsterlandingfromorbit!
27,785
747
113
Location
Cincy Ohio
Its been a while since I did mine. Its a tapered fit, and it took a bit of force to get it to "pop". Best I can do for ya right now.
 

1800 Diesel

Member
768
25
18
Location
Santa Rosa County, FL
Thanks Gimpyrobb--I'm taking it slow but I believe it's moving. Looks to be abt 1/4" between the end face of the crankshaft & the aft face of the wheel. I believe that dim was more like 1/8" or less before I started. Taking a few photos of the process & will post when I figure out how and also get some time...
 

1800 Diesel

Member
768
25
18
Location
Santa Rosa County, FL
Its been a while since I did mine. Its a tapered fit, and it took a bit of force to get it to "pop". Best I can do for ya right now.
Decided to stand down until my son picks up a couple GR 8 bolts. I only had GR 5 bolts & I'm convinced if I pull any more these are going to fail, possibly leaving me with a big mess to clean up with a broken bolt stuck in the crankshaft (meant blower wheel hub, not crankshaft).... Any movement--perceived or real--has ceased at this time.... :-(

Still would like someone to confirm I need to ignore the other bolts (that I believe connect to the dampener) and only needed to remove the center hex bolt with 5/8" hex head to pull the blower wheel.


Thanks...
 
Last edited:

storeman

Well-known member
1,345
52
48
Location
Mathews County, VA
Most fans won't give you a "pop". It is a keyed, tapered shaft. Put it under tension and hit the fan with a 2-3 lbs hand sledge around its circumference at the base, not the fins. Progress you saw was likely the puller turning the center bolt. Apply more pressure and repeat the hammer. Earlier puller I had used weak bolts and tended to bend off-center.
BTW: the threads are fragile. I have had to re-bore and tap several fans to break them loose, finally using 3/8" bolts to pull. A couple came loose as one might expect. On one it took an even larger tap. Liberal light use of the hammer. You can tighten the bolts from the other side but may have to remove the permanent magnet to do so, can't remember.

Jerry :grd:
 

jbk

Member
404
5
16
Location
livingston la.
I did mine similar to jerry applied tension on the puller and i tapped the end of the crank with a mall ,then tightened the puller more and repeated the process until it poped off.
 

1800 Diesel

Member
768
25
18
Location
Santa Rosa County, FL
Jerry,

I stopped for the night. Don't usually work on Sunday nights, but trying to get this one's DC side working. Using a high quality (USA) HB puller, GR 8 bolts 3"-5/16"-18TPI (chased the threads & oiled well), puller pushing against face of crankshaft, rotation of blower wheel locked in place and 1/2" breaker bar turning the puller....still no movement. I even used a heat gun to increase wheel temp to 110 degrees and loads of PBB....

I also applied a few good whacks to the end of the puller with my lead hammer--a method I usually use when pulling flywheels on small engines...no change..still stuck..

I thought about whether I should reinstall the center bolt 1/2" or so from home and push on that....would that make any difference?

I haven't tried hammering on the wheel itself....

Can you confirm that the stator & dampener comes off with the wheel? No one seems to want to answer that question though per the TM illustration it's bolted through the wheel and there's no way to remove the bolts until the wheel is removed from the crankshaft.

Thanks for the assist--I'll regroup on Monday.

Hope everyone has a good week.
 

storeman

Well-known member
1,345
52
48
Location
Mathews County, VA
Jim is right. Stator stays on block. Large rare earth magnet that interacts with stator comes off as part of the Fan.

"reinstall the center bolt 1/2" or so from home and push on that....would that make any difference?" Yes, I use the bolt as the pressure point for removal. Believe that is the way the tm recommends. strike the fan itself around its base. I don't think you will get anywhere striking the puller.
Jerry
 

1800 Diesel

Member
768
25
18
Location
Santa Rosa County, FL
Thanks jbk--I mispoke on my terminology. I could see the stator wasn't turning and the magnets were connected to the back of the wheel by screws. Didn't mean to say stator..late night fatigue I guess. I'll get back on the job this evening. Tried to post some photos of the work last night but only thumbnails showed up in the preview. I need to read the post about setting up photos.
 

1800 Diesel

Member
768
25
18
Location
Santa Rosa County, FL
MEP002A Blower Wheel pulling attempt

Test post here to confirm correct photo upload method...

1st pic: Chasing threads in blower wheel.
2nd pic: Puller setup (center bolt removed)...
3rd pic: Wire broken off soldered terminal on DC fuse holder.
4th pic: Overall view of Units 1 2 & 3 in various stages of completion.
 

Attachments

1800 Diesel

Member
768
25
18
Location
Santa Rosa County, FL
Attempted photo upload here...was successful on the test forum , so here goes.

1st pic: Chasing threads in blower wheel. (5/16, 18 TPI)
2nd pic: Puller setup (center bolt removed)...
3rd pic: Wire broken off soldered terminal on DC fuse holder. Terminals on fuse holder covered with solder--will need to melt most of it off to be able to see the connection points.
4th pic: Overall view of Units 1 2 & 3 in various stages of completion. Building a shop on the property but it's not done yet. This is our temporary work area...

Thanks to all who have offered advice on this effort. Will get back on task this afternoon.
 

Attachments

1800 Diesel

Member
768
25
18
Location
Santa Rosa County, FL
OK I officially surrender...puller maxed out with impact wrench (can't turn any tighter with a 1/2" breaker bar), puller squealing even with lube on the threads and face of crankshaft, spray lubed key-way area, heated wheel to 140 degrees and hit the back of the wheel with a 2# machinist hammer at 4 locations (12, 3, 6 & 9)...no move....aua

I really wanted to get this one apart to clean up the stator and anything else that needed clean-up, but I've already got too much time in it. If the broken fuse wire doesn't correct the DC charging problem, this one will be a candidate for a 24v onboard charger....
 

Speddmon

Blind squirrel rehabiltator
Super Moderator
Steel Soldiers Supporter
4,640
28
38
Location
Cambridge, Ohio
This is probably going to sound like a really stupid question, but I have got to ask...You did take the large washer off with the center bolt correct? If it's still on there and you are pulling against it, you are going to get absolutely nowhere.

Also, if I'm reading your last post correctly, and you are only pulling the wheel for cleaning and inspection...why? Start the set up and check for the AC voltage from the 2 stator leads. If you have about 33 volts AC on those leads, nothing needs to be taken apart at all, the stator is good.
 

1800 Diesel

Member
768
25
18
Location
Santa Rosa County, FL
Speddmon, Happy to answer & I appreciate you weighing in....the washer was still on but I backed the bolt out about 3 threads or so. Approx 1/4" free movement or "end play" for the wheel to move toward puller. Even while the puller was "pegged" I could grab the thick washer and move it in & out a little. My hope was that the wheel would spring loose against the washer & at that point I would remove the bolt....

My first attempt was without the bolt in place and the puller pushing against the face of the crankshaft....I am assuming the face where the center bolt is positioned is the very end of the crankshaft, right?? If it is part of the wheel or something else then the center bolt needs to be in place though the TM instructs to remove the bolt prior to setting up the "suitable puller"....But if the center bolt definitely needs to be in place (backed out as needed to allow for initial movement) then I would say the TM is in error and I probably need to retry one more time...

BTW, the stator on this unit was pretty gummed up with oil residue & grime, hence the idea to remove the wheel & perform a cleaning. Since this unit had a solar charger installed I also assumed that the depot or field maintenance folks had already verified the DC charging system needed major work, but hopefully I'll be wrong....

Thanks again for the assist!
 

gimpyrobb

dumpsterlandingfromorbit!
27,785
747
113
Location
Cincy Ohio
I doubt that was a solar charger. Probably a solargiser. It runs pulses of voltage to the batterys to keep them desulfated. That will help them keep their voltage and cca capacity, but not charge them.
 

1800 Diesel

Member
768
25
18
Location
Santa Rosa County, FL
Yep--that's exactly right, it was a solargizer...it reads abt 4v DC under a flourescent trouble light, but that's only when I read it without the black box connected (or directly off the solar panel wiring). This one had a splice inside the blower housing that I had to disconnect in order to remove it from the generator...in other words when I connect it back together I get no voltage off the leads...maybe a battery has to be connected for this thing to function properly...?
 

Isaac-1

Well-known member
1,970
48
48
Location
SW, Louisiana
The older solargizer did nothing to charge batteries, the newer models combine the desulficating pulses with a small trickle charger to keep batteries topped off. I found a study online a while back showing where the army tested them on MEP-002a's or maybe MEP-003a's that showed that the newer models with the charge function provided just enough charge to maintain the pair of batteries on the test units. As I recall they tested 4 generators over the course of a year in the SE United States (maybe Georgia) and found the solargizer was able to keep 3 of the 4 fully topped off, and 1 almost topped off with some seasonal variation.

Ike
 
Top
AdBlock Detected

We get it, advertisements are annoying!

Sure, ad-blocking software does a great job at blocking ads, but it also blocks useful features of our website like our supporting vendors. Their ads help keep Steel Soldiers going. Please consider disabling your ad blockers for the site. Thanks!

I've Disabled AdBlock
No Thanks