My trip, the same weekend was 104....saw 100 in the trailer, rode 300 miles in 3 1/2 days. Time for some maintenance!
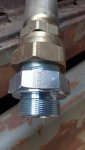
Moved onto hydraulics today. Had someone come out, measure and give us a price to do all of the lines from the tank out.
Keep in mind, never been around one of these, but have had to do hyd. hoses on projects I have done in the past, in a former life....that's why I called someone
")
. We got around to the hoses under the pig. Seems that the system is fed through #16 lines from the tank to all of the working elements, crowd, lift and rotate. Well, the #16 lines that run to the center of the rotation area, run apx 2 feet up into the center into a swivel cylinder, I get that, HOWEVER, in browsing through the TMs here....we don't have the correct one for the wrecker body in the library....it seems that the boom needs to come off to replace these lines. Please say that ain't so!
Why in the he double toothpicks would someone design something like that for a vehicle that is designed to things under stress?
Anyone ever replaced the bottom lines on an M62? The body on this truck has the hyd tank in the front of the bed, so it is an early one.
We have a second wrecker bed, the one that has the tank mounted to the side of the boom. Can that bed be swapped to the M62 chassis?
It seems that if the above can happen, it might be easier than pulling the boom.
Are the control rods the same between the bed on the M62 v.s the bed off of an 816, which is what I believe is what the other bed is.
This is more work than I care to do I think......
Depressed, but love you all!
Will