• Steel Soldiers now has a few new forums, read more about it at: New Munitions Forums!

  • Microsoft MSN, Live, Hotmail, Outlook email users may not be receiving emails. We are working to resolve this issue. Please add support@steelsoldiers.com to your trusted contacts.


Was told to get "back-up" lights, so,,,,,,

stumps

Active member
1,700
11
38
Location
Maryland
I know alot of you are concerned about the vehicle has to be in reverse in order to trigger the lights, well what about a micro switch mounted under the boot on a pedestal that is triggered when the shifter is in the reverse position... I literally just thought of it, and kinda jotting it down will help me remember... I'm going to try tinkering with it sooner or later, I'll let you guys know how it goes....
Too much work to get right. Just use the 1st-neutral-reverse rod that comes out of the back of the deuce's transmission. Mount a plunger switch behind the rod so that it gets pushed when the rod is fully extended (reverse).

-Chuck
 

clinto

Moderator, wonderful human being & practicing Deuc
Staff member
Administrator
Super Moderator
Steel Soldiers Supporter
Supporting Vendor
12,596
1,120
113
Location
Athens, Ga.
Ok, so I told peashooter I'd post some updates once I was done with mine.

Long post so take your ritalin.

I wanted to use the armor headlights (http://www.steelsoldiers.com/showthread.php?23925-Headlights-or-spotlights) for the reverse lights, as they are strong, military, have a lot of light output, etc. Once I saw gringeltaube's switch, I had an idea. Use the transmission switch for the high beam, since you figure you want the maximum light output for safety (letting others know the truck is reversing) and for seeing in the dark. Then, control the low beams with a separate switch, so you can leave the truck running in neutral when you are hooking up trailer, loading up the truck or doing recovery operations at night.


Using the peashooter-gringeltaube switch has a benefit of not accidental leaving the reverse lights on when driving.

After much thought, I decided to pull power from the #75 brake light switch circuit. This has multiple benefits: The truck retains it's mil-spec capability of being operate without any lights and the #75 wiring is near the transmission, so the wiring won't be difficult to run. Note: My '87 A2C with dual circuit brakes had #175 tags on the wires, I think that's an error. Yours should be #75.

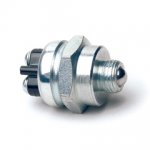
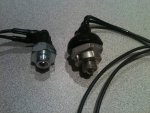
So, all that decided, I ordered the switch from peashooter and requested it with packard connectors. I bought plenty of high quality wire and 100' of Grote's asphalt covered cloth wiring loom (like what the front composite harnesses are wrapped in under the fenders).

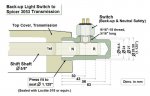
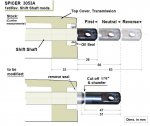
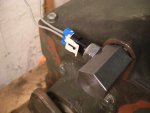
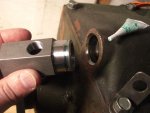
Installing the switch:

IMAG0664.jpgIMAG0663.jpgIMAG0662.jpgIMAG0659.jpgIMAG0657.jpgIMAG0655.jpgIMAG0654.jpgIMAG0653.jpg
Remember, both wires going to the brake light switch are #75, so you'll need to use a multimeter or test light to identify the input/output (you want the one that's always hot when the light switch is in service drive or brake light operation.

IMAG0683.jpgIMAG0682.jpg

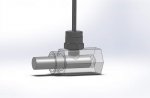
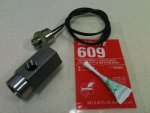
Obviously now is the time to upgrade to the air operated switch.

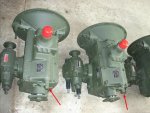
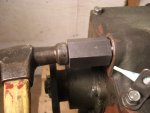
Once you've got your power source, run it up to the switch. Make sure to protect it from chafing hazards and make sure it isn't in the way of future service operations.

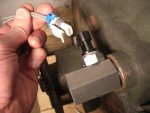
Now that you've got the switch installed and powered it, you need to run the switched wire back to the reverse lights. Same thing as before, make sure it's protected from chafing an pinching hazards, etc.

More in next post.
 
Last edited:

clinto

Moderator, wonderful human being & practicing Deuc
Staff member
Administrator
Super Moderator
Steel Soldiers Supporter
Supporting Vendor
12,596
1,120
113
Location
Athens, Ga.
Switch installed and power feed/output run:

IMAG0687.jpgIMAG0684.jpg

So once you've run the switch power to whatever your choice of rear lights is, you simply need to hook everything up. I use packard connectors and dielectric grease on everything.

I used existing holes in the underbed area to mount the lights. Make sure to use some good star washers (http://www.steelsoldiers.com/showthread.php?10131-Star-washers) so the lights will ground if you're using this type.

Can't remember if this was high or low beam, think it was the low beam.

IMAG0689.jpgIMAG0688.jpg

This isn't related to peashooter's switch, but as I said earlier, I wanted to be able to switch the lights on without the truck being in reverse, so I built a switch panel, fed it from the truck's #10 main feed circuit, protected it with a new, military 30A circuit breaker and put indicator lights on it so I would be less likely to leave the lights on. The other switches are for other stuff I'll elaborate on later.

IMAG0691.jpgIMAG0680.jpgIMAG0678.jpgIMAG0641.jpgIMAG0640.jpgIMAG0635.jpg

Now, only one issue: Peashooter's switch is rated for 5 amps. The high beam on the armor lights are 110W each, so 220W at 28V is 7.85 amps. So I am exceeding the rated capacity of the switch by over 50%. We'll see how long it lasts. There are higher rated switches out there, so I can upgrade if it fails. I will update the thread if it fails.
 

peashooter

Well-known member
1,038
202
63
Location
Hanover, minnesota
Below is a drawing of a brake switch mount that you can use with most ball nose plunger brake/reverse/neutral switches. Its based off of Gringeltaube's great concept and design (with help from him in this design as well). If anyone wants this but doesn't have the time or tools to make one then you can check the classifieds for a finished kit that includes the machine mount, switch, and LocTite retaining compound. Just search the classifieds in Parts for "Reverse Switch Kit"

I'll also put the instructions for installation in the next post for history sake since the classified add with the instructions will expire at some point.
 

Attachments

peashooter

Well-known member
1,038
202
63
Location
Hanover, minnesota
INSTALLATION INSTRUCTIONS for the Above style switch setup.

(To gain access to the switch area: Remove bench seat, and remove the center floor pan cover that goes over the transmission)

1. With transmission in REVERSE, Measure 1-7/8" from back of sprag shift rod and mark.

2. Cut the 1-7/8" section off and chamfer edges, especially the area where the ball will be contacting the shaft. A slight "Ramp" in the shaft at that location will help the switch work smoothly. (Simple tools are fine here. I've used a Hacksaw and file on one install, the shaft isn't hardened.)

3. Remove rod seal AFTER cutting shaft!. Shifting into 1st gear will give better clearance to pry the seal out. With shifter in 1st gear, clean the bore surface with brake cleaner. Do not use abrasives as this will be a slight press-fit (.0002") and removing material could prevent an adequate press.

4. Clean the outer round surface of the Mount with brake cleaner as well and let dry. Apply a thin layer of retaining compound to both surfaces. (note the 609 will begin hardening within 10 minutes. Also make sure that no retaining compound gets onto the the sprag shifter rod or its bore.)

5. Line up the mount so the threaded hole is pointed in the direction you want it and using a hammer, tap the mount into the transmission cover, making sure you have it lined up straight with the hole. Tap it in until it stops (there should be a slight gap between the hex body and the cover when fully seated). Let the Loctite cure overnight.

6. Apply some Teflon Tape or gasket compound to the switch threads to give it a nice seal. Then screw the switch into the mount but don't tighten past 15 ft/lbs or you may damage the ball switch. Paint the Hex Mount to prevent rust.

7. Wiring. Clinto's great suggestion is to pull power from the #75 brake light circuit going to the brake light switch. That way, the lights only work if you have the 3 lever switch in the stop light or service drive positions. Also, the #75 circuit is near the transmission anyway, requiring less wiring length.

If you ever need to remove the steel mount, It will require high heat to break the bond (over 400 deg F). Give it heat and put a 1-1/4 wrench on it and try turning it until it breaks free. Heat on the case and not on the mount will probably be the best way to remove the mount if needed.

***Another tip that may make life easier: When mounting one of these to a transmission on the truck, it can be hard to get a hammer into the area to tap the mount in. You can easily take the top shifter plate off the transmission and do the work to the removed top plate. It will give you a chance to inspect the Trans gears also. I took a round magnet and dropped it into the trans fluid also to fish out the old metalic crud then drained and filled the fluid again, (much easier to do when you have this access).
 

Attachments

Last edited:

135gmc

New member
307
0
0
Location
St Paul/MN
Any way you look at it, backup lights are a good idea, whether required by the state or not. It can be challenging backing up any MIL vehicle at night, particularly on a rainy, gloomy night - the kind that seems to suck the light right out of your headlights. One "incident" of backing into something will probably cost a whole lot more than a backup light... And, as they say, the life you save might be your own.
 

tcruwithme

Member
244
19
18
Location
Eagan, MN
Back-up lights!

I finished my install of the back-up lights today.

I had a switch housing made at my local machine shop (Ickler in St. Cloud, MN) from the schematics that Peashooter posted in post #44 of this thread. I also bought the switch that Peashooter suggested in post #47 of this thread; I got the one with waterproof connectors - part #9242-04-BX.

The only trouble I had with the entire deal is that the seal would not come out with a normal seal pulling tool. So, I ended up pulling the top plate of the transmission off and taking it to my local machine shop. That ran me an extra $24 to get that stupid seal out of there. That also allowed me to tap the switch housing into place, as Peashooter suggested. When the transmission top plate is in position, you can't get a hammer in there to tap in the switch housing.

I tied into circuit #75 just as Clinto suggested in post #42 of this thread. When I tied into #75 right at the air pack, I tested both leads to find the constant power one (constant when the light switch is in service drive). The two leads going into the connector were labeled 75 and 75A; the one labeled 75 was the constant power.

The only thing I did a little different than what was previously described in this thread is that I ran a power lead off the starter and ran it into a 30 amp circuit breaker that I put on the engine side of the firewall, passenger side. Power ran out of the circuit beaker and back along the frame rail to a 24 volt relay that I tied to the inside of the frame rail, passenger side, close to where the switch and housing were. Power from the starter and running through the circuit breaker came into pin #30 on the relay, and pin #87 sent power back to the lights. Power from circuit #75 went into one lead of the switch, then power came out of the switch from the other lead and went into pin #86 on the relay. Pin #85 on the relay went to ground. This way, I am not sending all the power for the lights though the switch. I did this so that I can add other things like a back-up beeper or back-up camera and not have to worry about how much power was being drawn through that switch.

I previously took the corner light brackets from an A3 truck and bolted them onto my A2. I got the light brackets from TNJ Murray, and the white lights that fit those brackets came from Erik's. All the wire I used was the 14 gauge Prestolite from Erik's, and I used the 1/4" Grote non-metallic loom - I can't recall where that came from.

20150124_152104[1].jpg 20150124_152130[1].jpg

So, thankfully everything works as it should. I was careful to test everything as I was going, as I was worried I would have to cut apart a hundred zip ties looking for a problem. Of course, I could not have done this without the help from all the experts here.

Now, my next project is to delete the manifold flame heater and bypass the FDC. That needs to get done before the Iola trip.
 
Last edited:

Valence

Well-known member
Steel Soldiers Supporter
2,135
605
113
Location
Davis County, UT
I just finished my reverse light switch too. I also copied clinto's wiring to the positive side of the air brake light switch, with an in-line fuse. The biggest pain was feeding the wires out that frame crossmember followed closely by removing/installing the transmission tunnel cover with all my mods/crap in the way. :p

A short video, apologies as I couldn't remember this thread title or everyone's names during filming.
https://youtu.be/cyeGX8npYoQ

I removed the transmission top plate from the truck and used an angle grinder to cut the shaft and chamfer the edge.

image.jpg image.jpg image.jpg

I copied Clinto's wiring here and used the lift bracket to zip tie to, but decided to still drill and mount a cable clamp. Then finally, also just like Clinto, pulled power from the positive side at the brake light switch and included an in-line fuse. I did drill a hole in the toolbox by the air pack for another cable clamp so the mess wasn't just dangling. I hate chafed wires!

image.jpg image.jpg image.jpg
 
Last edited:

Storm 51

Just a Grunt
Steel Soldiers Supporter
888
9
0
Location
Seattle, WA
I think you got off lucky on your install. Most state laws that I have seen require the backup lights to only be activated when the vehicle is in reverse. In other words, you can not be able to turn them on unless you are in reverse. Incidentally, I recently researched this and in Michigan it looks like a reverse light is not required but if installed it must be only activated when the vehicle is in reverse.
Washington state is the same way with this stupidity.

I installed "rear work lights" on my truck (M37/M42) with a labeled covered switch. They are NOT reverse lights. Cops will attempt to trick you into calling them reverse lights, because if you call them reverse lights they can cite you because they are not activated by the transmission being in reverse gear. If you always refer to them as "rear work lights" there is nothing they can do (a 1952 truck was not required to have reverse lights by law). They will always and continually refer to them as back-up lights and you will have to correct them every time. They only have to win once; you have to win every time.

It is a petty stupidity, but it produces revenue, which is the only concern.

So, if they are switched and not activated by the transmission, always call them "rear work lights".
 

goodwithwood35

Active member
Steel Soldiers Supporter
327
51
28
Location
Bakersfield, CA
I just finished my reverse light switch too. I also copied clinto's wiring to the positive side of the air brake light switch, with an in-line fuse. The biggest pain was feeding the wires out that frame crossmember followed closely by removing/installing the transmission tunnel cover with all my mods/crap in the way. :p

A short video, apologies as I couldn't remember this thread title or everyone's names during filming.
https://youtu.be/cyeGX8npYoQ

I removed the transmission top plate from the truck and used an angle grinder to cut the shaft and chamfer the edge.

View attachment 685488 View attachment 685489 View attachment 685490

I copied Clinto's wiring here and used the lift bracket to zip tie to, but decided to still drill and mount a cable clamp. Then finally, also just like Clinto, pulled power from the positive side at the brake light switch and included an in-line fuse. I did drill a hole in the toolbox by the air pack for another cable clamp so the mess wasn't just dangling. I hate chafed wires!

View attachment 685491 View attachment 685493 View attachment 685492
Valence,
Do you have a wiring diagram on how you ran the manual switch in the cab? Did you use a relay? Thank you. I have a similar setup to this and would like the capability to use them as aux lights as well.


Sent from my iPhone using Tapatalk
 

Valence

Well-known member
Steel Soldiers Supporter
2,135
605
113
Location
Davis County, UT
Valence,
Do you have a wiring diagram on how you ran the manual switch in the cab? Did you use a relay? Thank you. I have a similar setup to this and would like the capability to use them as aux lights as well.
I don't have a wiring diagram, and no relay was used, all the power to the lights flows directly through the switch (my reverse lights are just M35A3 reverse lights, so no more than 1 amp each, 2 amps total). Let me describe my wiring for the manual switch:

I have a constant power line from my batteries to a pair of cab fans that follows the speedometer cable up and under the dash. I added a 'Y' splitter to that line to power the manual switch. From the manual switch it goes back down, following the speedometer cable and at another 'Y' splitter, joins the one light from the ball switch in the transmission mounted automatic Reverse Light Switch and then as normal back to the reverse lights.

As far as the wiring used on that rocker switch as seen in the video, well, this is the diagram I used for that. For pin #6, I pulled power from the instrument cluster lights via another 'Y' splitter.
IMG_9330.JPG
 
Last edited:

someoldmoose

New member
583
2
0
Location
Lancaster, PA
Sturm 51, good call, gotta know the rules & regs. In PA, you MAY have a manually operated reverse light switch if the veh. did not have OEM reverse lights. It MUST have an indicator in clear view of the operator when activated (lighted switch is aceptable). Backing up without them can get ya a citation if seen, but oddly, driving forward with them on will only get ya a "talkin' to" if pulled over. Of course going to MD, or VA, NY,NJ, CT,VT etc. . . . who the EFF knows. I usually ask for reciprocity ( It's OK in PA, sir ) and have ( wood - knock, knock ) never been cited or taken out of service for that. I even had an Electronic flasher in the circuit so the indicator would blink. Anyway, is on the early part of the punch list for Exit Stategy.
 
Last edited:

Valence

Well-known member
Steel Soldiers Supporter
2,135
605
113
Location
Davis County, UT
Word of warning to anyone doing the transmission mounted, automatic reverse light switch:

Make sure you are very careful when putting on the top plate of the transmission and test the movement of the truck before reinstalling the tunnel cover. I pulled off the top plate while it was in neutral, but I must have moved some gears by accident when reinstalling.

Current truck operation:

Reverse = Reverse
1st gear = Reverse
Neutral = Reverse

Thankfully a transfer case in neutral saved me when I was starting the truck. But now I need to pull the tunnel cover again. Mine is not easy to do. :x

I don't know what I'm looking at in the transmission, so I'm currently reading TMs to find the correct positions...

Update:
I think this figure will do it. From TM 9-2520-246-34-1 (Page 2-104, PDF page 124) - Technical Manual Maintenance Direct Support and General Support Level Transmission Model 3053A.
transmission_top_plate_replace.jpg
 
Last edited:

gringeltaube

Staff Member
Super Moderator
Moderator
Steel Soldiers Supporter
6,872
2,232
113
Location
Montevideo/Uruguay
Simple: when you put the top back on, the first-reverse fork missed the large gear's collar. Then, when shifting into reverse, that gear slid all the way to the back of transmission and remained there - which means, engaged in reverse.
 
Last edited:

clinto

Moderator, wonderful human being & practicing Deuc
Staff member
Administrator
Super Moderator
Steel Soldiers Supporter
Supporting Vendor
12,596
1,120
113
Location
Athens, Ga.
Awwww man, I'm so flattered (Valence copying my idea).

I keep hoping I'll start seeing deuces on Craigslist with "Clinto flasher relay mod" the way you see CUCVs with the "Doghead starter relay mod".

Valence,
Do you have a wiring diagram on how you ran the manual switch in the cab? Did you use a relay? Thank you. I have a similar setup to this and would like the capability to use them as aux lights as well.


Sent from my iPhone using Tapatalk
I'm not Valence but I'll tell you how mine is.

I had a variety of switches that needed to be fed 24V. I pulled power from the #10 circuit, that's the big wire coming from the starter or magnetic relay mounted near the starter that feeds the vehicles electrical system. I used one of the military 1-2 Y adapters. I ran the new wire through one of the military 20 or 30 (can't remember) circuit breakers, mounted in the pre-existing holes in the firewall. I then fed an aftermarket civilian bus bar with the 24V power.

I then ran an individual wire from the bus bar to each switch. One of these switches controls the low beam on the reverse lights.

So mine is "fused", although via a military circuit breaker that protects all the accessory lights. These switches are rated for 20 or 30 amps, so I didn't bother with a relay.

IMAG0599.jpgIMAG0600.jpgIMAG0601.jpgIMAG0602.jpgIMAG0603.jpgIMAG0681.jpgIMAG0679.jpgIMAG0677.jpgIMAG0642.jpgIMAG0640.jpgIMAG0638.jpgIMAG0637.jpgIMAG0635.jpgIMAG0691.jpg
 

Valence

Well-known member
Steel Soldiers Supporter
2,135
605
113
Location
Davis County, UT
Simple: when you put the top back on, the first-reverse fork missed the large gear's collar. Then, when shifting into reverse, that gear slid all the way to the back of transmission and remained there - which means, engaged in reverse.
Of course you're right, and that's exactly what I discovered! I didn't realize that the gears could move so easily so I didn't watch as closely. I'm happy to report I was able to resolve it, and learned something in the process. I'm still not a fan of taking off the transmission tunnel. :lol: (mine's a pain - I suspect it isn't original to my truck)
 
Top
AdBlock Detected

We get it, advertisements are annoying!

Sure, ad-blocking software does a great job at blocking ads, but it also blocks useful features of our website like our supporting vendors. Their ads help keep Steel Soldiers going. Please consider disabling your ad blockers for the site. Thanks!

I've Disabled AdBlock
No Thanks