I'm embarrassed by comparison with my progress to date! Clean machine for sure! I greased Brutus' chassis today. Lotsa zerks. I then proceeded to terrorize Phillipsburg NJ while running numerous errands in full Whistler mode. Tachometer stopped working. Dang!
-
Steel Soldiers now has a few new forums, read more about it at: New Munitions Forums!
What did you do to your deuce this week?
- Thread starter Seth_O
- Start date

More options
Who Replied?RedbeardTheZombieHunter
New member
- 702
- 4
- 0
- Location
- Darrington, Washington.
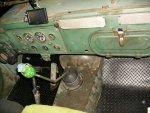
I scored a couple pieces of diamond plate pattern rubber mat. I trimmed them to fit the floor wells on both sides of the cab of my bobbed deuce. They look super cool, and from what I can tell, they manage to dampen engine noise a little bit too. Gotta love that!

Attachments
-
 77.7 KB Views: 67
Kloakndagr
New member
- 266
- 4
- 0
- Location
- On The Road/California
Yesterday, I pressure washed all the loose paint off the frame, first time bath since bring her home, lots of red clay mud from previous owner. All in all she's squeaky clean. She's getting ready for paint by the end of summer.
NCAR15MAN
New member
- 3
- 0
- 1
- Location
- Stony Point, NC
Went on a road trip to TN to pickup a cargo cover, bows and stays! Now I have a cargo cover...woohooo! He also threw in two doors, front grill, front turn signal marker, blackout marker, and a front windshiel! I only need the windshield...so if anyone needs doors, front grill, markers...let me know! Next mod will be a Jatonka primary fuel spin-off adpater...then perhaps....installing the heater!
Ford Mechanic
Active member
- 1,805
- 10
- 38
- Location
- Edenton, NC
Updated pics of the repaint after the radiator got put back in it. The last coat goes on the grill tonight so it'll be up and running this week end! A AFTER and BEFORE, Check out my new scoop too! Also got my less than $10 horn upgrade installed. I got the horn at my folk's auction for 2 bucks, says International Harvester on the back. Never seen a tractor with a air horn though.....
Attachments
-
 57.6 KB Views: 62
 -
 77 KB Views: 65
 -
 41.2 KB Views: 62
Last edited:
- 18,642
- 6,358
- 113
IH (International Harvester) built large trucks for many years. Eventually evolving to just the "International" brand.I got the horn at my folk's auction for 2 bucks, says International Harvester on the back. Never seen a tractor with a air horn though.....
IIRC... the present day NAVISTAR INTERNATIONAL traces its ancestry back to the IH branding.
JakeLewis
New member
- 1
- 0
- 0
- Location
- Staunton IL
I have a question, where do i post it? Can i right here or will i get in trouble?
FatBuddhaBoo
Member
- 330
- 8
- 18
- Location
- Jacksonville, Fl
Pics of the engine as promised..
Wow, that is one super clean engine compartment!

Woodsplinter
Member
- 723
- 6
- 18
- Location
- Phoenix/AZ
Lots of degreaser!!
Welder Sam
New member
- 1,430
- 6
- 0
- Location
- Glendale, Arizona
I agree! Looks great, rides great, even drives great! Helluva job on this oneI have seen many and I mean MANY M35's but this is the sweetest I have ever seen. BRAVO!!
Woodsplinter
Member
- 723
- 6
- 18
- Location
- Phoenix/AZ
Sam, you're always welcome to visit and drive it again! Next time we'll go to Alberts and do some target shootin'.
RedbeardTheZombieHunter
New member
- 702
- 4
- 0
- Location
- Darrington, Washington.
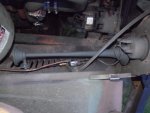
In keeping with my "on the cheap" motif, I utilized the brake reservior from the M105 I butchered when I bobbed my truck. I mounted it inside the driver's seat box, connected a 1/2" clear hose from it to the vent in the truck's reservior cap for added fluid capacity. I also added a male air fitting to the cap on the trailer reservior. Now with an air line connected to it, I can power bleed my brakes using the air system on the truck. One of these days, I'll get to the point where I'm ready to paint the truck!
Attachments
-
![HPIM1780[1].jpg](/data/attachments/293/293209-1165022c2ff1112fb60d7454baf0dea9.jpg) 64.2 KB Views: 50
64.2 KB Views: 50
srodocker
Well-known member
- 6,549
- 70
- 48
- Location
- Lacey, Washington
Used it to take me and my cousin to a ATV poker run. Tons of questions and looks! even the sheriff was giving me thumbs up. waiting for a pic to be sent to me.
ccf460
Member
- 327
- 1
- 18
- Location
- granite falls/N.C.
I got my homemade wheels & 16.00 XL's mounted, also installed the A3 lights on the fenders

- 18,642
- 6,358
- 113
I like the look of that Quad-Headlamp arrangement!I got my homemade wheels & 16.00 XL's mounted, also installed the A3 lights on the fenders
View attachment 426750
ccf460
Member
- 327
- 1
- 18
- Location
- granite falls/N.C.
Thanks cold warrior, I got some 450 watt bulbs from popacom to put in the factory headlight buckets to use as driving/search lights.
We convoyed down to Danielson CT for a touch a truck fundraiser. Nice little town, we met a few of the local fire crews. It was a great time for all and Im very thankful we were able to be a part. It was just us in the MV category. Even the CT guard was in a pickup truck. 


Last edited:
Clay James
Member
- 524
- 4
- 18
- Location
- Reno/NV
Tried using the axle as an improvised press for control arm bushings. Just wound up jacking the axle up
- 18,642
- 6,358
- 113
We convoyed down to Danielson CT for a touch a truck fundraiser. Nice little town, we met a few of the local fire crews. It was a great time for all and Im very thankful we were able to be a part. It was just us in the MV category. Even the CT guard was in a pickup truck. View attachment 426833View attachment 426834View attachment 426835View attachment 426836
Looks like y'all had a great event with a good turn-out, too.
I'm considering organizing something similar. Who sponsored your event? Our local "Downtown San Angelo Association" (businesses in the old downtown area) are always looking for new and novel ways to attract crowds - and hopefully shoppers. I'd like to approach them for sponsorship.
Thanks for and advice and suggestions on pulling off a successful "show".
John
brianp454
Member
- 572
- 12
- 18
- Location
- Portland, OR
My weekend activites with my M35A2C


1) Fixed a pair of coolant leaks. Since purchasing the truck about 2 months ago I’ve noticed a little dribble of coolant when the engine is cold that usually starts about 11AM and dribbles about a cup over the next hour as the weather warms up. It does not leak when the engine is warmed up. Poking around, I noticed the coolant was dribbling down the passenger side of the block and following it up to the highest point there was a puddle under both of the short hoses for the coolant return manifolds (pics attached). The old rubber was quite cracked and I figured it was past time all of the hoses were replaced. I went to NAPA and got 1 foot of 1 5/8 and 1 foot of 2 inch diameter radiator hose. There are some posts here claiming the these little hoses are 1 ¾, but the hose I took off was marked 1 5/8, plus the 1 5/8 hose needed to stretch to get over the barb end of the manifolds and fit snug on the remainder of the manifold seal area as it should. I think 1 ¾ would be looser than it should and more likely to leak down the road. Radiator hoses should fit snug and you should not count of the clamp to make a loose fit seal properly. I’m not saying it can’t be done, but I’m not going to do it.

I drained about 2 gallons of coolant. I cut the old hoses in half with a long razor blade, which made them a snap to remove. This is where I learned that I should have drained more coolant as a quart or so of coolant poured out as the first manifold came loose. My gaskets stuck the head side so that was where all the cleaning needed to be done. Scraping gaskets, what fun, NOT! I found that using a medium flat screwdriver at about a 75 degree angle and tapping it with a hammer chipped off the old gasket without marring the head. Then I scraped with a 1 inch wide putty knife to make sure it was flat. I removed the valve covers to make it easier to get the manifolds back on. I also used a syringe to suck the coolant from the blind screw holes and q-tips to clean out any of the leftover coolant. I also put anti-seize on all threads. I ran to NAPA to find a gasket, but they didn’t have one on the shelf that fit very well. Rather than ordering them from one of the surplus places, I decided to use RTV and it worked fine, no leaks! There’s a particular wiggle that lets the manifold clear the head studs while sliding the hose on. Someday I’ll get to all of those short 2 inch hoses. It’s only a matter of time till they start leaking.
2) Change spin-on primary and both secondary fuel filters.
Thank you to JATONKA for a great product and CastleBravo for leaving a spare set in the tool box and clearly marking the date, miles, and hours on the old filters. After spinning off the old filters I oiled the seals on the new filters with WMO, spun them on, and gave them the recommended extra ¾ turn. I was happy to see that the fuel in the old filters was completely clean and clear. I’ve drained about ½ cup the primary filter about once a month and got little bits of rust each time. I change the filters as a precaution, yet am convinced they kept any crud from my precious LDT-465 IP and injectors. Anyway, once the new filters were on I turned on the fuel pump and cracked the bleeder valve on top of the filter housing. It hissed for about a minute and then began to dribble fuel. I closed the valve and started the engine. It started and died twice, then on the third start I gave it a little extra throttle and it ran fine. The job took about 10 minutes including clean-up.
3) Loaded sod. Dug up and loaded a bunch of sod to put in new garden beds for the wife. A Honey-Do mixed with deuce fun! Since I have a M35A2C I pulled the truck up next to curb, dropped the passenger side cargo bed (pic attached), and enjoyed the easier access to the bed. It took all day, but I managed to load about 4 yards of sod. Oh, my back and shoulders…

4) Drilled and Tapped holes in both bumpers to mount my plates. I chose to put the front on the drivers side corner and the rear just right of center under the tailgate.
5) Took a pic of my cat enjoying the warm hood after a quick test drive.

1) Fixed a pair of coolant leaks. Since purchasing the truck about 2 months ago I’ve noticed a little dribble of coolant when the engine is cold that usually starts about 11AM and dribbles about a cup over the next hour as the weather warms up. It does not leak when the engine is warmed up. Poking around, I noticed the coolant was dribbling down the passenger side of the block and following it up to the highest point there was a puddle under both of the short hoses for the coolant return manifolds (pics attached). The old rubber was quite cracked and I figured it was past time all of the hoses were replaced. I went to NAPA and got 1 foot of 1 5/8 and 1 foot of 2 inch diameter radiator hose. There are some posts here claiming the these little hoses are 1 ¾, but the hose I took off was marked 1 5/8, plus the 1 5/8 hose needed to stretch to get over the barb end of the manifolds and fit snug on the remainder of the manifold seal area as it should. I think 1 ¾ would be looser than it should and more likely to leak down the road. Radiator hoses should fit snug and you should not count of the clamp to make a loose fit seal properly. I’m not saying it can’t be done, but I’m not going to do it.
I drained about 2 gallons of coolant. I cut the old hoses in half with a long razor blade, which made them a snap to remove. This is where I learned that I should have drained more coolant as a quart or so of coolant poured out as the first manifold came loose. My gaskets stuck the head side so that was where all the cleaning needed to be done. Scraping gaskets, what fun, NOT! I found that using a medium flat screwdriver at about a 75 degree angle and tapping it with a hammer chipped off the old gasket without marring the head. Then I scraped with a 1 inch wide putty knife to make sure it was flat. I removed the valve covers to make it easier to get the manifolds back on. I also used a syringe to suck the coolant from the blind screw holes and q-tips to clean out any of the leftover coolant. I also put anti-seize on all threads. I ran to NAPA to find a gasket, but they didn’t have one on the shelf that fit very well. Rather than ordering them from one of the surplus places, I decided to use RTV and it worked fine, no leaks! There’s a particular wiggle that lets the manifold clear the head studs while sliding the hose on. Someday I’ll get to all of those short 2 inch hoses. It’s only a matter of time till they start leaking.
2) Change spin-on primary and both secondary fuel filters.
Thank you to JATONKA for a great product and CastleBravo for leaving a spare set in the tool box and clearly marking the date, miles, and hours on the old filters. After spinning off the old filters I oiled the seals on the new filters with WMO, spun them on, and gave them the recommended extra ¾ turn. I was happy to see that the fuel in the old filters was completely clean and clear. I’ve drained about ½ cup the primary filter about once a month and got little bits of rust each time. I change the filters as a precaution, yet am convinced they kept any crud from my precious LDT-465 IP and injectors. Anyway, once the new filters were on I turned on the fuel pump and cracked the bleeder valve on top of the filter housing. It hissed for about a minute and then began to dribble fuel. I closed the valve and started the engine. It started and died twice, then on the third start I gave it a little extra throttle and it ran fine. The job took about 10 minutes including clean-up.
3) Loaded sod. Dug up and loaded a bunch of sod to put in new garden beds for the wife. A Honey-Do mixed with deuce fun! Since I have a M35A2C I pulled the truck up next to curb, dropped the passenger side cargo bed (pic attached), and enjoyed the easier access to the bed. It took all day, but I managed to load about 4 yards of sod. Oh, my back and shoulders…
4) Drilled and Tapped holes in both bumpers to mount my plates. I chose to put the front on the drivers side corner and the rear just right of center under the tailgate.
5) Took a pic of my cat enjoying the warm hood after a quick test drive.
Last edited:
- 114,414members
- 167,299threads
- 2,355,084posts
- 1,847online users