twlinks
New member
- 225
- 3
- 0
- Location
- Hutchinson, KS
The biggest part of the "forklift dent" will push back out. Just take your door panel off, reach in and start pushing.
Steel Soldiers now has a few new forums, read more about it at: New Munitions Forums!


I used one of those harbor freight 6" suction cup things that never worked on my dodge but somehow worked great for this.The biggest part of the "forklift dent" will push back out. Just take your door panel off, reach in and start pushing.
Yeah, I even tried a "plumbers friend" suction cup...it would move the metal but not enough to get it to "pop" back out. I still had to use a fair amount of filler in that area after massaging it back into place.I used one of those harbor freight 6" suction cup things that never worked on my dodge but somehow worked great for this.


I would just rebuild the one you have and save the extra cash. I just rebuilt one of mine last weekend and it only took about 45 minutes. I'm sure that next time around it would only take 30 minutes. I got the parts form ASP and they shipped them the same day as ordered.Looked at ordering a remanufactured alternator to replace my Gen2 so I can rebuild the original to keep as a spare. Part WIL90014277 if anyone has any experience.
If you do get the Wilson, bring a multimeter with you to the parts house. Test to make sure it is truly built as an "isolated ground". Sometimes they are NOT rebuilt correctly.Looked at ordering a remanufactured alternator to replace my Gen2 so I can rebuild the original to keep as a spare. Part WIL90014277 if anyone has any experience.
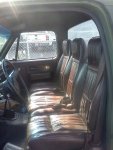
Very nice! What veh are the seats from?I was able to complete my project of installing three across bucket seating in my 1031.
They are actually very easy to rebuild. CUCV electric has great (and free) rebuild instructions with pics on the web site. http://cucvelectric.com/altrrebuild.htmlLooked at ordering a remanufactured alternator to replace my Gen2 so I can rebuild the original to keep as a spare. Part WIL90014277 if anyone has any experience.
I like this a lot! Could you supply extra information please?I was able to complete my project of installing three across bucket seating in my 1031.
Very nice! What veh are the seats from?


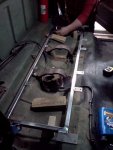
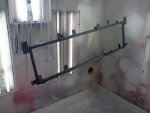
max1008, My M1008 did not come with any of the cargo cover. I had to source all of it from various sellers. The last part I installed was the rail on the tailgate. I had to fab the whole thing up. I bought a bunch of turn buttons and a piece of barstock. I marked the location of the buttons on the stock and installed them. Then I attached the curtain to the assembly and stretched the curtain taut, marking the location of the bar onto the tailgate. It's a great fit.Installed a cargo cover system. Truck already had holes and riv-nuts when I bought it. Had to do some adjusting for the rails but I still cant get the back door to close! Anyone have tips on aligning these things?View attachment 426259View attachment 426260View attachment 426262