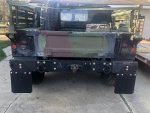
I test fit my camouflage storage rack that came with the BEOD today. Didn't have the spacers it's supposed to come with, didn't realize it at first, so ended up drilling an extra hole through the windshield frame that I didn't need to, but I can cover it up by replacing the windshield retaining bracket.
Also installed the hood reinforcement/stiffening kit designed for the armored grills. Don't have the armored grill, but I do end up walking on the hood a lot so I figured it couldn't hurt.
View attachment 795734
View attachment 795733
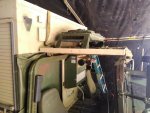
Today was putting all the Red Dot stuff in place to see if it will fit how I want it to.
Downside is, I'm moving the inside unit up higher, so the existing hose is now 6 inches too short. Have a new hose on the way to replace it with.
The condenser takes up just over half the roof rack front to back. I kind of wanted to install it on the front of the BEOD, but it just doesn't seem to work for me. The fans are puller fans, so it won't work properly if installed facing forward, and that would increase likelihood of being damaged, so just doing it to the roof rack for now.
Moved the dryer/receiver inside the truck instead of attached to the condenser unit (which ended up removing one hose from the system, as I'm not running these through armor don't need bulkhead connections), allowing me to shift the condenser back a little bit so it doesn't take as much of the roof rack, and the hoses fit better. Currently it's sitting on some 3/4" thick wood blocks so the lines don't rub against the back end of the rack.
I'll probably switch to a fender mounted unit in a year or two, for now just want it installed and working for this summer.
(Plate the unit is mounted on is some scrap from a dead standby generator unit that was disassembled a couple years ago, still need to drill the holses for bolting it to the B pillar bar, and I installed some rivnuts in the truck floor)


So if anyone sees something horribly wrong or can give me some advice for improvement before I finish installing everything I'm all ears. I've done some aircon repairs before, but not installs like this.


")