Autonomy_Lost
Well-known member
- 693
- 1,554
- 93
- Location
- Pennsylvania
I just drive a few minutes down the road to mac motorsJust waiting on parts... from 3 vendors... Bane of my existence, both here at home and work...

Steel Soldiers now has a few new forums, read more about it at: New Munitions Forums!

I just drive a few minutes down the road to mac motorsJust waiting on parts... from 3 vendors... Bane of my existence, both here at home and work...
 No grease. The new tire went on easy until the final torque. Once I had the wheel halves together, but prior to torque, I put 20psi in to make sure the o-ring had stayed in the groove. With no hissing sound and the gauge holding steady at 20psi I went ahead and did the two-stage torque. But now it won't take any air.... so it had to come apart. I realized the PVC beadlock valve-hole was off by less than five degrees, and the air valve pressed into the beadlock and blocked the air. Fixed that drama and on to wheel number three.


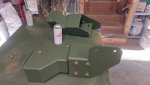
I have a couple of that holder.The new ammo cans arrived....
OK, what's wrong with this picture? I buy a three 40mm ammo can holder and three 40mm ammo cans and it looks like maybe a 4th will fit in there? What am I missing?
View attachment 893459
The new ammo cans arrived....
OK, what's wrong with this picture? I buy a three 40mm ammo can holder and three 40mm ammo cans and it looks like maybe a 4th will fit in there? What am I missing?
View attachment 893459
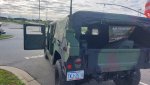
The soft top couldn't possibly hold that much weight.Pics of the turret mounted MK19 that goes with these or it didn't happen.
How about a turret mounted nerf gun?Pics of the turret mounted MK19 that goes with these or it didn't happen.

.


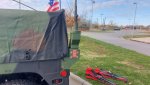

Very nice! Where'd you find the mounts? I've been looking - I still need one more.Cargo cover and offset antenna mounts. Need a little TLC but with some Rapco 383 looks almost good as new.
A Friend of mine had them. Very hard to find anymore.Very nice! Where'd you find the mounts? I've been looking - I still need one more.
When you have a cargo cover or similar it kicks the antennas out enough they don't rub on the cover in the bowed/stowed position. If you don't have the the military SOP is to stow them in an X configuration across the back.Whats the appeal/purpose of the offset antenna mounts?
I guess I'm not finished yet....The last wheel finished. The PVC was giving me fits, not wanting to get into position, but in the end I prevailed. The centramatics did an OK at balancing, but I took it to Discount Tire. The tire guy drove it into the bay and all work stopped as the whole workforce gathered around to gawk.
They used a lot of weight but it's very smooth now. The best part is the piece of mind getting the 16 year old tires out from under me.
spray some soapy water to find out. Even a slow leak will generate bubbles.I guess I'm not finished yet....
Left rear has a slow leak, lost 10 psi overnight. The valve/valve -stem appear to be OK so maybe the o-ring didn't get seated properly.
Pulled the wheel after work, soaped the valve, the bead on both sides, and bubbles appeared in the hole there, whatever that's called. I tried to re-torque the bolts but it didn't change. I popped the small half off and the o-ring looked OK, but replaced it with my spare (ordered five just in case). No bubbles now. I put exactly 35psi in and I'll check it tomorrow to be sure.spray some soapy water to find out. Even a slow leak will generate bubbles.
Better to verify that it actually is the O-ring leaking than do all the work only to find a pinhole in the tire or rim (unlikely, but not impossible)

