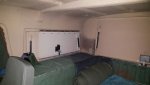
I'm sure this isn't what most people have in mind when they talk about putting a radio in their Humvee. To some this is blasphemy but having some music really makes those long off road commutes more bearable

. My plywood in the center was rotten anyway so I went ahead and made this setup.
View attachment 657761View attachment 657760
I used marine grade components so it will stand up to the wet between all the leaks and when I hose out the interior. I traced the old wood as a template and sprayed it down with the Behr exterior latex in 383 green. Used a HVLP gun at 100 psi and thinned the paint with approx 1 ounce water to 12 ounces paint. These 4 speakers with 45 watts each are easily heard while cruising at 60 at half volume. At full it's unbearably loud for any length of time. The amp is inside the box which is sealed with glue all around and has adhesive foam weatherstripping around the removable top piece to make it water tight.
View attachment 657762View attachment 657763
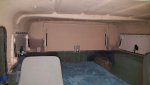
Mounted these two ammo cans to a radio tray. The left one has the radio with the power switch, volt gauge and power outlet. The right is for storage and lined with 1/4 inch thick neoprene adhesive foam. I sleeved the cables for a more professional look.
View attachment 657764
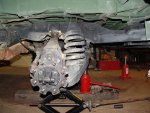
For power I used a Sure Power 40 amp battery equalizer. I removed the bracket next to the battery compartment (not sure what it's for) and placed the converter there with some spacers I made due to the battery hold down hook. Used 2 100 amp fuses for protection and also have a 4 way fused distribution block which will allow for future accessories too.
View attachment 657765View attachment 657766View attachment 657767


 opcorn:


![IMG_3073[1].jpg](https://www.steelsoldiers.com/data/attachments/449/449320-867a92a45608499abbca4db448ac8f00.jpg "IMG_3073[1].jpg")
![IMG_3070[1].jpg](https://www.steelsoldiers.com/data/attachments/449/449319-1a58767b9b30d706f3dd09f09af5f1f1.jpg "IMG_3070[1].jpg")
![IMG_3071[1].jpg](https://www.steelsoldiers.com/data/attachments/449/449321-6f79005e06a5484c28260f9b27b8963a.jpg "IMG_3071[1].jpg")
![IMG_3072[1].jpg](https://www.steelsoldiers.com/data/attachments/449/449322-6b9e34f3444441a9b022fa0a6522998a.jpg "IMG_3072[1].jpg")
![IMG_3069[1].jpg](https://www.steelsoldiers.com/data/attachments/449/449323-fd7263bb778e9334718586096a9040f2.jpg "IMG_3069[1].jpg")
![IMG_3068[1].jpg](https://www.steelsoldiers.com/data/attachments/449/449325-ed37e2a1505642cff1aff9f6cdf4ccf5.jpg "IMG_3068[1].jpg")
![IMG_3067[1].jpg](https://www.steelsoldiers.com/data/attachments/449/449326-6ecd39ea2dcc6e005a3648319ca9616d.jpg "IMG_3067[1].jpg")
![IMG_3066[1].jpg](https://www.steelsoldiers.com/data/attachments/449/449327-f8077b26dbfa09f9778bb95cc5b7baa3.jpg "IMG_3066[1].jpg")