- 568
- 1,376
- 93
- Location
- AL
Removed the blackout stop lens and replaced with a clear plexiglass cut-to-fit replacement. Wired it up and added an LED bulb to use as a reverse light. Keeps the original look and able to convert back to original.

Steel Soldiers now has a few new forums, read more about it at: New Munitions Forums!

Man, that's cool as hell! Awesome work!Removed the blackout stop lens and replaced with a clear plexiglass cut-to-fit replacement. Wired it up and added an LED bulb to use as a reverse light. Keeps the original look and able to convert back to original.
View attachment 922887

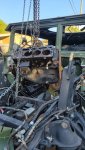
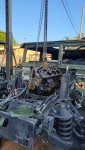
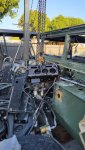
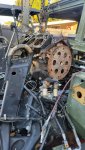
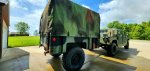
Looks like you pulled more than the engine, LOL. CAMOPulled the engine on the 1151A1 today.
That looks awfully familiar to me almost exactly a year agoPulled the engine on the 1151A1 today.
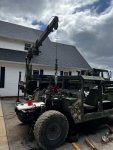
LOL, yes i know, this truck came with the engine tore apart and missing a bunch of stuff. good thing i have the donor engine and cooling stack.Looks like you pulled more than the engine, LOL. CAMO
yep, had to do it over a year ago on my M1123. now again on this truck.That looks awfully familiar to me almost exactly a year ago
Looks clean and nice, congrats.Took A road trip today and picked up a travel buddy for the truck. Clean 2008 M1101. Local Fire station had it, guy said I have a 2" receiver to pintle adapter you can have to get it home... I told him I have the mate to the trailer I'm bringing to get it, no adapters required!


")


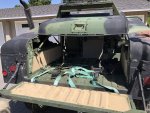


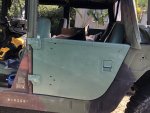
You can always add ( build) removable upper half sectionsReceived some half doors for the M1123. Aluminum, they’re surprisingly lightweight, seem to be about 1/4” thick. I‘m not happy with the soft doors and dislike the look of X doors on a soft canvas. Beside, no A/C on the M1123 to windows are open 9 months a year.
View attachment 923916
View attachment 923917
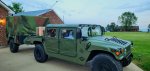
I think this truck will end-up being a 2 man cab, because it’s my daily mule and I never take more than a passenger for expeditions. In the 2 man crew configuration I like the sand color style, and I’ve ordered a dozen 7’ long, 4”x1” T6 aluminum extrusions to build racks to expand the ability to load the truck while looking badass.
It’s hard not to touch it before the slant back A2 is done !


We get it, advertisements are annoying!
Sure, ad-blocking software does a great job at blocking ads, but it also blocks useful features of our website like our supporting vendors. Their ads help keep Steel Soldiers going. Please consider disabling your ad blockers for the site. Thanks!

