• Steel Soldiers now has a few new forums, read more about it at: New Munitions Forums!

  • Microsoft MSN, Live, Hotmail, Outlook email users may not be receiving emails. We are working to resolve this issue. Please add support@steelsoldiers.com to your trusted contacts.


M819 RECEIVES NTC400!!

steelsoldiers

Administrator
Staff member
Administrator
5,239
3,880
113
Location
Charleston, WV
*Thanks guys for the continued interest in this project. I forgot to add these pics:

Our Sam Winer care package arrived. (900 series front axle brake parts)

The Brockway donor truck mentioned earlier in this thread just happened to have Rockwell rears;-). They, along with 800 and 900 series 5ton axles all have the same backing plate bolt pattern diameter of approx 8" as well as the same drum diameter of 15".

So....were gonna purchase 6 new or used 900 series drums for front and rear. (900's use a wider 7" shoe) and ditch the 800 drums. Then bolt the backing plates and parts from the Brockway rockwells onto the rear axles and the 900 stuff to the front axle. (the rears have service and emergency caged canisters.)

How does that sound?:| ........
Sounds like a good plan for the brakes. The 939-series air brakes really slow those big trucks down in a hurry. I don't know if I can ever go back to air over hydraulic. :)
 

No.2Diesel

New member
1,264
11
0
Location
Huntington, NY
Agree 100% Chris. When operating a 939 you only have to use the weight of your foot to gently squeeze the pedal. If you use your leg muscles at all, you'll go through the windshield.:razz:
 

No.2Diesel

New member
1,264
11
0
Location
Huntington, NY
Current Status of Project:

Hello,

I totally forgot to post here, even with the weather things are busy etc. I'll share the latest (pics on monday, sorry you'll have to use your imaginations.) We last left off with everything taken apart and questioning what our next move should be with the drivetrain etc. Much has taken place:

-The old cab has been fully picked of everything, and the replacement cab & hardtop is being cleaned and worked on.

-The dual clutches have been re-faced with new material, pressure plate rebuilt, and the flywheels re-surfaced all for $250 instead of $900 for a brand new setup. New Pilot bearing and throughout bearing have been installed.

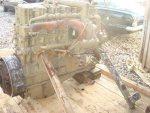
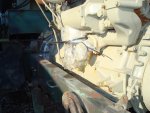
-12/26/08 Mating the 400 to the Fuller required a little bit more finnese than your average SB Chev and M21 :hammer:. The clutch housing was torqued on and the runout was checked with a dial indicator. (it was within tolerance just bolting it on) The Flywheel was torqued on and Pilot bearing installed. We used the plastic OTC input shaft tool to align the clutch discs and torqued the Pressure Plate on. We dragged the 400 on its pallet out of the barn and in front. We then righted it and secured it on the pallet with wood supports.

:soapbox:
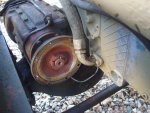
Never use a plastic alignment tool! That c-------ing m---------in' plastic tool is two pieces glued to each other....as soon as we tried to pull it out it came apart, leaving the splined part inside:doh: We rammed it with a pointed stick to poke a hole in the platic tip and used a slide hammer to reach in their and bust it out.

It was easier to align the clutches by using crow bars to open the clutch and release it using steel shims. Then we just poked around and aligned the clutches by sight. It was dead on, on the first try Always get a real input from a scrap yard.

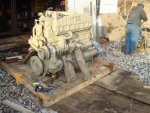
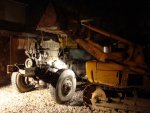
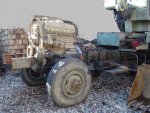
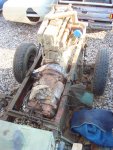
We used an engine hoist to finely tune the position of the 800lb. tranny and inserted it for mating with the engine. (beavis & butthead sd fx) After the bellhousing was torqued, the JD crawler loader was used again to install the combo in the frame. We were excited to see how it would fit.

It plopped right in there and fit like a glove....with the exception of three things:;-)

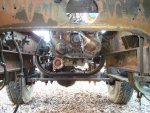
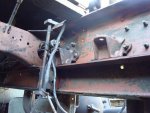
1.) The front motor mount sits .25" too short, to sit on the centerline of the front crossmember. The crossmember will need to be boxed and two old holes filled & two new holes drilled. Not really a big deal.

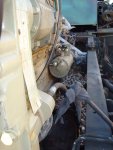
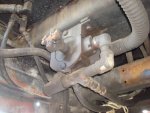
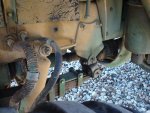
2.) Due to the 6x6 setup of MVs the entire drivetrain is offset to the passenger side to clear the front driveshaft. This creates a big problem if your putting a high hp small or big cam Cummins. The stock cartridge oil filter on the 250 is on the driver side. The small and big cams have vertical spin on bypass & full flow oil filters on the passenger side. This creates a major interference problem with the frame rail.:doh: There are shorter filters out there but they still go 3-4" below the top of the framrail. The solution: oil filter relocation kit for a stationary/marine application (try finding one;))

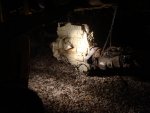
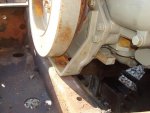
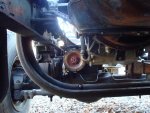
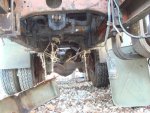
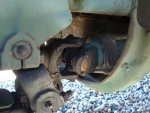
3.) It was dark when we put it in so we didn't notice this last one at first: Upon closer inspection, the driver side of the oil pan (right where the oil sump feed line exits) is about .125" from the front axle yoke flange:D. Solution: remove oil pan, section & TIG weld a severe relief where interference exists. We contemplated putting the pan from the 250 on but the oil feed line outlet is about half the size etc. There are a few pans out there with large front sumps but that won't help. In terms of vertical travel, the axle will never be in danger of hitting the pan even if it was at the bumpstops.

We've already found the coveted filter relocation kit and re-did the front crossmember. The pan is next on the list.

-------------------------------------------------------------------------

Update Part II:

As if this combo couldn't get more complicated, we've sprinkled another ingredient onto this s--t sandwich:p

Being inspired by fellow member Recht71's installation of an auxilliary transmission into his Deuce we had a brain fart: Why are we going through all this trouble and only saving a couple hundred RPMs by using a .73 over the stock .79? Why not install an aux. box. and cruise the highways at significantly lower RPMs?

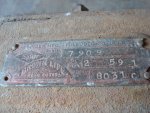
So we've found a really nice Spicer/Brown Lipe 8031C 3spd. Auxilliary.

Underdrive:--2.59:1
Direct:--------1.00:1
Overdrive:----.75:1

Multiplying the .73 OD from the Fuller RR and the .75 OD from the Aux. you get a final OD of .5475:stir pot: cutting the 6.44 axle ratio almost in half reducing engine wear and increasing fuel mileage

With 43.5"dia. tires RPMs would be:

1,362 @ 50mph
1,498 @ 55
1,634 @ 60
1,770 @ 65....etc.

Unlike Recht71's mod we're gonna put the aux. behind the tranny and move the transfer case another 2ft. backwards in addition to moving it back a foot for the tranny. The 215" wheel base is nice, there's plenty of room under there. We may have to relocate the hydraulic motor for the crane....:hammer:


Thanks for your continued interest in this project. Pics Monday.
 

JDToumanian

Active member
1,655
14
38
Location
Phelan, CA
So the drive shaft for the front axle is going to be three feet longer? Are you going to make it a 2-piece with a pillow block on the frame? That suckers gonna be long....

Very interesting project... :cool:

Jon
 

No.2Diesel

New member
1,264
11
0
Location
Huntington, NY
First gear in the RR:-------13.32:1
Low in Aux:-------------------2.59:1
Low in Transfer:-------------2.00:1
Axle Ratio:--------------------6.44:1

Overall Ratio in Low:----444.34:1 :p


This will help immensely when executing a "pick & carry" with a heavy object.

The 8000 series Spicer Aux. has the same 2" input/output shaft as the Fuller RR so it'll take the tq.
 
Last edited:

No.2Diesel

New member
1,264
11
0
Location
Huntington, NY
Hey JD,

To answer your question about driveshafts:

As it as stock, all of the 215" wheelbase 5tons have a very long two piece driveshaft assembly with a bearing hanger. I don't know the exact overall length but its 5-6ft. overall

We'd be cutting down the rear and elongating the front accordingly and installing a bearing hanger for the front. The M923 has a front bearing hanger stock. I'll post a pic of it and how its mounted for comparison.

Despite the longer transmission and Aux. there is still 3-4ft. to the front rear axle yoke flange.
 

scooter01922

Well-known member
1,721
42
48
Location
Newbury, MA
Sounds like you are making real progress. That thing in 1st, low, low range sould really be a force to contend with. I can hardly wait to se the pics. What are we shooting for in terms of a completion date??? I wanna see this thing at a rally this summer.
 

wreckerman893

Possum Connoisseur
15,606
1,963
113
Location
Akenback acres near Gadsden, AL
Since my 250 had the catastrophic runaway I am contemplating a similar swap.
An old timer mechanic near me has a 400 with a 9 speed tranny for a good price. Since I am going to let him do the swap I will print out all the above and let him read it so he will know what to expect.
Thanks for saving us a lot of work.[thumbzup]
 

maddawg308

Well-known member
Steel Soldiers Supporter
10,852
723
113
Location
Front Royal, VA
Sounds great, Dave! Can't wait to see some pics of the truck, almost seems like you guys have had to get engineering degrees in order to make this conversion! Once it's done, this will have to be an attendee to Aberdeen, in the DISPLAY AREA! It's going to be one-of-a-kind!
 

No.2Diesel

New member
1,264
11
0
Location
Huntington, NY
Pics for the Updtate

Hi, Pics are here.

IF....everything goes according to plan, you should see this thing at Aberdeen 09'. We'll work on it around the clock as the weather gets warmer.

Pic description:

-The first set are of the engine/tranny installation. I should've taken more pics of mating the tranny together but we were so focused I forgot.

-The second portion shows the intereference problems/fitment. Take note of that Oil feed line from the pan as well as the vertical oil filter on the pass. side. Also notice how the front engine mount only partially sits on the crossmember.

-The Third group of photos shows the overall space in the frame from the Engine to the crane. Take note of the existing transfer case mounts, crossmembers etc.

-The last photo shows how the M923 uses a front bearing hanger for the front driveshaft for comparison.

Thanks for the kind words maddawg, but its just trial & error, nothing fancy. Grab that engine Wreckerman! Start rippen that thing apart!


More pics to be posted.....
 

Attachments

No.2Diesel

New member
1,264
11
0
Location
Huntington, NY
Here's some more pics....

-Take note of the location of the hyd. pump that drives the crane (pics 319,322.)

-Last two pics (298, 299) show M923 front bearing hanger
 

Attachments

Flea

Member
456
9
18
Location
Northeast TN
Overall Ratio in Low:----444.34:1 :p
:shock::shock::shock:

You could pick something up, put it in gear and eat lunch while the truck moves 100ft in a straight line.

:shock::shock::shock:

Or you could blip the throttle and twist all your axles into pretzels! Definitely would be careful with that one!

Oh, could you do the world a favor with that? Get a good anchor, face east, and drop that sucker into low gear and pull the EARTH in the other direction for a couple hours on the weekends? I'll even send you gas money.:razz:

Looking great! Got a 270 to go with it yet?
 

maddawg308

Well-known member
Steel Soldiers Supporter
10,852
723
113
Location
Front Royal, VA
No, those look stupid. Put a hood scoop on it, nothing too rounded, something boxy that looks like it belongs there. The "box" reminds me of the hillbilly mods that some did that was a bread pan tack-welded in place....
 

No.2Diesel

New member
1,264
11
0
Location
Huntington, NY
Some update info & pics

Hi,

Ok, here are some pics of the Spicer 8031C. Its an oldy but goodie. The Teeth & synchros look great and the bearings have no wiggle. All it needs is a good wire wheel, paint and some gaskets. They were nice enough to throw in a jackshaft and the original shifter. The shifter looks to be a pretty simple affair.

Note the pic of the jackshafts next to each other. One is the original Mil. unit and the other came with the Aux. box. The Civi. unit has .5" larger shaft diameter (3.25") than the 2.75" Mil. unit. The Civi also has a larger section mudulus in the yoke department. Were not sure at this point to change all the u-joints to the larger size. The flange on both Mil & Civi have the same bolt circle and flange dia.

Maybe its better to snap a u-joint/driveshaft or two instead of blowing up gear boxes/t-cases etc. We may just convert over as time goes on after the projects completed.

Also recently acquired is the holy grail/golden bull/religous icon;-) of this project: The full flow & bypass remote oil filter adapter. It now allows the filters to be relocated away from the frame on the passengers side without hacking into them. No other filter (shorter or otherwise) can be used. The adaptor kit is a must. Your only other choice is to significantly karate chop the frame and that wouldn't be good. (Note in the pic, the quarter placed near the parts for scale.)

We also got the last bit of big air brake parts from Sam Winer on our way to the MATS (see trip here: http://www.steelsoldiers.com/upcomi...w-louisville-ky-march-19-21-anyone-going.html )

Currently all the old hydraulic brake parts are being stripped from the axles (backing plates etc.) and the 900series stuff can be bolted on. An entirely new pneumatic system for the whole truck is being built using new components. No plastic air line is being used, only heavy wall copper and braided aeroquip.

Enjoy the pics:
 

Attachments

Top
AdBlock Detected

We get it, advertisements are annoying!

Sure, ad-blocking software does a great job at blocking ads, but it also blocks useful features of our website like our supporting vendors. Their ads help keep Steel Soldiers going. Please consider disabling your ad blockers for the site. Thanks!

I've Disabled AdBlock
No Thanks