• Steel Soldiers now has a few new forums, read more about it at: New Munitions Forums!

  • Microsoft MSN, Live, Hotmail, Outlook email users may not be receiving emails. We are working to resolve this issue. Please add support@steelsoldiers.com to your trusted contacts.


My New toy

pwrwagonfire

New member
652
5
0
Location
Central Massachusetts
This afternoon I'm meeting with a gentleman who wants to buy a couple parts off of me...hopefully it'll go through, and I'll be able to purchase the new fuel sending unit and filler neck hose so I can FINALLY get this thing driving around the neighborhood!
 

1943ht

Active member
478
94
28
Location
Batavia, OH 45103
Redid my M37 Tank for around $100 bucks ... cost was for 2 quarts of gas tank sealer, 1 gallon of MEK (Methyl Ethel Ketone), 2 gallons of Muratic acid ...purchased all but the tank sealer at Home Depot .. Tank Sealer at Car Quest.
 

pwrwagonfire

New member
652
5
0
Location
Central Massachusetts
Took off the tarp and dusted her off today. Did some more POR15 painting around the axles, charged up the battery and let her run for awhile

Also called up vintage power wagons and order new fuel pick up and gasket, and got the fuel tank re-sealer kit from the local parts store.
Good to be back making progress, even if its just SMALL progress!


I know it's been super slow lately, nothing exciting to report...but Imma keep posting, using this as a sort of re-build "blog"
 

Karl kostman

Well-known member
Steel Soldiers Supporter
2,283
836
113
Location
Fargo ND
Congrats on the truck and it seems to be coming along nicely, my first MV was a 52 M-37 it still had the delivery papers on the glove box to Fort Leonard Wood. I bought it from a small fire Dept in ND for 600.00, it looked great, virtually no rust what so ever, I put two batteries into it and it turned over, I drained the oil and refilled it smelled the gas it smelled decent it fired right up and seemd to run good, I filled it on the way out of town and drove it 65 miles to my house, Great little truck! Have fun with yours
KK
 

pwrwagonfire

New member
652
5
0
Location
Central Massachusetts
Just got back from a road trip...drove down to Uxbridge, MA today with my father. There is a power wagon parts yard down there, and the owner Dennis Sherman was a pleasure to talk to and deal with!

The website is Power Wagons Parts and after meeting Mr. Sherman, I would definitely suggest anyone in need to parts to check him out.

Anyhow, traded him a bunch of parts I had for a decent radiator because mine is shredded/soldered. Also picked up a new heater shut off valve for the block from him.

My package from Vintage power wagons arrived with my new fuel pick up, and I made the appointment to take the gas tank down and have it repaired tomorrow...things are coming along nicely!

If I get the tank in this week, I'm also going to do the radiator swap.
The local airport has a 50's M-37 as a firetruck and their radiator is shredded. I am going to get my old one flushed out, and donated to them.
 

pwrwagonfire

New member
652
5
0
Location
Central Massachusetts
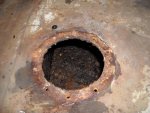
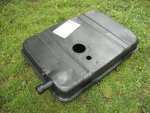
Got my re-built gas tank back today.
Got it done at Custom Radiator & Sales in Gardner, MA. They were a pleasure to work with, tank comes with a 5 year warranty. Lined the inside with 2 coats, and I had them top coat it as well.
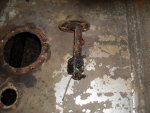
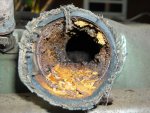
I attached a picture of the tank previously...the shop actually had to clean it 3 times before they got it all out!

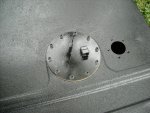
I heeded the advice I got here on another thread, and purchased allen head screws for my fuel pickup, worked much better than the phillips which were on there before.

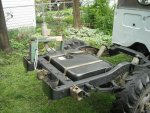
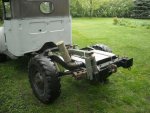
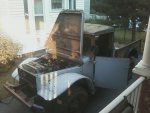
Went back into the truck easily, and the truck idles great!

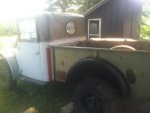
I had to rig up a pretty hill billy looking brace to hold the filler neck for now because they body isn't on...to be honest, it'll only be like that for the month, so looks don't matter to me :-?

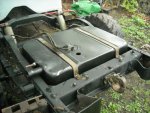
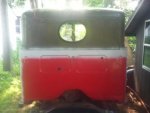
Got the bed flipped over, putting a coat of POR15 on the underside before I install it

Well, now I'm off to adjust the idle on the carb!

Loves days with good progress!
 

Attachments

pwrwagonfire

New member
652
5
0
Location
Central Massachusetts
As a side note...the new fuel pickup I purchased from vintage power wagons didn't come with a place to attach the vent line...unsure about what I will be doing on this matter for the time being
 

M-37Bruce

Active member
705
59
28
Location
Midlothian, VA
Are you going to add the vent line later? It really makes a big difference. I just added fuel to my renewed tank, also adding some sea-foam tomorrow.
 

pwrwagonfire

New member
652
5
0
Location
Central Massachusetts
Are you going to add the vent line later? It really makes a big difference. I just added fuel to my renewed tank, also adding some sea-foam tomorrow.
I'd like too! We'll have to see...

I will have to add a fuel gauge sending unit in the future as well, my wiring harness is gutted, so I couldn't justify the $100 right now...maybe I will add the vent at the same time
 

pwrwagonfire

New member
652
5
0
Location
Central Massachusetts
Got the truck painted between the cab and the body...now the body is just sitting ontop of the frame awaiting a bolt down.

Now that I have the $$ to buy the appropriate parts, I would like to go to the local mom and pop-have EVERYTHING hardware store to get the bolts/support local buisness, etc.

I have been searching through my manual, and for the bolts I need it just says "if bolts need replacement, remove and replace with new."

I need a "cap screw," and 2 different sized step bolts to make this work...

Does anybody on here happen to know what size these bolts are so I can get the body on?

After the body is mounted, I am going to register it! So close!

Also bought the new body mount spacers today from the guys at midwest military. 6 "body pad, square type" and a set of 6 repo "cargo box spacers."

Great guys to deal with, very pleasant...will not hesitate to order from them in the future! Also, can't believe I was able to find these parts...made my day! Didn't want to have to use cut up 1 1/2" fire hose as spacers like I feared I was going to have to haha
 

Attachments

Last edited:

GUNNY 155

Member
238
4
18
Location
elgin illinois
Spent 32 years as a FF and made a lot of things with old 1 1/2 and 3 inch fire hose. Body mounts was not one of them though. Cant say enough good about John and the crew at MWM though.
 

pwrwagonfire

New member
652
5
0
Location
Central Massachusetts
John probably has the step bolts, did you ask him?
I had thought about that...but I was sort of hoping to be able to get them locally for whatever reason...may have to call him back I guess!

I was also thinking about buying a new fuel pickup from from. The one I got from vintage powerwagons I am not satisfied with, as it doesn't have a return on it...midwest military one looks EXACTLY like the one I took out of the truck!


Spent 32 years as a FF and made a lot of things with old 1 1/2 and 3 inch fire hose. Body mounts was not one of them though. Cant say enough good about John and the crew at MWM though.
haha Interesting eh? Yeah, instead of those square spacers which go on the bolts, the previous owner had fire hose, hense why I'm missing them :-?
 

pwrwagonfire

New member
652
5
0
Location
Central Massachusetts
Opened up the toolbox again today while the weather is staying nice...

I used spray on rubberized bed liner, and coated the entire underneath of my seat/battery area with it. I ended up picking up one of those marine battery boxes, so I installed that as well.

It isn't original I know...but this'll make it more functional for me!
I also picked up some correct gauge battery cable wire and ends, and made/installed a new set of battery cables...REALLY happy with the way today's work came out. And mannn are those cables heavy duty!! Installed a new 12v starter solenoid as well.

Truck is having a problem getting fuel, I believe the old rusty lines are the cause of this. Cleaned the sediment out of the bowl on the fuel pump, and tested it with a boat tank- working.

What I ended up doing to clear out the blockage in the fuel lines was make an adapter, and connect the boat tank to the fuel lines instead of the fuel pump. Then I reversed the suction on the squeeze-ball of the boat tank, and used that to suck the fuel through the lines and into my auxiliary tank. Worked like a charm!

Tomorrow I'm going to be installing a flow through electric fuel pump, to help the engine prevent vapor locking in the summer heat. We have these on all our power wagons at work, and it works great!

Sorry for the poor quality pictures...camera ran out of batteries so I used my phone!
 

Attachments

1943ht

Active member
478
94
28
Location
Batavia, OH 45103
Looking good ...:-D

Tank sure came out nice .. did the same with mine regards cleaning, (steam and then a Muratic Acid bath) and coating exterior and interior.

There was an incredible amount of crud in the neck and tank in your pics, was the cap on it when you found the vehicle?

Recovered and rebuilt a halftrack fuel tank recently as a spare .. some kids had filled most of it up with dirt back in the day.. what a mess! :jumpin:
 

pwrwagonfire

New member
652
5
0
Location
Central Massachusetts
Finally...after 3 months of no progress finally was able to get some parts collected this week.

Have a Carter P4603HD Rotary Vane Electric Fuel Pump headed to me...I installed one of these as a replacement on our 1957 W300M power wagon at work, and have been very happy with it!

As soon as the fuel pumps in...I can finally get this **** bed on :roll:
 

pwrwagonfire

New member
652
5
0
Location
Central Massachusetts
Looking good ...:-D

Tank sure came out nice .. did the same with mine regards cleaning, (steam and then a Muratic Acid bath) and coating exterior and interior.

There was an incredible amount of crud in the neck and tank in your pics, was the cap on it when you found the vehicle?

Recovered and rebuilt a halftrack fuel tank recently as a spare .. some kids had filled most of it up with dirt back in the day.. what a mess! :jumpin:

Believe it or not, the filler cap WAS on
 

pwrwagonfire

New member
652
5
0
Location
Central Massachusetts
Hope everyone had a great thanksgiving!

Saturday morning my friend Rob (mrcucv here on SS) and I put my bed on.

Used a borrowed engine hoist to suspend it in the air and back the M-37 under it...didn't work perfectly, but it worked well enough! Getting those 2 rear bolts in the bed, the ones above the shackles...:roll:. Hope I never have to do that again!

Thanksgiving morning I replaced my fuel pump with a brand new replacement Carter M2090, and put an inline fuel filter in the engine compartment.

All I've got left is electrical (besides cosmetics) and I'm road worthy!
I'll be replacing the radiator soon...I have one in my shed waiting. Also, I'm moving the M-37 to a relatives garage within the month, so I'll have an indoor place to work on it.399188_10200153066212391_1520866544_n.jpg30341_10200153071052512_762709267_n.jpg28069_10200153073172565_1041703741_n.jpg225513791.jpg
 

pwrwagonfire

New member
652
5
0
Location
Central Massachusetts
I just wanted to point out to anyone following this thread, that of the body bolts which I ordered from Midwest Military, the two REAR bed fasteners were about 1/2" too long.
They were the right bolts, but too long.

I cut them and threaded them to the right size, just an FYI for everyone.

Once I make it up to see my grandpa (machinist) I will have him tell me what the official bolt size is.
 
Top
AdBlock Detected

We get it, advertisements are annoying!

Sure, ad-blocking software does a great job at blocking ads, but it also blocks useful features of our website like our supporting vendors. Their ads help keep Steel Soldiers going. Please consider disabling your ad blockers for the site. Thanks!

I've Disabled AdBlock
No Thanks