• Steel Soldiers now has a few new forums, read more about it at: New Munitions Forums!

  • Microsoft MSN, Live, Hotmail, Outlook email users may not be receiving emails. We are working to resolve this issue. Please add support@steelsoldiers.com to your trusted contacts.

What have you done to your HMMWV today/lately

155mm

Chief and Indian
Steel Soldiers Supporter
1,245
497
83
Location
Guymon, OK
Got wiring issues fixed with inverter, installed 24v air compressor and tank, welder reinstalled and wiring chased down (with many thank you's to @aghumvee for his time)

next will be a test tickle with a ford alternator to verify the 'not under the hood' under the hood welder works before investing $500 in a 12v 250amp alt.

then maybe paint it all, truck is very faded compared to newer box and both doors are new, so need to color match them all

got battery cables delivered and installed for the 6ea group 31 batteries placed in right rear floorboard

finally got motivated to build the passenger side filler door.


IMG_2370.JPG

IMG_2625.JPG

IMG_2599.JPG

IMG_2646.JPG

IMG_2649.JPG
 
Last edited:

aghumvee

Active member
Steel Soldiers Supporter
205
222
43
Location
Blairstown,Missouri
Got wiring issues fixed with inverter, installed 24v air compressor and tank, welder reinstalled and wiring chased down (with many thank you's to @aghumvee for his time)

next will be a test tickle with a ford alternator to verify the 'not under the hood' under the hood welder works before investing $500 in a 12v 250amp alt.

then maybe paint it all, truck is very faded compared to newer box and both doors are new, so need to color match them all


View attachment 952498

View attachment 952499

View attachment 952500
It looks awesome!!

Hmmm....maybe we should have switched boxes since mine is camo going on a solid green M1097 and yours is green a camo humvee. :ROFLMAO:
 

155mm

Chief and Indian
Steel Soldiers Supporter
1,245
497
83
Location
Guymon, OK
It looks awesome!!

Hmmm....maybe we should have switched boxes since mine is camo going on a solid green M1097 and yours is green a camo humvee. :ROFLMAO:

oh, now you are going to make my head hurt, but now would be the time to swap before I start really loading it up with the toolboxes, oxy/acyt reels-tanks, air hose reels.
 

hgun

Well-known member
Steel Soldiers Supporter
215
382
63
Location
Leechburg, PA
I got all the fun flats out. 3 out of the 4 had 2 piece run flats big round one and a little on then sits on the other one I can say they were much easier to install than the big one. Time to clean and paint the wheels and reassemble. I’ll keep you updated
 

Attachments

hgun

Well-known member
Steel Soldiers Supporter
215
382
63
Location
Leechburg, PA
I got all the hub fluid changed. When I removed the dust cover to torq the 3/4 bolt to I noticed the lock washer was laying inside the dust cover they must have said oops we will get next time lol. And one nut didn’t have the tabs bent into the grooves. So now I’ll start cleaning the wheels and reassemble.
 

HookEm

Member
21
39
13
Location
Central Texas
So I had been chasing a power steering leak for quite some time, intermittent issue so that was fun...

Anywho, for those with the M1152/A2 with the big alternator, the hose off the Cadillac valve to the cooler (the aux cooler at the passenger rear fender well) runs dangerously close in a pinch point between the alternator and body.

20250829_211127.jpg
20250829_211140.jpg

I am assuming this isn't an isolated issue as when I went to my parts rig it had the same issue. Now off to find a hydraulic shop that can make up a new line, or I may try and jerry rig something, cant find the part online for the life of me.

Would hate for someone to go crazy trying to find this leak, changing the PS pump, hydroboost, steering gear... because that would just be nuts... I mean who would do such a thing...
 

KKroger

Active member
109
156
43
Location
KC MO
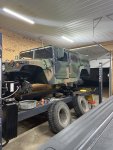
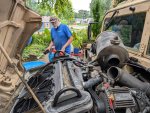
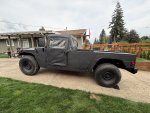
A Little While back I added A/C to my 1097R1
Red Dot Evaporator, Sanden 508 Compressor with 24VDC Clutch, BlackDog Customs Compressor Bracket, Red Dot 5 groove water pump pulley. bunch of hose and fittings and a parallel flow condenser from Coldmaster, and a simple wiring harness. works quite well.

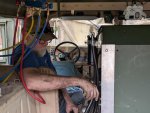
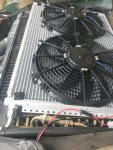
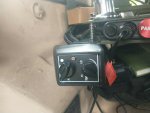
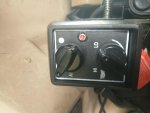
Ended up with the condenser on the cooling stack dual fans, Had a minor issue with the manifold gages I used for automotive the low side valve stopped working. had to use a consumer trigger hose. Meh it worked. Designed and 3D printed from ASA plastic some Square to round duct transitions. Fabricated the Evaporator brackets from 3" x .125 aluminum angle (6063) a bit ham handed but they work. Control from Coldmaster. has 4 speed fan and rotary temp control there is a thermistor in the evaporator. I put mesh wire wrap around the main forward to rear trunk, this is all 24VDC so the main power comes right off the batteries just like the Red Dot setup. the Evaporator arrived brand new in a Red Dot Box Damaged... the plastic duct around the dual squirrel cage fans was broken so when first powered up the fans were rubbing and dragging so bad it started blowing fuses and burned out the speed controller. I initially repaired with nylon Zip Ties, Coldmaster shipped a new same manufacturer fan assembly immediately. While it is still uninsulated the system pours 41 degree air on my head. and reduces 105 degree air to 80 degrees and lower ambients to much less.

A Bit of Simplification.
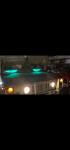
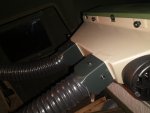
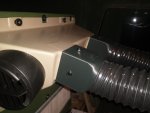
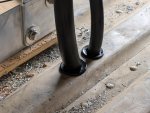
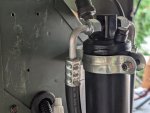
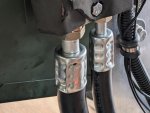
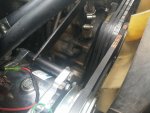
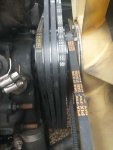
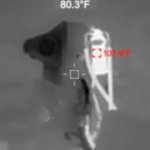
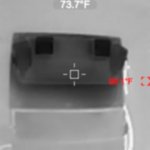
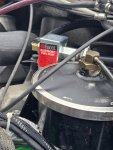
the smallest hose is the high pressure "Liquid" line, the Largest is the "Vapor" line or lowest pressure, the MIDDLE size hose is the high side of the compressor. smallest is #6 Largest here is #10 and the "Middle" is #8 so if we start at the Compressor Number 8 goes to the TOP of the Condenser, #6 comes from the bottom of the condenser, that goes all the way back to the Dryer, which is the canister shaped item. from THAT to the EVAPORATOR in is also #6 then #10 is the return that goes back to the compressor. you can see in the thermal pics attached that the dryer and high side lines are quite hot. the lines all run UNDER the Hump Floor over the transmission and exhaust I WANTED to use a bulkhead connector in the floor there and had it but the supplied fittings for the dryer were Straight not right angle so for my mounting solution they would not work. Most mount the dryer on the fender liner on the passenger side. it would not fit there for me. so it is alongside the evaporator. as shown. the Red Dot instructions show the Dryer mounted outside the cab on the back wall. and the condenser is also on the back wall or the roof. I chose not to do any roof penetrations on the Helmet top. the Condensate drains go through the floor behind the evap. I tied them to a stainless Tee fitting there.

523813568_717768711135050_3900570960073276868_n.jpg
 

Attachments

Last edited:
Top
AdBlock Detected

We get it, advertisements are annoying!

Sure, ad-blocking software does a great job at blocking ads, but it also blocks useful features of our website like our supporting vendors. Their ads help keep Steel Soldiers going. Please consider disabling your ad blockers for the site. Thanks!

I've Disabled AdBlock
No Thanks