• Steel Soldiers now has a few new forums, read more about it at: New Munitions Forums!

  • Microsoft MSN, Live, Hotmail, Outlook email users may not be receiving emails. We are working to resolve this issue. Please add support@steelsoldiers.com to your trusted contacts.


WSUCougar's M925A1 Acquisition and Build Thread

wsucougarx

Well-known member
6,951
65
48
Location
Washington State
Back Up Light Switch and Status Light Project

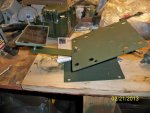
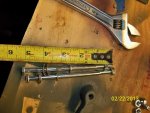
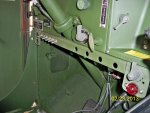
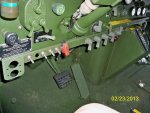
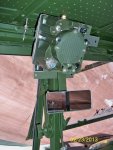
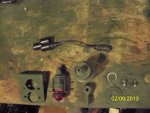
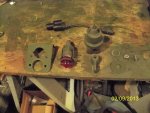
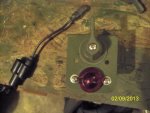
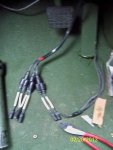
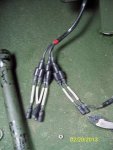
This is the start of my wiring project for this truck. First order of business was getting the back up light switch/status light completed. The bracket used was nothing more than an M35A2 Airshift Lever bracket, M939 series battery switch, Low Air Pressure Indicator Light kit,and a large stainless steel washer. This project was a piece of cake. I added the status light as to not blind the drivers behind me or accidentally leave the light on after shutting her down for the night. I won't explain how it was all assembled, the pics will answer the questions. The large stainless steel washer was used because the rotary switch is offset in the bracket. To cover up the obvious offset, I just covered it up with the washer.
Pics:
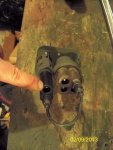
1- Parts needed for the project
2-Oops same pic
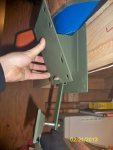
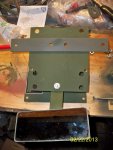
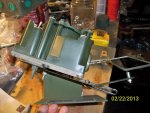
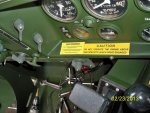
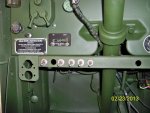
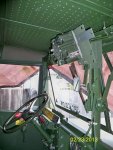
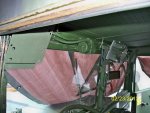
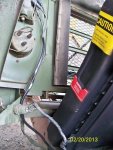
3-Everthing assembled
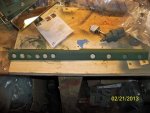
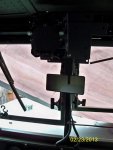
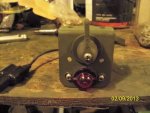
4-Different angle
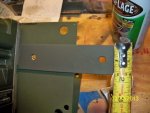
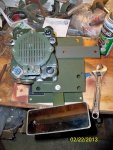
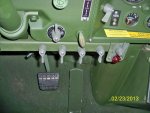
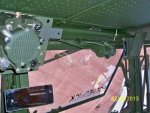
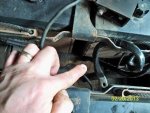
5-I don't have it wired quite correctly. However the idea is to have the status light in between the switch and the power out. As electricity flows from the switch to the rear back up lights, it'll light up the status light. The socket I'm pointing to will have the connector wire that feeds the rear lights. Simple enough.
 

Attachments

Last edited:

wsucougarx

Well-known member
6,951
65
48
Location
Washington State
Light Power Wire Project

Next project was to run my power wires for the lights. I ran three 12 AWG Presolite wires from the battery compartment, down through the battery drain hose, up over the tranny to the firewall of the truck. On the firewall, I have three 15 AMP military circuit breakers. From the circuit breakers, I have three 12 AWG wires running to the cab of the truck. The three wires then terminate into a military wire splitter to create two circuits for each wire. Thus creating six total circuits which are represented by 6 M939 series battery rotatary switches....whew, did you get all that? To protect these rubber wires (overkill I know) I wrapped each run with electrical tape. Looks more organized and keeps everything together.
I also ran three 12 AWG Presolite wires from the cab (switch plate just under the steering wheel) to the front of the truck. I snaked the wire harness down the firewall and along the frame of truck. I then cab out through an hole in the frame just under the radiator. From here each 12 AWG wire will also terminate into a military wire splitter to create two circuits for each wire. Two circuits to power a wire on the driver and passenger side of the truck. So we have a total of six circuits up front. As discussed earlier, for a pair of Infrared Lights, two pairs of Route Clearance Lights (just using two circuits), and one aux circuit for future use.
I also ran one 12 AWG power wire from the cab to the rear of the truck for the back up lights. One wire will power a pair of lights.
Wire lengths used:
Battery comparment to the firewall: 12.5 ft
Firewall to the cab: 4 ft
Cab to the front of truck: 13 ft
Cab to the rear of truck: 31 ft (back up lights)

Next Projects:
Mounting the switching panel under the steering wheel area
Mounting the Route Clearance Lights and back up lights
Mounting the MX-7777 Surge Suppressor
Mounting the complete VIC-1 Intercom System w/3 stations in the cab and 1 station in the bed
Mounting overhead center console with two LS-671 and rearview mirror

Pics:
1-Cab to the front of the truck wiring harness
2-Battery Comparment power wire. Pointing to where I have the wire harness running out of the battery drain hose (didn't want to drill anymore holes than I needed to)
3-Wire harness on the bow of the truck
4-Three 15 AMP fuses (wires from the battery compartment are marked with red tags)
5-Running the harnesses through the existing firewall grommets
6-Three power wires making six total circuits;-)
 

Attachments

Last edited:

Amer-team

Well-known member
1,706
28
48
Location
Centralia/WA
The administrators need to add a wow button to the list. Thank you, sometimes, is not enough. Great stuff Mike, thank you for taking us along on this journey.
 

Artisan

Well-known member
2,762
227
63
Location
CDA Idaho
Awsome as always Mike! It would be even moreso
if it had one* of those new front winch bumper
Vise Mount Kits a SS member is fabbing up
and thinking about peddelin' for dolla's
or parts. I heard the guy wants some
of those sweet door battle locks !
:tank:

*or two, they will fit PS and DS, DS needs one hole drilled is all.
 

wsucougarx

Well-known member
6,951
65
48
Location
Washington State
Awsome as always Mike! It would be even moreso
if it had one* of those new front winch bumper
Vise Mount Kits a SS member is fabbing up
and thinking about peddelin' for dolla's
or parts. I heard the guy wants some
of those sweet door battle locks !
:tank:

*or two, they will fit PS and DS, DS needs one hole drilled is all.
Hmm, I may have one pair left. I'll have to search in my garage heap of parts to see if I can locate them.
 

jonesal

Mission Specialist
Steel Soldiers Supporter
413
68
28
Location
Brookings, SD
:not worthy: I agree, we need a wow button. I would pay to read this thread. Thanks for showing us how to do first class work.

Al Jones
84 M923
 

wsucougarx

Well-known member
6,951
65
48
Location
Washington State
Overhead LS-671 Loudspeaker Console/Rearview Mirror Project

I've been working off/on trying to figure out the overhead speaker/rearview mirror console. I bought a bunch of military mounts for another project and some left over (still have a bunch left over if anyone's interested). This mount serves as the foundation of the console (I have them installed in all five of my trucks). The plan is to mount this console to the upper portion/middle of the windshield assy. I am going to drill two holes, mount two 1/4" nutserts, and bolt them into place. I was originally going to mount LS-454 for the VRC-12 family of military radios. However, I am going to go SINCGARS with this truck (saving up for radios). So I opted to mount the LS-671 Loudspeakers instead. I am going to go with two speakers up front (A and B speakers). The A LS-671 will be interfaced with the VIC-1 Intercom system and the B will be hooked upto the SINCGARS or whatever.
I fabricated the rearview mirror arm and the dual LS-671 Loudspeaker mount. I went down to my local ACE and bought four 5" bolts to mount the speakers to the mounts. Everything went pretty straightforward. My second LS-671 is enroute as we speak (thanks to a fellow SS). I am also going to mount one in the bed of the truck.
The mirror is a standard cheapo military rearview mirror. I bought it for $10 online.

Next up is the Switch Panel for all my lights and future electrical gadgets. Stay tuned!

Pics:
1-Foundation of the console
2-Showing the angle of the mounting plate as it would be in the truck
3-Rear view mirror arm mounting
4-LS-671 dual mounting plate
5-LS-671 Mounting bolts from ACE
6-Sideview of the mount
7-Almost complete
 

Attachments

Last edited:

Kingpepsi

New member
48
0
0
Location
Wallingford CT
That is a beautiful truck! Nice work so far. Its looking really good! I have a dumb question and i apologize in advance. How are folks like you driving these home? Are you getting temp tags or dealer tags or just hoping for the best?
 

wsucougarx

Well-known member
6,951
65
48
Location
Washington State
That is a beautiful truck! Nice work so far. Its looking really good! I have a dumb question and i apologize in advance. How are folks like you driving these home? Are you getting temp tags or dealer tags or just hoping for the best?
Thanks KP, I go down and buy a 3 day trip permit (some states have 7 day trip permits).
 

wsucougarx

Well-known member
6,951
65
48
Location
Washington State
Under the Dash Light Switch Panel

Today I got the chance to finally mount my light switch panel. The panel itself is made from steel angle iron I got from Home Depot. I just cut her down to length and drilled a series of holes for the rotary switches and toggle switches. I originally planned on just having the rotary switch. However, since I had so much steel I decided to run the panel under the steering column. I have no plans for the toggle switches but opted to put them in for future projects.
Due to the size of the angle iron and the proximity of the steering column, I had to cut a channel in the horizontal portion of the angle iron. No big deal. I also mounted the back up light switch and another bracket at the opposite end for yet another future project. My thought is to do the work once now, rather than having to tear it apart to accomodate projects in the future. Everything else is pretty self-explanatory with the panel itself.
Now in regard to the wiring, the rotary switch are the only one's with power. Since I split three 12 AWG power wires into six circuits, I had to plan on what was going to be powered with what shared circuit. I didn't want to overload any one circuit so I did a little brainstorming and came up with a plan:
Circuit 1: Powers Back Up Lights and Infrared Lights
Circuit 2: Powers Route Clearance Lights and Can Interior Lights
Circuit 3: Powers Front Aux Circuit (TBD) and Toggle Switches (TBD)

Pics:
1- Switch Panel after receiving some Behr Paint
2- Switch Panel mounted with only two 1/4" bolts
3- Flush mounted to the dash
4- Toggles installed and a bracket for future projects
5- Main Light Switches (L-R: Front Aux Circuit Power,Cab Interior Lighting, RCL, Infrared Lights)
6- Panel view
 

Attachments

Last edited:

wsucougarx

Well-known member
6,951
65
48
Location
Washington State
LS-671 Console Mounted and Overhead Console Prep

While I had metal shavings all over the cab from drilling, I decided to keep drilling. I mounted my LS-671 Speaker Console along with two other mounting brackets at opposite ends of the dash. My plans are to use these brackets for an overhead console of sorts. I'm going to mount personal items (I-Pod, GPS, CB Radio, etc). I have plans on using some more angle iron to mount a CB radio or HAM radio on the driver's side. More on that later. I used Nutserts for mounting for the ease of dismouting them later if need be. I tested the strength of the nutserts by hanging my body weight (205 lbs') on each one.
Pics:
1-
2- Still awaiting my second LS-671.
3-
4-
5- Three mounting brackets along the top of the windshield assy.
 

Attachments

wsucougarx

Well-known member
6,951
65
48
Location
Washington State
Hey Scott, those toggles are all US military toggle switches. They are all sealed unlike the civilian toggles out there. Thanks for the heads up though.
 

srodocker

Well-known member
6,549
68
48
Location
Lacey, Washington
ahh ok. yea as of right now i need toggles for my heater and my transfer tank lol

going to switch to military ones. you get yours at eriks?

also Really love those mounts you did on the hardtop. or did you do it on the windshield?
 
Last edited:

Amer-team

Well-known member
1,706
28
48
Location
Centralia/WA
Mike that is a great looking install for your switches, but have you considered shin guards, next time you his a large pothole?
I noticed this in Dan's truck as well. Have you guys had any problems with that mounting location. Maybe it doens't make a difference with an automatic, but with my truck, I can sometimes hardly get on the clutch without the door or steering wheel getting in the way of my knee. Beautiful work.
 

wsucougarx

Well-known member
6,951
65
48
Location
Washington State
Mike that is a great looking install for your switches, but have you considered shin guards, next time you his a large pothole?
I noticed this in Dan's truck as well. Have you guys had any problems with that mounting location. Maybe it doens't make a difference with an automatic, but with my truck, I can sometimes hardly get on the clutch without the door or steering wheel getting in the way of my knee. Beautiful work.
Thanks Peter, so far so good. No issues with hitting the switches. I put the switches in that location so I can just simply feel for the switches and keep my eyes on the road. I thought about an overhead panel but didn't have enough wire. I've got the same type of panel on my M109A3. Haven't had any issues with my knee or shin hitting the switches either.
ahh ok. yea as of right now i need toggles for my heater and my transfer tank lol

going to switch to military ones. you get yours at eriks?

also Really love those mounts you did on the hardtop. or did you do it on the windshield?
I got all my switches from Broncobuddy a couple years ago. I bought around 30 or so. I bolted the mounts directly to the windshield assy. I couldn't get enough meat on the hardtop lip. I plan on putting a lot of weight on those mounts so I opted for the thick windshield frame. I just made my brackets for the door rifle mounts. Probably will get those on tomorrow in between church services.
 

srodocker

Well-known member
6,549
68
48
Location
Lacey, Washington
You just use hardstock for the door mounts and vice to bend right?

of course you got the switches from broncobuddy....

and peter I have had no problems with my toggle switch location. just that i dont get weathproof ones
 

wsucougarx

Well-known member
6,951
65
48
Location
Washington State
I did;-) I took pics of my process and will post tomorrow. Just need metal stock, something to etch the metal (used an air cutting tool so it'll bend where you want it), benchvise, and a hammer.

You just use hardstock for the door mounts and vice to bend right?

of course you got the switches from broncobuddy....

and peter I have had no problems with my toggle switch location. just that i dont get weathproof ones
 

srodocker

Well-known member
6,549
68
48
Location
Lacey, Washington
sweet. Yea i just bought a vice yesterday and a cpl more little backup lights.

have you started up your brick yet? or wired it to your house? hehehe
 
Top
AdBlock Detected

We get it, advertisements are annoying!

Sure, ad-blocking software does a great job at blocking ads, but it also blocks useful features of our website like our supporting vendors. Their ads help keep Steel Soldiers going. Please consider disabling your ad blockers for the site. Thanks!

I've Disabled AdBlock
No Thanks