• Steel Soldiers now has a few new forums, read more about it at: New Munitions Forums!

  • Microsoft MSN, Live, Hotmail, Outlook email users may not be receiving emails. We are working to resolve this issue. Please add support@steelsoldiers.com to your trusted contacts.


WSUCougar's M925A1 Acquisition and Build Thread

Amer-team

Well-known member
1,706
28
48
Location
Centralia/WA
Now of course you called in a hazmat team before you went any further. :) You guys with the fancy trucks. I was worried you had a short in your power windows. At least it was an easy fix.
 

wsucougarx

Well-known member
6,951
65
48
Location
Washington State
Another pallet of aluminum parts

I had another pallet of aluminum and steel parts, on a pallet, follow me home last last night. Not sure which truck will get this set of parts. My M923 has a brand new hardtop from RRAD while my M925A1 has the old ratty one from whenever. Based on my reservations to cut into a hardtop alone, I am more apt to put it on the M925A1 project truck. As far as completeness, then it'll go on my M923 project truck. My son suggested I just swap hardtops. I thought about this, however I epoxied the outside of the 925's seam to seal it. So essentially the two halves are now "married" together and would be physically impossible for me to muscle both halves off myself.
I suppose in the meantime I could just mount it on the "intended" truck (m923) for now. Then through my frustration of not being able to use the LWS, I'll probably just cut into the thing:grin:. I say "intended" because my M923 is nicknamed after my career Marine grandfather Major James Young Henderson, USMC. My truck is nicknamed "JY". He was double distinguished with the rifle and pistol. It was only fitting to have a weapon station on his truck.
http://ct.thecmp.org/app/v1/index.php?do=contactDistinguishedView&distinguished_id=12650
http://ct.thecmp.org/app/v1/index.php?do=contactDistinguishedView&distinguished_id=12651
I need to secure a few parts before this project gets started. She was missing the nutstrip for the front driver side leg bracket. I also will need to find 4-6 U bolts to mount the legs on the back of the cab. I say 4-6 because I have seen some M939 series trucks with two U-bolts per leg and others with three. I have found a source for them for $25 NOS but we'll see.
 

Attachments

Last edited:

Amer-team

Well-known member
1,706
28
48
Location
Centralia/WA
Cool stuff Mike. $25 seems high unless that is the price for all the ubolts you need. You should check your local Napa or logging truck parts store. you would have to paint them green, but don't think you would have any problem with that. P
 

wsucougarx

Well-known member
6,951
65
48
Location
Washington State
LWS Leg Dimensions

Here are some pics for a few of you who have asked about the support legs for the LWS.
 

Attachments

wsucougarx

Well-known member
6,951
65
48
Location
Washington State
Back Up Lights/Rear Auxillary Lighting

Playing catch up here. I installed my back up lights a few weeks ago. I just realized I didn't post this in the thread so here it is. I used the Aurora Armored Lights I got off SS last year. These lights have a Hi and Lo setting. I opted to just power the Hi Beams on these lights for backing up. Though I have LED lights adorned on this truck, I went with the armored lights for those just in case moments of backing into something. I used an "L" bracket from The Home Depot electrical section. To power them I ran a 12 AWG wire from the cab switch and used a "Y" splitter at the rear of the truck to power the lights.
I opted to place my back up lights on a switch so I can also use them while offroad, disaster driving, or simply hooking up a trailer. I used a star washer on the mounting of the "L" bracket to ensure I had good ground. The install was pretty straightforward. I just need to wait for a nice dark night to get them aimed correctly.
 

Attachments

wsucougarx

Well-known member
6,951
65
48
Location
Washington State
Rear Towbar/Safety Chain Storage

Still catching up on my write ups.
Following my M923 Project idea, I installed the same setup for my tow bar/Safety Chain storage area. I used the same components but had to locate my crossbar a little different as the M925A1 chassis was a bit different than my M923A0 chassis. Nevertheless, it's the exact setup. I still need to mount my towbar mounting bracket (stealing it off my M109A3 for now:-D). Plus I need to install a cross-bar to keep the end of the large "L" shaped bracket spaced apart and stabilize her. I tried to use the chassis existing bolts as much as I could to minimize drilling. However, I ended up having to drill a couple holes in the chassis anyways.

Components used for this project:
Two M939 passenger side under the cab "L" brackets
Two Home Depot Electrical Dept. small "L" shaped brackets
One 1/4" thick piece of "L" shaped stock (left over from the M923 project)
One accessory box off of a generator trailer

I tried to use the chassis existing bolts as much as I could to minimize drilling. However, I ended up having to drill a couple holes in the chassis anyways.
 

Attachments

wsucougarx

Well-known member
6,951
65
48
Location
Washington State
Lightweight Weapon Station Install Part I (Driver Side Cab Brackets)

Yesterday I began the arduous task of installing the LWS. Though I didn't have all the parts for the cab brackets, I went forth to get this thing installed. I found the installation instructions to be non-existent. I search all over the internet to no avail. Having nothing to go off of, I just winged it and tried to document my process to help others. I apologize ahead of time if something is not installed correctly. Please let me know if you see something that looks incorrect.
First order of business was removing the driver door hinges....yah right!! The upper four screws came out OK. However, the lower hinge was an issue. In fact, it was the biggest issue I encountered during the complete install!! I ended up shearing the head off of 3 out of the 4 screws. I attempted to drill out the screws to no avail. Oh well, I just used a Grade 8 bolt in the lonesome hinge hole and tightened her down really really well. Hopefully she'll hold.
I am missing a total of 3 pieces in this project. I am missing two nut strips that go on the inside of the driver and passenger vent hole. It acts as a backing plate and has 4 nuts soldered to it. I am also missing an "L" shaped support bracket that marries the cab bracket to the outside panel of the truck. Since I have one of the "L" shaped support brackets, I went ahead and pre-drilled the holes for the missing one for the passenger side. Someday one will show up.
Pics:
1-"L" shaped support bracket pre-drilled holes
2,3-Bolted into position
4,5-Complete Mount in position with support legs installed
6-Pin in place to prevent the support legs from shifting downward with all the weight
7-Rear Support Legs installed
8-Rear Support Leg Pin in contact with the middle U-Bolt
 

Attachments

Last edited:

wsucougarx

Well-known member
6,951
65
48
Location
Washington State
Lightweight Weapon Station Install Part II (Passenger Side Cab Brackets)

Next order of business was tackling the passenger side cab bracket. This install was pretty straightforward. The bolts for the cab bracket are already installed. You just need to remove them, install your bracket, and replace/tighten the bolts and you're done.
One thing you need to pay attention to is to tuck your cab bracket under the corner of the dash plate. You may need to use a prybar to open the space up so you can slide the bracket into place. It can be a little tricky lining up the two halves of the cab bracket to the hole. Just use a screw driver to recenter everything, then install your bolt loosely. Get all your bolts into place and make sure your bracket is squared up before getting too crazy on tightening everything down;-).
Also loosely install the three big bolts on the outside of the mount.

Pics:
1-Predrilled holes for the missing "L" shaped support bracket
2-Two halves of the passenger side cab bracket. Notice the 5 holes in the middle. Those holes mount to the "L" shaped bracket. This is the only difference between the M35A2/M809 series truck's brackets.
3-The factory installed bracket bolts removed
4-The small space where the bracket needs to be tucked under the dash plate.
5-A little prying helped open up the void
6-Install each half separately. Just tap into place with a rubber mallet
7-Centering the hole with a tool that was nearby
8-Bracket installed and ready to go
 

Attachments

Last edited:

wsucougarx

Well-known member
6,951
65
48
Location
Washington State
Lightweight Weapon Station Install Part III (Support Leg LWS Crossbar Install)

This step is probably the most critical part of the install. So pay attention!
Upto this point, it has been pretty straightforward. Now is where you really need to plan ahead and get everything ready for the LWS.
In this segment, we're installing the aluminum cross bars that our LWS will sit on. You cannot simply just slapped the cross bars on there and call it good. You need to take measurements and space your crossbars at a prescribed measurement from each other. The crossbars need to be parallel to each other!
For me, I have the rear support legs facing each other. In other words, the support leg mounting plate is parallel to the back of the cab. To prevent movement of the rear legs, I tightened all six U-bolts to prevent them from shifting and tightened the rear crossbar down as well. Next, I went to the LWS plate and measured the distance between the U-bolt holes. I used this measurement to space my crossbars from each other. This step is critical because you need to get everything measured and tightened down before putting this heavy LWS into position. You definitely do NOT want your crossbar to move and have your nice LWS smashing down through your soft top or hardtop!

Pics:
1-Crossbar bushings, washer, and bolt orientation
2-Crossbar bushings installed. The underside is a mirror image of the top with the exact same bushings
3-Crossbars installed loosely. The front leg supports can still be rotated freely. The rear leg supports are tightened down and cannot rotate
4,5- I am pointing at the stop tabs that are welded on top of each crossbar. You want these tabs towards the drivers side of the truck. The LWS plate rests against these small tabs.
6-Crossbar spacing at 47.5" apart. Take measurements at both ends of the crossbars. Once you get it dialed in, tighten the front legs brackets!
 

Attachments

Last edited:

wsucougarx

Well-known member
6,951
65
48
Location
Washington State
Lightweight Weapon Station Install Part IV (Physics)

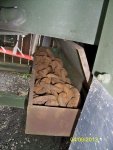
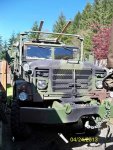
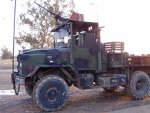
Ok, so here I am. I've got all the cab brackets and leg supports ready to go. I've taken all my measurements and everything looks great. But there's just one small problem. The 300-400 lb pallet of LWS is sitting in the back of the M925. Hmmm, yah yah yah yah. How am I going to get that thing on top of the truck??:roll: 
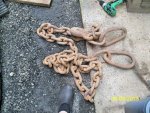
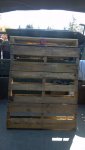
It dawned on me. I really didn't have a plan in place to get that thing up there. I am standing there all by my lonesome without a soldier B to help out. I don't have a wrecker to crane it into place nor do I have an engine hoist nor a forklift. I am no body builder so simply picking this behemoth up by hand wasn't an option. Plus, it would be difficult to put it into place as the spare tire void is about 2 ft wide and the spare tire davit is right in the way. Well, it was time for some good ole ingenuity. I looked around and see I have two pallets in the truck (compliments of Uncle Sam). Plus I had four 2x4's laying up against the house. I also had a broken cargo strap (complments of Uncle Sam) and a small cargo strap that somewhat worked. I constructed something out of the Red Green show (minus the duct tape) and with a little muscle and a few groans, we were good to go!!!!

Pics:
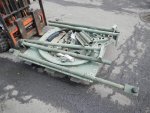
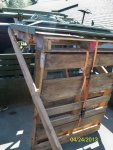
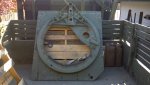
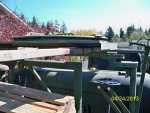
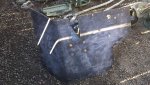
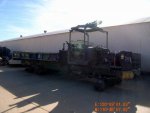
1-Place a pallet up against the headache rack and dragged the LWS and leaned it up against the pallet. I then strapped the LWS to the pallet so she wouldn't slide out from underneath me. Note, position the weapon tray at the
front so you're not lifting all that extra weight!!!
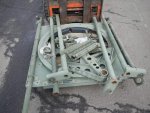
2-I grabbed the bottom of the pallet and heaved her upward. While holding the pallet up with one hand I reached over and grabbed the other pallet to hold everything up...whew!!!
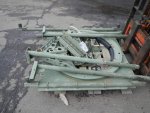
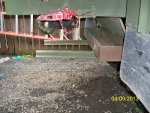
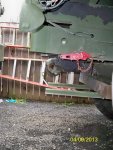
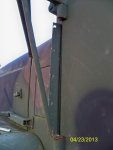
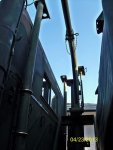
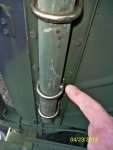
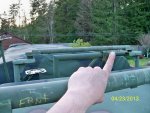
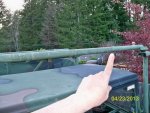
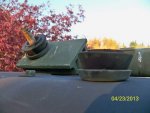
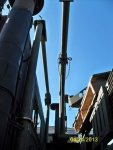
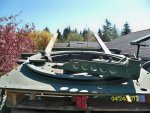
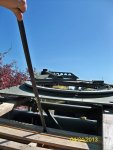
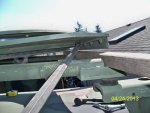
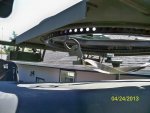
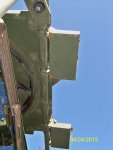
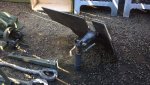
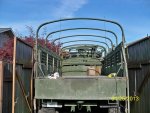
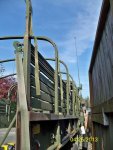
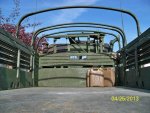
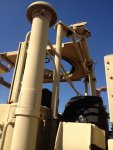
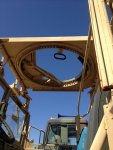
3,4,5-The pallet dangling over the front of the headache rack. Luckily the spare tire davit stopped her from going overboard
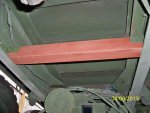
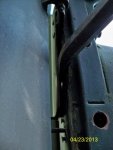
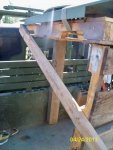
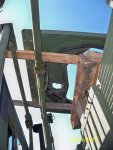
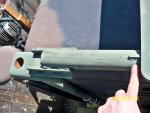
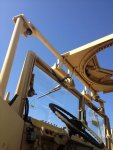
6-I grabbed a 4' post and heaved the front of the pallet upward. Plus I used two 2x4's to stabilize the pallets to keep them from separating at the most in opportune time!
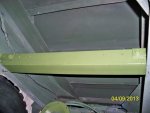
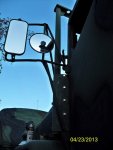
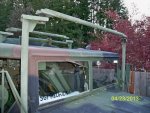
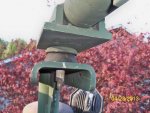
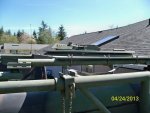
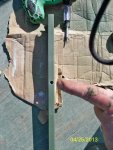
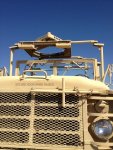
7-Used a cargo strap to hold the contraption up against the headache rack
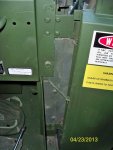
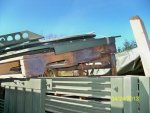
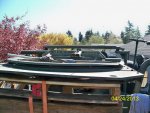
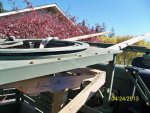
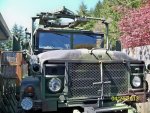
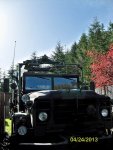
8-With everything in place, you can see it doesn't have to go up very far.
9-Another angle of the mess
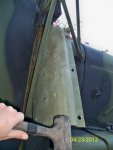
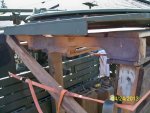
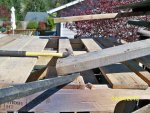
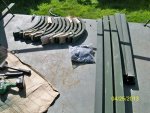
10-The 2x4 ramps in place. Be sure to nail the end to the pallet so the ramp doesn't go along with the LWS as you push it.
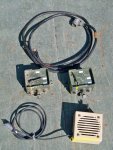
 

Attachments

Last edited:

wsucougarx

Well-known member
6,951
65
48
Location
Washington State
Lightweight Weapon Station Install Part V (Physics Cont.)

Now the heaving really begins!!! At this point, everything is in place and ready just brute force. While I was pushing this LWS up the 2x4's I had lineman drill flash backs where you do hand thrusts into the opponents chest. Once you get the LWS up the 2x4's, you can make things a bit easier by using a crowbar to push it up. Just insert one end to one of the pallet slits and push her up. Don't get too carried away as to not let your LWS fall off the 2x4 ramps. Also make sure you use long enough 2x4's as to go past the front crossbar. If you don't, you'll know why. Once you get the LWS far enough up the ramp, you can take the nails out of the 2x4's that held into the pallet. Just simply let the LWS drop onto the crossbar. From here, it's nothing more than get her far enough on the 2x4's so she's hovering over both crossbars. From here, just use your pry bar to lift the LWS plate and remove the 2x4's one at a time. Pay particular close attention that your LWS plate will rest onto the crossbar!!
Pics:
1,2-The 2x4 ramps are nailed down and in place. It's time to work those muscles!!
3-After a couple pushes she's made it about 1.5 ft. She cleared the spare tire davit by a couple inches...no problem
4-Front view of the ramps
5-Using a pry bar to cheat the LWS up the ramp
6-Remove the ramp nails from the pallet and let her fall into place
7-Almost there
8-Once the plate is hovering over the front/rear crossbars, it's time to use the prybar and remove the 2x4 ramps.
 

Attachments

Last edited:

wsucougarx

Well-known member
6,951
65
48
Location
Washington State
Lightweight Weapon Station Install Part VI (LWS Mounting)

Now that the LWS plate is resting the crossbars, we can loosely mount the seven u-bolts (3 in the rear and 4 up front) that will hold this thing in place. Those tabs on the crossbar I mentioned earlier will now be used. Make sure both the front and rear tabs are up against the LWS plate. Now we can tighten the LWS mounting u-bolts. Once complete, I installed the two ammo can brackets into place. She is now complete. I do have plans to cut a hole in the hardtop but need to track down one of the those HEMTT roof plates. Or find something that will stiffen up the hardtop roof.
My son and wife came home and were a bit shocked I put the LWS up on the roof. She initially kind of help me drag the pallet from the back of my 3/4 ton Dodge Ram into the back of the M925A1. So she knew how heavy that thing was. She looked around and looked at me (I think she was waiting for me to complain about my back hurting from heavy lifting). My son and she simply asked how I got that thing up there. I just said I put it up there and in a redneck voice said "We don't need to stinkin' forklift or crane" and walked away.
 

Attachments

Last edited:

Danger Ranger

New member
2,253
23
0
Location
Roland, IA
Holy crap son! That was clever, but silly, clever but silly. Did you have some straps or something to keep the lws from falling back down and cutting you in half???
This is why I have a backhoe, or a lift, or TREES! I understand a man using what he's got, but wouldn't hoisting it into a tree and backing under it be easier?


Great writeup, as usual. Just be careful, I want to see more threads like this in the future, don't ruin that for me, lol.
 

wsucougarx

Well-known member
6,951
65
48
Location
Washington State
Hahaha now that I'm sitting here looking at the pics, I am now wondering how it worked. I had a cargo strap pulling the whole contraption against the headache rack to keep it from falling back. That weapon tray is really really heavy. Though heavy, you can use that weight to your advantage by placing it toward the area you want to go. The weight will help "drop" the LWS into the area you want to go.
I've got one more challenge ahead, height clearance permitting, I need to get the chicken plate up on top of the LWS weapon tray. This will pose to be a real challenge and the chances of getting hurt or damaging something will increase.
I originally bought this LWS for my M923 truck "JY". However since I put the 395's on FMTV wheels on her, she really bounces down the road. She does level out around 50 MPH but still have a bit more bounce than the M925 w/14.00's. I needed to work that issue out before placing an extra 400 lbs plus on top of the 923. My concern was the bouncing would really cause some undue damage to the cab.
So since I had the LWS just sitting there, I opted to get her mounted on the best truck I had. Plus I have no reservations about cutting a big hole in the roof of this truck. I still have a partial LWS in my garage that can go on the 923 once I get all the parts together (support legs and cab brackets).
So at this point I still need to mount the chicken plate, the MK64 weapon mount, a couple 40mm ammo can trays (storage), cut a hole in the hardtop, add a couple smoke dischargers (static display item), and possibly a passage way linking the hardtop to the LWS to keep the weather out of the truck. I would need to secure a HMMWV LWS hatch for the mount itself if I go this route.

Pics:
Chicken plate to go on top of the LWS..someday;-) I have a feeling there may be some height issues but will get it figured out.
 

Attachments

Last edited:

wsucougarx

Well-known member
6,951
65
48
Location
Washington State
Cargo Bed VIC-1 Stations

Today I added my usual cargo bed VIC-1 station in the bed of my 925. You will notice I used two C-10456 control boxes. The one towards the headache rack will be used for an LS-454 Loudspeaker. From there, I piggy backed it to the rear VIC-1 station where there will be an H-161 headset. Though never used, I like the option of having comms with someone in the bed for parades or disaster type scenarios.
 

Attachments

wsucougarx

Well-known member
6,951
65
48
Location
Washington State
New Cargo Cover Kit Install

Before I won this truck, I was after a RRAD M925A1 soft top truck w/out a cargo cover. In anticipation of this win, I was bidding on a lot of two M939 series cargo cover kits at JBLM. Well, I lost out on the auction only to find I lost to a fellow SS over in New York!! I found this out while looking through the classified ads. I was toggling through the ads when I recognized a pic of a wooden box with a cargo cover in it. Then it dawned on me, those were the actual GL pics of the lost I just lost the week before. After contacting the seller, I ended up buying one of the two cargo kits from him.
Well I didn't win the RRAD truck I was after but won the truck this thread is based on. As luck would have it, the truck already has a cargo cover kit installed. Well, when I removed the cover two days ago I noticed the staves and bow corners were in really rough shape. They looked as though someone ran them over with a tank and reshaped them with a hammer. So since I already had a NOS kit sitting in my garage for a spare, I decided to get her installed on the truck.
I was without the baggie of straps and bolts but found some on ebay. The only involved thing I had to do was drill into the staves at both ends of the bed for the troopseat retention pin to go into.
Pics:
1-Bow corners, metal bows, fiberglass staves, bag full of cover straps and bolts
2-Retention pin hole made in 4 staves
3-Bows and corners all installed
4-Cargo straps installed
5-Shot of the LWS
6-Proper way of laying out the cargo cover
7-Unfold each side, one by one
8-Stencil info towards the front of the truck
9- Preliminary fit, going to stretch it further once it sits in the sun for a few hours
 

Attachments

Last edited:

wsucougarx

Well-known member
6,951
65
48
Location
Washington State
LWS Pics for reference

Some LWS Pics for reference. I used the next 4 posts as reference for the LWS. Just thinking someone out there may need some of these pics for reference.
 

Attachments

Last edited:
Top
AdBlock Detected

We get it, advertisements are annoying!

Sure, ad-blocking software does a great job at blocking ads, but it also blocks useful features of our website like our supporting vendors. Their ads help keep Steel Soldiers going. Please consider disabling your ad blockers for the site. Thanks!

I've Disabled AdBlock
No Thanks