• Steel Soldiers now has a few new forums, read more about it at: New Munitions Forums!

  • Microsoft MSN, Live, Hotmail, Outlook email users may not be receiving emails. We are working to resolve this issue. Please add support@steelsoldiers.com to your trusted contacts.


What have you done to your CUCV today/lately? - Part 1

Status
Not open for further replies.

True Knight

Active member
666
169
43
Location
San Pedro, CA
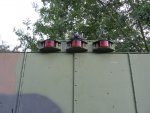
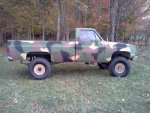
Here's how it came out. The new lights are much brighter than stock! I used a single pole double throw switch (aka 3 way switch). The three positions are manual on, off, or on in reverse. In the off position the lights do not come on when the truck is placed in reverse. Here is a rough schematic of the circuit.(The lights are not wired in series, I just got lazy and only drew the one power/ground.) I spliced into the backup wire (light green) from the backup light switch for the b/u signal.

ImageUploadedByTapatalk1349842059.584566.jpg
ImageUploadedByTapatalk1349842078.252342.jpg
 
Last edited:

MarcusOReallyus

Well-known member
4,524
810
113
Location
Virginia
Okay, so your switch is a 3 position switch, right? So in the different positions it's like this:


  1. Connected to existing backup light hot wire to relay. This allows the existing BU light to operate the relay.
  2. Connected to nothing. No 12v gets to the relay coils, so lights never come on no matter what.
  3. Connected to 12v. This energizes the relay and turns on the lights.
If so, then your switch is a SPDT Center Off switch.


I really like the center off option - it gives you full control.


Very nice! :beer:
 

Keith_J

Well-known member
3,657
1,313
113
Location
Schertz TX
How about what have I done WITH my CUCV? My brother's car spun a CV joint on the right side, it was dead on the road. Took me a half minute to diagnose and a few days to get parts. Then the M1031 was by my side to spin off the 30 mm axle nut, air impact wrench is an arm saver. All powered by the 1031. I also used impact wrench to spin the lug nuts off, I'm getting lazy.

Now the sway bar link bushings? Also shot so those were spun off with air power. Contact maintenance is awesome. Even had the C-clamp to compress the caliper to get the vehicle back together.

This truck is very useful. I will need a 3/4" impact wrench. The 1/2" is still a bit weak.
 

Smokingman

Member
64
1
8
Location
Two Harbors MN
I had to remove my front tire mount to add the winch.

Angle iron welded to the front shackle mounts and to the brush guard.I used an old trailer hitch so I could move the winch to either the front or back.Power up front was easy,the rear power has not been.Currently the only way I could use it when rear mounted is with jumper cables for power.I will post more pictures of the build later.


True Knight

Active member
666
169
43
Location
San Pedro, CA
Okay, so your switch is a 3 position switch, right? So in the different positions it's like this:


  1. Connected to existing backup light hot wire to relay. This allows the existing BU light to operate the relay.
  2. Connected to nothing. No 12v gets to the relay coils, so lights never come on no matter what.
  3. Connected to 12v. This energizes the relay and turns on the lights.
If so, then your switch is a SPDT Center Off switch.


I really like the center off option - it gives you full control.


Very nice! :beer:
Yup. That's exactly the way it works and it is a center off switch. Thanks. Hopefully this helps anyone else who might be doing some reverse lights in the future!
 

HOWEY

Member
159
1
18
Location
ireland

Attachments

Keith_J

Well-known member
3,657
1,313
113
Location
Schertz TX
FINALLY got my high side 12 volt wiring system done. This will power 12 volt loads WITH TWO WIRES!!! Hot to ground is 24 volts, hot to 12 volts is 12 volts. Slick setup, the 24 volt side is through a solenoid relay so the ignition switch also switches this system.

With that done, the rear view camera is working and I will soon have a 12 volt accessory socket and power for the air conditioner. The camera wires are snaked between the mat and pad, just to the left of the transfer case lever. This made fishing the wires much easier. The camera wires are all hidden :jumpin:
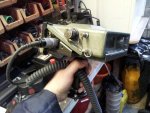
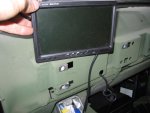
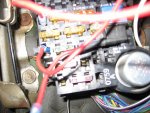
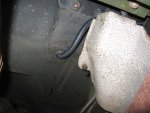
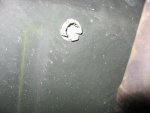
. The video and power go through a knock-out plug in the bottom of the cab. There are two, all external wire is in convoluted plastic conduit.

24 volt is tapped off the starter relay, in my case that is the Doghead mod. this goes to a 30 amp automatic breaker, then to a relay for key switching of this high side power.

The negative side is a tap off the fuse block, another 30 amp breaker with fuse block tap is used.

I still need to put the dash back together. Made access much easier.


Just got it all back together. Camera is working great.
 

Attachments

Last edited:

Keith_J

Well-known member
3,657
1,313
113
Location
Schertz TX
The rear view camera seems to have an issue with voltage, I'm measuring 14.65 at the camera...so I use a 8 A-H sealed lead acid I have handy and the camera works GREAT. I have to check the alternator output, check the filtering capacitors and possibly, install an electrical noise filter on the power lead to the camera.
 
Status
Not open for further replies.
Top
AdBlock Detected

We get it, advertisements are annoying!

Sure, ad-blocking software does a great job at blocking ads, but it also blocks useful features of our website like our supporting vendors. Their ads help keep Steel Soldiers going. Please consider disabling your ad blockers for the site. Thanks!

I've Disabled AdBlock
No Thanks