Nice! That's what it's all about in the end, having fun!Got her STUCK!!!
Now I'll be taking the hubs covers off today to drain and fill with fresh grease...
View attachment 798757
-
Steel Soldiers now has a few new forums, read more about it at: New Munitions Forums!

What have you done to your HMMWV today/lately
- Thread starter Warthog
- Start date

More options
Who Replied?Wire Fox
Well-known member
- 1,252
- 162
- 63
- Location
- Indianapolis, Indiana
That's a neat idea... I've got another idea to try first without modifications. Failing that, a plug will make a fine change.I think my cover plate underneath has a hole in it with a plastic bung stuck in it.. Remove plastic bung and I believe it has access to that nut /washer.. If I’m not mistaken that cover piece is fairly thin, you may be able to drill an access hole and use a plastic hole cover when done... Just thinking out loud...
Sent from my Nokia 6.1 using Tapatalk
- 320
- 411
- 63
- Location
- Geographical Center of Virginia
Painted the ibis tek bumper after 2 hours of sanding it today. The more I worked on it in detail, the more I understood why the CEOs of IBIS TEK are in prison. I'll install it later this week. Purchased all new dock bumpers for it, $5 each on zoro.
Attachments
-
 68.2 KB Views: 71
- 1,425
- 771
- 113
- Location
- Quantico VA
You're not gonna leave us hanging are you Dan'l?Painted the ibis tek bumper after 2 hours of sanding it today. The more I worked on it in detail, the more I understood why the CEOs of IBIS TEK are in prison. I'll install it later this week. Purchased all new dock bumpers for it, $5 each on zoro.
Bad welds? Dissimilar metals? That makes me think of my first ship, USS Gunston Hall, LSD-44. She left initial construction with all the hotel steam piping (used for non critical heating and cooking) made of whatever 2" pipe the contractors could find and painted over. Every foot of pipe rotted wherever the dissimilar metals were joined and failed routinely (and at bad times). We lost hotel steam every couple of days for a few hours at a time until the Auxilliaries Shop made up a schedule, ordered a couple miles of steel 2" pipe and replaced every inch of it.
Bulldogger
- 802
- 916
- 93
- Location
- Bainbridge Island Wa
Interesting read, I was not aware of this fraud.
Sent from my iPhone using Tapatalk

Sent from my iPhone using Tapatalk
- 320
- 411
- 63
- Location
- Geographical Center of Virginia
Well to start, the paint is bad quality and led to galvanic corrosion with the steel bolts and aluminum bumpers. There are several welds that are cracked. The aluminum is also bent just from mounting the bumper. Some GI had to redrill the holes because IBIS TEK did not have the spacing correct.You're not gonna leave us hanging are you Dan'l?
Bad welds? Dissimilar metals?
Bulldogger
- 320
- 411
- 63
- Location
- Geographical Center of Virginia
Installed the bumper yesterday. My lightbar mount from Predator shipped yesterday and I'm thinking of putting 9" or 11" lightbars in the corners of the IBIS TEK bumper. I'm also waiting on the fairlead to arrive.

Crapgame
Well-known member
- 642
- 342
- 63
- Location
- Navarre, FL
My Ibistek, I'm going to put a 5ton Wrecker 24v spotlight near each outer corner.
- 6,162
- 4,880
- 113
I poured a chocolate shake on mine  .
.
Doubly bad because I hadn't even taken a sip yet.
.Doubly bad because I hadn't even taken a sip yet.
Attachments
-
 55.1 KB Views: 72
twisted60
Well-known member
- 617
- 251
- 63
- Location
- Jupiter, Florida
5 sec rule did not apply ?I poured a chocolate shake on mine
Doubly bad because I hadn't even taken a sip yet.
- 3,833
- 3,961
- 113
- Location
- Brooklyn, NY
I can absolutely say that you own one SWEEEEEET HMMWVI poured a chocolate shake on mine
Doubly bad because I hadn't even taken a sip yet.
papakb
Well-known member
- 2,285
- 1,196
- 113
- Location
- San Jose, Ca
Putting in large rivnuts doesn't require that special tool unless your going to do a lot of them. Just use a 1/2-13 bolt and a couple of nuts to set the rivnut.
BTW, I did the flasher replacement.


BTW, I did the flasher replacement.
Wire Fox
Well-known member
- 1,252
- 162
- 63
- Location
- Indianapolis, Indiana
Well, say it ain't so. I did quite a simple search and came across a guide that explains a good way to do this. I might just re-explore this option, as I have plenty of hardware around and can definitely afford a couple rivnuts.Putting in large rivnuts doesn't require that special tool unless your going to do a lot of them. Just use a 1/2-13 bolt and a couple of nuts to set the rivnut.
This guide seems to address the problem of the rivnut spinning before being fully tight: https://www.spyderindustries.com/blogs/news/diy-how-to-install-nut-inserts-rivet-nuts
Sjoconnor
Active member
- 46
- 102
- 33
- Location
- Marshfield MA
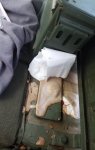
Got an awesome AmmoAudio stereo in a 50 cal can. Sound is incredible. Now I just need the beaches to open up!!


Wire Fox
Well-known member
- 1,252
- 162
- 63
- Location
- Indianapolis, Indiana
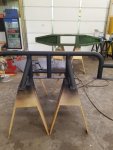
My little Handee Clamp was the perfect tool. I used it with a piece of tape to hold the washer loosely to the nut. Gives you plenty of grip to start the bolt onto the nut from within the channel. Can slip a small wrench in there after to actually tighten it down without worry of dropping any of the hardware.
Edit: just thought I'd add how remarkably easy this really was. I removed the divider barrier so that I can reach the channel and top bolt at the same time. Took about 30 seconds to clamp the nut and tape on the washer. Set the bracket in place, slipped the Handee Clamp into the channel from the comfort of the front seat, looked in the hole for alignment, then dropped in and hand-tightened it. One little flick to release the clamp sent it tumbling down into the rear footwell without any drama. Took what was setting up to be frustrating hours of work into a super easy 5 minute job for both.

Sent from my Nokia 6.1 using Tapatalk

Last edited:
- 3,176
- 4,794
- 113
- Location
- Olympia/WA
Sure, tease me. I've been looking for a couple of those brackets for a while and not available anywhere, then you have to show off that you have someMy little Handee Clamp was the perfect tool. I used it with a piece of tape to hold the washer loosely to the nut. Gives you plenty of grip to start the bolt onto the nut from within the channel. Can slip a small wrench in there after to actually tighten it down without worry of dropping any of the hardware.
Edit: just thought I'd add how remarkably easy this really was. I removed the divider barrier so that I can reach the channel and top bolt at the same time. Took about 30 seconds to clamp the nut and tape on the washer. Set the bracket in place, slipped the Handee Clamp into the channel from the comfort of the front seat, looked in the hole for alignment, then dropped in and hand-tightened it. One little flick to release the clamp sent it tumbling down into the rear footwell without any drama. Took what was setting up to be frustrating hours of work into a super easy 5 minute job for both.
Sent from my Nokia 6.1 using Tapatalk
Got me motivated though to paint my 2 man bulkhead, and drag out the troop seats to power wash them. I have a vertical barrier in the center to hold my red dot evaporator inside the cab, will probably just bolt the bulkhead to it instead.
- 597
- 599
- 93
- Location
- Evansville, IN
Installed my rebuilt tranny and tcase...Finished the evening off with installing the starter also, old style front mounting bracket 
Only took 3 hours all together.. I will definitely be replacing that bracket if that starter ever comes out again..What a boreass, good thing I have some guns on me.....Forearms are burning though...
Only took 3 hours all together.. I will definitely be replacing that bracket if that starter ever comes out again..What a boreass, good thing I have some guns on me.....Forearms are burning though...
Spitfirebuilder
Member
- 92
- 88
- 18
- Location
- Perrysburg OH
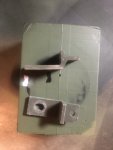
Are you looking for the two brackets for the two man bulkhead. I have a couple of them.Sure, tease me. I've been looking for a couple of those brackets for a while and not available anywhere, then you have to show off that you have some
Got me motivated though to paint my 2 man bulkhead, and drag out the troop seats to power wash them. I have a vertical barrier in the center to hold my red dot evaporator inside the cab, will probably just bolt the bulkhead to it instead.
So are you looking for the two man bulkhead brackets. TheseSure, tease me. I've been looking for a couple of those brackets for a while and not available anywhere, then you have to show off that you have some
Got me motivated though to paint my 2 man bulkhead, and drag out the troop seats to power wash them. I have a vertical barrier in the center to hold my red dot evaporator inside the cab, will probably just bolt the bulkhead to it instead.
Attachments
-
 40.8 KB Views: 35
- 3,176
- 4,794
- 113
- Location
- Olympia/WA
Yes I am. Put everything together without them, the bulkhead is about half an inch low from where it should be for the troop seats.Are you looking for the two brackets for the two man bulkhead. I have a couple of them.
So are you looking for the two man bulkhead brackets. These
- 3,833
- 3,961
- 113
- Location
- Brooklyn, NY
Got an awesome AmmoAudio stereo in a 50 cal can. Sound is incredible. Now I just need the beaches to open up!!
View attachment 799202View attachment 799203View attachment 799202View attachment 799203
WOW, that's a $400 radio. Must be made of pure Silver mixed with the cure for COVID-19
- 114,242members
- 167,167threads
- 2,353,413posts
- 4,361online users