• Steel Soldiers now has a few new forums, read more about it at: New Munitions Forums!

  • Microsoft MSN, Live, Hotmail, Outlook email users may not be receiving emails. We are working to resolve this issue. Please add support@steelsoldiers.com to your trusted contacts.

WSUCougar's M925A1 Acquisition and Build Thread

wsucougarx

Well-known member
6,951
65
48
Location
Washington State
Projects in the making.....

I've been busy accumulating parts for my upcoming project while on 7 weeks of leave. Here's what I have so far:
1) NHC 250 Blue Coolant Hoses
2) NHC 250 USGI Belts
3) NHC 250 180 degree thermostat w/seal
4) Wix Coolant Filter Housing w/Filter
5) HALDEX Air Brake Check Valve (qty 3)
6) USGI Marker Light Brackets for the rear (qty 3) w/Aurora Cord 24v Red Marker Lights (qty 3)
7) Aurora Armored Infrared Lights (qty 2) for rear of truck
8) Back up Alarm w/tranny pressure switch
9) USGI Tripod Blind Spot Mirrors for front fenders (qty 2)
 
Last edited:

wsucougarx

Well-known member
6,951
65
48
Location
Washington State
Blue Force Tracking Display

I'm thinking I probably should have purchased a HMMWV for the latest projects. After seeing a pic of a HMMWV's setup, I was determined to make it fit in an M939 series truck....my style8). I bought a broken BFT Display off e-bay and secured the BFT Display Mount and Ram Mount from Beltfed34 off e-bay as well. I simply printed off an image off Google of a BFT Display and made to fit the display dimensions by monkeying the format using Windows Word. I've never seen a BFT setup in a M939 series truck so I was up to the challenge. I don't have any plans of finding the main CPU unit as it is way too big to place in the cab for a static display. Plus with what I have seen, I don't want to pay $3k for a non-functioning static display. So for right now, the BFT display will add a nice touch to the cab. This project got my son's thumbs up of approval:grin:
I had thought about using the mount for a lap top with GPS hardware etc. But my main focus was adding a military display of some sort. So in this case, it was fashion over function. I searched for a good two months before this one came up on e-bay. It was around what I was willing to pay.
I still need to secure the two display cables to add to this project.
Pics coming....errors coming up
 

Attachments

Last edited:

Artisan

Well-known member
2,762
227
63
Location
CDA Idaho
I've been busy accumulating parts for my upcoming project while on 7 weeks of leave. Here's what I have so far:
1) NHC 250 Blue Coolant Hoses
2) NHC 250 USGI Belts
3) NHC 250 180 degree thermostat w/seal
4) Wix Coolant Filter Housing w/Filter
snip

Looks like a coolant system overhaul yes?
if so you might want to grab;

2- 1/4" x 2.5" Brass nipples
2- 1/4" FIP x 1/4" MIP Butterfly Handle Valves
2- 1/4" Brass Caps
(Think bottom of radiator, left and right)

...and maybe a 110V block heater

...and look at heater hose valves, good time to renew them,
and the heater hoses.

Make sure the small hoses (1/4" ? ) from rad to right
side are OPEN. Mine was frail, I made anew.
Flush the heater box forwards and backwards
w/ a high volume water hose several times. Pull the
plates on the side of the engine and flush the goop out
of there too. Flush flush and flush again backwards and forwards.
Fill and drain MANY times everything. I made adaptors to
flush things, it made a huge difference. Don't pressurize, flush.
 

wsucougarx

Well-known member
6,951
65
48
Location
Washington State
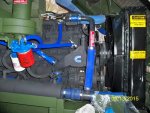
PM-Fuel Filter Change

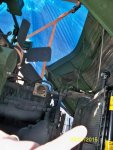
We had some incredible weather today. Now was a good time to finally get that Fuel Filter changed out. I've had the truck a couple years and have put this on the back burner for what ever reason. I think since the truck was running so well, I didn't want to screw it up. I've been reading about issues with guys getting air into the fuel system causing all sorts of issue. I basically freaked myself out of this project for the past 24 plus months. Well, today was the day to hit this perceived issue head on:p.
I know many of you have already done this so no read to continue on. If you haven't, it's no problem as long as you don't get in a hurry.
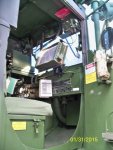
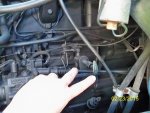
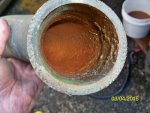
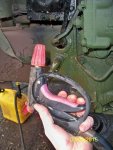
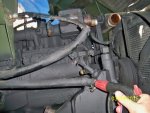
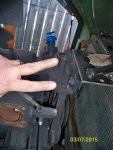
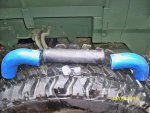
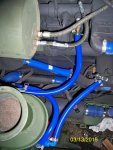
First order of business is draining the fuel/water separator canister. If you're having issues with nothing coming out then you're experiencing what I had. At first I had absolutely nothing coming out of the petcock. I thought the canister was filled with rust and all kind of goodies from the fuel tank. I simply hooked up an air attachment and blew air into the filter with low pressure! That's all it took to get the flow going. At first I had a nice When I reached the half gallon mark, I loosed up the canister mounting bolt on top of the housing. I loosed it up enough so I could shake the canister around if the petcock got plugged again. Continue to drain until she's done.
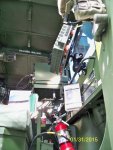
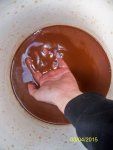
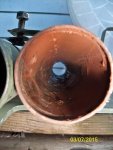
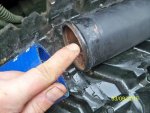
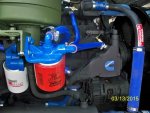
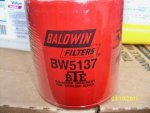
Second step is removing the old filter, filter gasket and the mounting bolt gasket (yes remove this gasket and clean the bolt and the top of the canister really well to prevent air into system!) You'll have all kinds of goop and caked on yuck that you'll need to clean out the bottom of the canister. Take your time and get all that crap out of there. Once done, I inverted the canister and shot her with some high pressure air to free up any stubborn junk.
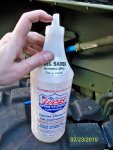
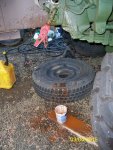
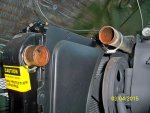
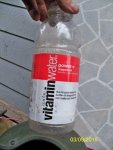
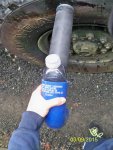
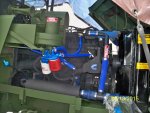
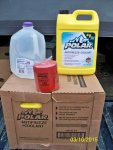
Third step is adding your fresh filter, new filter gasket, and the mounting bolt gasket. I screwed on the canister very loosely so I could lean the canister to the side to filler her up with diesel. I was without a funnel so I used a spare bottle of Lucas Fuel Treatment. I simply filled up the bottle and added fuel to the canister. Once you fill up the canister then simply spin the canister ever so slowly until it comes into contact with the big gasket. From there, tighten the top mounting bolt but don't tighten it up too much.
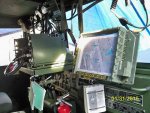
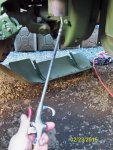
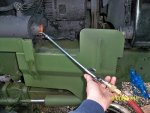
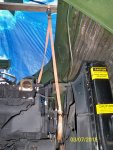
Fourth step it bleeding off the excess air out of the system. Now this step can either go very easily or be the biggest pain in the backside. I cracked open the small bleeder valve near the primer pump. Gave the primer pump two pumps and tightened up the bleeder valve.
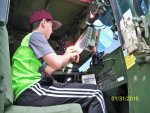
Fifth step is firing up your truck and checking for any fuel leaks......you're done...hopefully;-)
Pics:
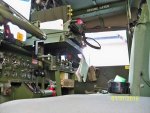
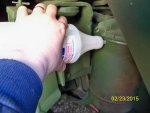
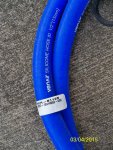
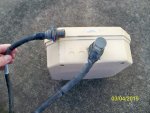
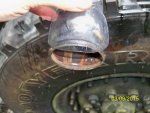
1) Shooting some air up into the petcock to unplug her. Use low pressure only!!!
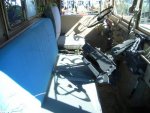
2) Drain the fuel out of the canister
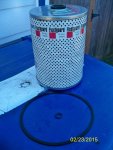
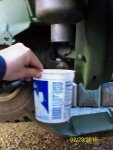
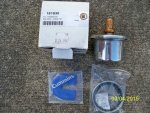
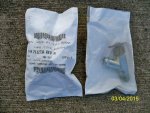
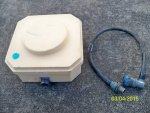
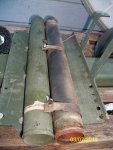
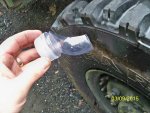
3) Fuel Filter, main gasket, mounting bolt gasket
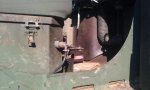
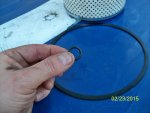
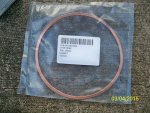
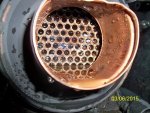
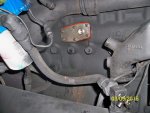
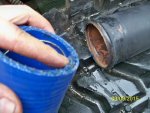
4) Typical problem gasket that causes air leak into fuel system
5) Without a funnel I had to fashion this fuel filler bottle
6) Insert bottle tip into the housing and start filling her up
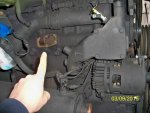
7) Open the bleeder valve and pump the primer pump a couple times to bleed off the air.
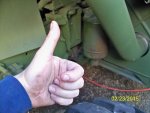
8) Hopefully the truck starts up and you're good to go. Give yourself a thumbs up!!!! See that wasn't so bad was it;-)
 

Attachments

Last edited:

wsucougarx

Well-known member
6,951
65
48
Location
Washington State
PM-Coolant System (Parts)

Before I hit a project, I research and plan accordingly before attacking. I'm a bit of a tactician when it comes to projects. It drives my wife nuts. I guess it's a military thing. During the course of the past couple months, I secured the parts necessary to replace ALL the soft parts under the hood. The first project focuses on the cooling system. I sourced all the parts of ebay. Some parts took some time to track down but eventually through waiting and persistence, I got them all. Sure I could have gone down the NAPA and bought some of the straight hoses and cut them to length. However, for me the fun is in the hunt. Plus I'm a bit of a purist. If there is a military part, then I'm going to find it and install it. However, I did source the engine block heater through a civilian company. But most of the time I'll go military if it's available.
Anyways, here is the layout of the hoses and a couple items that will be installed while the coolant is drained the hoses off. Somewhere in it all, I will replace all the belts while the coolant is drained because of that dreaded water pump belt. What's a project without it's challenges?...a boring one[thumbzup]. I tried to take pics that show the NSN or part numbers to help you guys out. I was going to save ebay links and sellers but figured a year from now they'd be useless. Plus the mods would be putting the frown down.
**Found out the heater hose should be ID 5/8"**
 

Attachments

Last edited:

wsucougarx

Well-known member
6,951
65
48
Location
Washington State
PM-NHC-250 Belts

Here are the belts to replace the aged ones on my truck. I found many of my belts have small splits and frayed edges. Although, I have no problem replacing them as needed. That water pump belt hose is the only one that has me a bit nervous. So I'm replacing it. Then I figured since I'm in there why not replace them all;-). These belts are all USGI with recent manufactured dates. As far as expenditure out of my pocket compared to the NAPA equivalents, I only paid about 1/4 of the price. I have about $35 total in these belts.
 

Attachments

Last edited:

wsucougarx

Well-known member
6,951
65
48
Location
Washington State
BFT Antenna

With the BFT platform behind the cab and the BFT display in the cab, it was only fitting to put the proper antenna on. I sourced this antenna from a fellow Steelsoldier and actually got it today. I took several pictures for those of you interested on what this thing looks like. I've been on the look out for one of these for the past year or so. This one wasn't even for sale. When I saw it, one PM lead to another PM then before I knew it, it was on my doorstep;-).
Paid $125 shipped for the antenna and cable
 

Attachments

Last edited:

wsucougarx

Well-known member
6,951
65
48
Location
Washington State
PM-Coolant Draining & Hose Removal

First order of business, drain all the coolant out of the radiator. You'll want to have some kind of funnel or hose, a few buckets w/lids, and patience. See the military and it's contractors strategically place the front air hook ups right under the radiator petcock. Why did they do that? So when you open to the petcock, that nice straight stream of coolant that is headed down toward your bucket now gets splattered all over the place. Thus missing your bucket almost entirely:roll:. Ok all sarcasm aside, you'll need a funnel or, in my case, an old piece of heater hose to divert the coolant into the bucket. Not a big deal if you want or mess or don't have your family pets around. For me, I don't like the mess and the risk of hurting my four legged family members. You'll get about 5 gallons out of the radiator. When your bucket gets close to full (5 gallons) start to close off the petcock or have your hose ready to divert into another container. The reason is the last bit that comes out will be nasty rust-sludge. Once drained, open the one radiator petcock, climb on top of the passenger tire, open up the overflow reservoir, stick your mouth over the hose while plugging off the vent pipe with your left hand. Now blow a few times and you'll hear the residual coolant come out with all kinds of nice junk. You'll have to repeat this process of few times. At this point, I disconnected and removed all the radiator hoses and just flushed the radiator forwards and backwards. I flushed that thing for over an hour and still kept getting rusty water and junk. The way I flushed it was I closed off all the radiator petcocks, inserted the hose in the upper radiator access on the driver side, walked over and plugged the lower radiator access with my hand until the radiator was full of water. From there, I just removed my hand and let her drain. I did this about 30 times and still got rusty water towards the end of every rinse. I then reversed this step by bringing the hose over to the lower access. I helped "seal" the hose with a T-shirt. I just ran the hose for awhile and reversed the step etc etc.
 

Attachments

juanprado

Well-known member
Steel Soldiers Supporter
5,516
2,733
113
Location
Metairie/La (N'awlins)
I would suggest if you can find them use the brass shut off valves with the hose bib. They will not rot out. My original tin ones were heavily pitted and rusted through. It seems the military must have had more than one supplier. I pulled some off a m931 tractor and have seen them on some other scrappers. The brass ones do show up on epay.

Even with all the magnets, The BFT antenna dome likes to come off when hit by branches. Ask me how I know... :)

Nice job with everything!
 

wsucougarx

Well-known member
6,951
65
48
Location
Washington State
Hey Juan, thanks for the heads up my friend. The valves I took off the truck to replace with the new ones are actually brass. Glad you said something about it. I already had them thrown into my garbage pail:-0. Looks like I'll have some NOS shut off valves in the classifieds soon;-).
 

wsucougarx

Well-known member
6,951
65
48
Location
Washington State
Draining Flushing Draining Flushing Draining Flushing Draining Flushing

I spent nearly 12 hours, no joke, and about 1,000 gallons of water, maybe is was only 100 gallons, flushing the system out several times. There was nothing really to report here other than have patience and don't get in a hurry. Though, I spent an entire day flushing everything out, the water was still a rust tint. I did what I could and called it good. Once I did the final rinse and drain, I used air pressure to push the remaining squatters out of the engine block and radiator. Using the side engine hole, removed cover for the engine block heater, I ran a small air hose (left over vacuum hose from a VW project) into the void and siphoned the remaining water out. Amazingly, I got about 1/2 gallon.
In regard to the radiator, I allowed it to drain over night. Once done, I ran the air hose up in the drain hole using one of those wands. I hoped the air circulation would gravity feed the remaining water out of the radiator. It worked! I pulled about a gallon out of that radiator using this technique. I wanted to ensure I got all the tap water out that I could.
I used the air wand, to clean out the tranny fluid cooler as well. I flushed and back flushed this unit about 12 times before the water came out clean. I didn't want to remove the cooler due to the potential mess with all the DEXIII fluid.
I also flushed and back flushed the heater core....wow! I can't wait to see my water bill next month!!!
 

Attachments

Last edited:

wsucougarx

Well-known member
6,951
65
48
Location
Washington State
Water Pump Belt

Now after reading a few threads about this task, I was a bit leary about this project. Was the waterpump seal going to leak? Would I have to rip everything apart? This first part of this task was remove all the belts as the water pump belt is WWWAAAAYYY in the back (except the alternator belts). Also you will need to remove the fan assy. You need to be very careful on how you do this. This assy is funky to hold onto as the center of gravity is not there. The potential of having the fan blade pierce the radiator was a huge concern. To help assist in this process, I ran a 2x4 over the cab to the top of the propped up hood. I then used a simple tie-down strap to hold the fan assy up so all I had to do was just slip her out...luckily it worked!!!.
If you have never done this before, it's easy if you do everything correct and have patience!!!! In order to get the belt off you need to rotate the water pump by using the rotating plate just under the water pump pulley. You simply loosen the 6 bolts surrounding the pulley and stick a screw driver in the rotating plate slots? Well, not exactly. Mine wouldn't rotate at all. The plate that locks the rotating plate in place runs perpendicular to the ground. The pressure affect of tightening the six bolts puts pressure against the rotating plate to keep it in place. After I loosened the six bolts, I noticed the locking plate wasn't as loose as I thought it should be. I then noticed the two 3/4" bolts mounting bolts topside (see pic 4). I loosened the two bolts and I was good to go.
Now, once you get everything put back together. DO NOT put the fan assy back in until you can verify your water pump seal isn't leaking!!!!!!!! This will save you a couple hours of frustration and decrease the chance of puncturing your radiator!!!!!!!
 

Attachments

wsucougarx

Well-known member
6,951
65
48
Location
Washington State
Engine Block Heater

I wasn't going to do this project because I just don't drive her as much as I want to. But I figured since I have all the hoses ripped out...why not. I went with the ZeroStart because I have heard they last longer than the other ones out there. Heard too many issues with the poorly made Katz. Plus I got a pretty good deal on her. The install was pretty straightforward. I have read about guys having issues with leaks when installing this type of heater. So I threw away the gasket it came with and went with hi-temp gasket maker instead. Just be sure to fully clean the mounting surface. I used a razor blade and brake cleaner to really get the gunk off.
 

Attachments

wsucougarx

Well-known member
6,951
65
48
Location
Washington State
Installing hoses

Thought this would be pretty straightforward with zero issues. And why not, taking the hoses off was easy!!! The only time consuming parts was backing the hose clamps off. This was not an easy step! Not sure if the type of hose was the issue. Most of my hoses are the new silicone type. They may be made to last but seamed a bit on the soft side when it came to the metal tubes. Albeit, the metal tube edges were quite sharp. I was having issues with the hoses not wanting to simply slip over the tube ends. I found the tube edges were actually cutting in the hoses...not good. Glad I caught this when I did and didn't try to force the hose on. Had I forced it, I would have caused hose wall separation for sure. Looking around I was going to use a screwdriver but felt that would dig into the hose as well. My thoughts turned towards a shoe horn. Sipping my Vitamin Water I stopped and looked at the contour of the bottles neck...there was my shoe horn...hose horn. For 88 cents, this was the best tool in my inventory. It worked with all the hoses until I dropped it on the ground and my black lab smelled the juice remnants and took off with it. Luckily I was done with the project.
I cleaned up and reused the hose clamps.
 

Attachments

wsucougarx

Well-known member
6,951
65
48
Location
Washington State
Coolant Filter Install, Heater Hoses, Hoses Installed View

I installed my Wix Coolant Filter housing. The biggest issue was location location location. Where could I put it to were it was accessible? Where could I put it were I didn't have to remove the side engine curtain? Where could I put it were it wouldn't interfere with anything? After about an hour of deliberation, I settled on the area next to the heater blower motor. I had to put the unit at a slight angle to clear the side engine curtain. The angle is the same as that of the tranny filter housing. I used a piece of left over angle iron I had laying around. I got a bit carried away with the heater hose. Not sure what the deal was with all the blue but I liked it;). I followed the same theme and order 10 ft of 5/8" silicone heater hose for $46 shipped!!! Now, that was about 10x more than I wanted to pay but I figured I'd be kicking myself if I didn't. Oh well, what's done is done. I also replaced the water shut off valves with new ones. They have brass valves on the inside. Not sure how long they'll hold up. The ones I took of the truck originally were brass ones but they leaked a little and just wanted to start off new.
I added a Cummins "C" to the starboard side of the motor to finish it off. I think it turned out really well. On the port side, I replaced the aged and crusty windshield fluid reservoir/mount. I also replaced the rubber hood bumpers as they were all beat to heck as well.
The coolant filter is enough to add the necessary charge to a 11 gallon system. After I run her on the road, I'll test the coolant to make sure she is where she needs to be to avoid cavitation.
 

Attachments

Last edited:
Top
AdBlock Detected

We get it, advertisements are annoying!

Sure, ad-blocking software does a great job at blocking ads, but it also blocks useful features of our website like our supporting vendors. Their ads help keep Steel Soldiers going. Please consider disabling your ad blockers for the site. Thanks!

I've Disabled AdBlock
No Thanks