• Steel Soldiers now has a few new forums, read more about it at: New Munitions Forums!

  • Microsoft MSN, Live, Hotmail, Outlook email users may not be receiving emails. We are working to resolve this issue. Please add support@steelsoldiers.com to your trusted contacts.

WSUCougar's M925A1 Acquisition and Build Thread

IsaLandr

Tartaned Goði
181
11
18
Location
Centralia, WA
Well, amid this project, I had a really hard day today. I had to put our pooch of 14.5 years down today. This was truly one of the hardest decisions I have ever had to make. It's amazing how you can get so attached to a four legged creature. I guess after 14.5 years they become a part of you and your family. I'm going to miss you Kayla! You were an outstanding dog that always kept me company during this project. My biggest regret is you never got the chance to ride in my truck. I love you ole girl, you will be missed!!!
I am so sorry for your loss. My deepest sympathy and sincere condolences. I know exactly how much that decision sucks and how much the aftermath hurts. Our fostered Arctic Wolf, 15 years young and registered service animal, needed emergency surgery yesterday morning. She expired on the operating table after a valiant but ultimately futile battle with cancer. We already miss her as I am sure you miss your Kayla. Her name is Pickled Beet, and she will live on forever in our hearts.
 

Amer-team

Well-known member
1,706
28
48
Location
Centralia/WA
Looking great Coug. I have one more inexpensive mod that you could do to the instrument panel. Home depot has a battery powered LED light, about 12 bucks that has a magnetic base, that fits at the top of the instrument panel and when turned on gives a light that you can actually see the insturment readings. It is silver, but is simple enough to paint it green or tan. It is cylindrical in shape and can be move to various positions so that it puts the light on the panel and not in your eyes. As it is magnetic, you can also pull it off and use it somewhere else if necessary.
Thank you for sharing.
 

wsucougarx

Well-known member
6,951
65
48
Location
Washington State
Upcoming Projects and Ideas

Well, as the weather would have it, things have been slowing down around our household. During this downtime, I can't help but think up projects for my truck. So, I have been pondering up some projects for this once completed truck;-). So here is a list of for sure projects that are coming up that I'll add to this already exhaustive write up thread:
1) In cab military radio mount-customized setup unlike what the military has
2) Coolant system maintenance
Replacing all coolant and heater hoses
Draining, flushing, and recharging coolant
Addition of a coolant filter
3) Replacing my seized up winch control cable-already have cable in hand
4) Addition of rear marker lights for safety
5) Addition of a license plate light for legality purposes
6) Add the Cold Weather/Winter Cover Loops to the grill of the truck (forgot I had the winter cover until now;-0)
Just want to get these projects on this thread in case I forgot where I was going with this project before the busy life begins again;-)
 
Last edited:

wsucougarx

Well-known member
6,951
65
48
Location
Washington State
Winch Control Cable Replacement- Wind-Neutral-Unwind

A couple days I manage to work the old cable loose. Just like everything on this stinkin' truck, it's a test of patience! The old cable was seized. It was like that since day one but I never really had any motivation to get her fixed until recently. The biggest obstacle was locating the correct cable for a decent price. I scoured the listings on ebay and tried to source a cable from MV vendors to no avail sometime ago. I found a cable or two but I wasn't going to spend the outrageous $140 they wanted for it. So a couple weeks ago, I was perusing ebay and found a listing for a military cable that looked like what I needed. None of the NSN's or part numbers matched what was in the M939 TM Parts manual but decided to take a chance. I got it for $40 shipped and luckily it was the correct one;-) Enough of that, let's get to the install.
The removal of the old cable took some pounding and tugging to her out of the cramped space it has been sitting for the last 28 years. I had to use a hammer to pound her out of her stubborn space. Once out everything was good to go. The challenge of the install was snaking the cable from below up into the winch control box. There is small space of about 2.5-3 inches to work with between the front of the cab on the monstrous NHC-250. Naturally, the winch control cable lives in this tiny little void of a space. With patience and perserverance you can get it done!!
The biggest advise I can give is to grease the top of the new cable to avoid water from going down into the cable. I'm thinking this is what happened throughout the years that lead to the cable being seized. Also, working the levers occasionally will help keep them loose as well. Also during install, hold off on tightening down the cable retaining clamps until you have the cable ends attached to where you want them. The hydraulic pump is in the naturally in it's neutral position. So you want to make sure your winch control lever and the neutral hydraulic pump piston are both in neutral position before you tighten everything up. It's a simple process but you just have to keep verifying where everything is when you're by yourself without soldier B.

Pics:
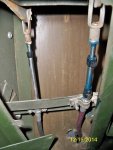
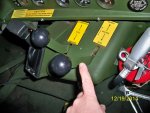
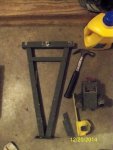
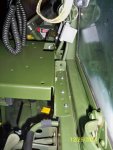
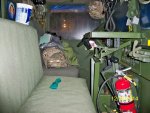
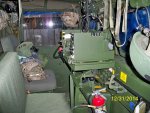
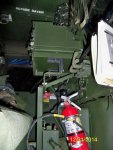
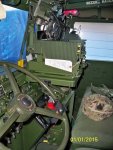
1- My seized control lever that I'm dealing with
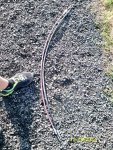
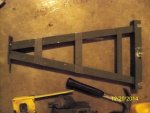
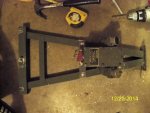
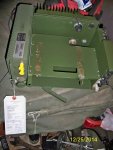
2- Old cable next to new cable. Verified hardware and length were the same
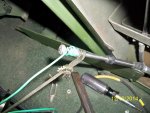
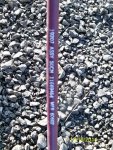
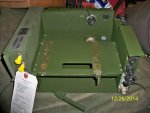
3- Numbers off the new cable (didn't locate any nomenclature off the old cable)
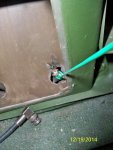
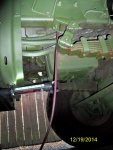
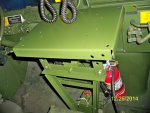
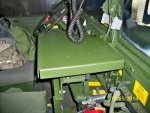
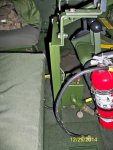
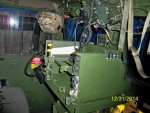
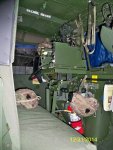
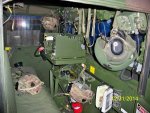
4- Void where the old cable was
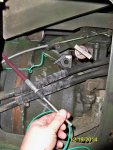
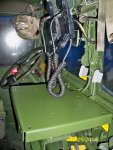
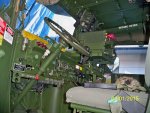
5- Fishing a wire down the cable run to capture the new one
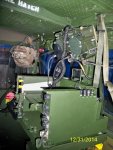
6-Run the new cable up from the bottom following the same route as the old cable
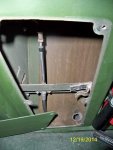
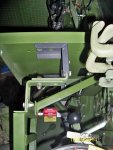
7- Open the tranny inspection door, grab the new cable and attach your pull wire (I attached a nut at the top of the cable to decrease the chances of the cable end from getting hooked on everything in it's pathway)
8- Pull the cable up into the hole...this is a test of patience right here. The cable end doesn't bend so you'll have to be creative to get her up out of the hole
9- I used some 550 cord to bend the cable end so it wouldn't snag on the insulation panel
10- Grease up the exposed cable shaft
 

Attachments

Last edited:

wsucougarx

Well-known member
6,951
65
48
Location
Washington State
Haha Scott, to be honest with you, I was surprised I had a nice uninterrupted 6 hours of time to do something today. Rain or shine I was determined to get out there to get that cable replaced. As my luck had it, I was laying in a nice mud puddle underneath my truck. Man, I'm not sure where time went. Today I stood and stared at my project trucks of yesterday. I wonder where I had time to work on them...hahaha. Those days are long ago with kids filling up our house. Next thing I'll know it, I'll be coaching Little League again for another 6 months (regular season and fall ball).
 

wsucougarx

Well-known member
6,951
65
48
Location
Washington State
Radio Tray Support Mount

The first phase of the radio tray support mount was procuring some parts to make it possible. Rather than reinvent the wheel, I opted to go with the USGI parts that were designed for the M939 series 5 tons. Though these parts were designed for this truck, I tweeked the design a tad bit to my likings. The first challenge was to locate the main radio tray in an area that would not obstruct the gauge panel or the view outside the truck. Another consideration was not loosing the second seat for Soldier C in the cab. I absolutely don't like the original design of the radio tray mount. It took up way too much room and deleted SOLDIER C's seat. Plus the original radio tray support system seemed a bit too clanky and didn't feel solid. But the biggest factor for me was loosing the extra seat for my kids during a parade etc.
The first order of business was dry fitting the main horizontal support leg for the entire mounting system. This was pretty straightforward as I was restricted to the placement of this mount. The forward angle mount mounts directed to the top of the dash to a prescribed bolt. The only calculations was to figure out the placement of the MX-7777 Power Suppressor unit on the mount so it didn't restrict movement of the transmission inspection door. Once the placement was figured out, I cut a couple stock steel bars to act as the mounting surface for the MX-7777. This was all pretty straightforward.
Once everything was measured and dry fitted it was off for paint. I used the standard Behr 383 Green CARC Substitute formula that I painted the cab with. Drying time was delayed with the high amount of moisture in the air.
I had to relocate the MX-7777 from it's place on the battery box because it impeded the support bar too much. So after much thought, rather than relocate it to the rear of the cab I opted to keep the MX-7777 in view to make sure she's turned off after the day's run. Plus, it adds to the coolness factor seeing that big hunk of green iron on that support;-)

Pics:
1- Horizontal Support Bracket, MX-7777, and a couple pieces of steel stock
2- Steel stock cut to size
3- MX-7777 mounting holes located and drilled
4- MX-7777 dry fitted to ensure it was good to go...off to paint
 

Attachments

Last edited:

wsucougarx

Well-known member
6,951
65
48
Location
Washington State
Radio Tray Support Mount (cont)

Second phase included mounting the actual radio tray to the top of the dash and marrying the horizontal support bracket together. The first part of this process included sitting in the driver seat and eyeballing the location of the radio tray. My goal was to keep my line of sight unobstructed to the gauges. Luckily there is a side cut in the radio tray from the factory that was absolutely perfect in achieving this goal! I love it when everything comes together. Now, the next question, do I have the radio tray resting directly on top of the small 1" of dash or do I come off the dash using a bracket of somekind. The biggest consideration was figured out when I saw the air lines for the wiper motors. I opted for the bracket approach because I really didn't want to have to reroute the air lines and buying longer lengths to achieve the rerouting. So it was into the garage to find a bracket of some sort. While rummaging through my parts bin I came across left over brackets from my M923 pioneer tool rack that I bought new. It had a couple short length brackets that fit the bill. This is all the more reason to hang onto those "extra" little parts you get in kits!!!!
I then mounted the radio tray to the top of the dash. I moved it as far to the port side as I could to allow the use of the dash mounted rifle racks. Once I got everything mounted I had to fill the nice 8-10" between the horizontal support bracket on the radio tray. It was back into the garage. Immediately I saw "L" shaped brackets on the workbench that were leftovers from another project. These were purchased at Home Depot in the electrical dept. These are the L-shaped brackets used to construct the electrical conduit framing. I was short of brackets and found a couple MRAP/Stryker Vehicle Route Clearance Light L-shaped brackets to finish the job;-). It's a potpourri of parts but they all work;-)
I plan on adding a shelf to the underside of the radio tray. Not exactly sure what will go there but we'll see. I also made sure there was plenty of room to operate the winch controls and there are no issues with shifting.
The only consideration with this setup is not having SOLDIER C in the truck during to/from drives. I normally only take my son to events as my daughter would rather stay with her mom. Something about creature comforts and the military trucks stink too much[thumbzup].
Also you need to take any viewing obstructions into consideration!!! Since I am the sole driver of this truck, my height allows no obstruction to the starboard side of truck. I can view the side mirrors unobstructed and over the hood unobstructed. A shorter stature driver may have issues. So before undertaking a project like this, make sure you take measurements to make sure you are good to go to operate. If not, don't take a chance! I got into my normal driving position and used a piece of cardboard box panel to mimic the side of the AM-7239. I raised and lower the panel to see at what level there was even a 1/4" obstruction while slouched (mimicking a long tired driving position). If there was, I then lowered the panel 2 1/4 inches to give myself 2 inches of free space. From there I was able to calculate a rough estimate of where the ceiling was for the AM-7239E. What you don't want to do is have the said item right at the obstruction/unobstruction margin. I may be overthinking this idea but if you only have a second to react to a situation, the last thing you want to do is to use that 1 second to shift your body to see something but rather react. Just my 0.02 on the issue;-)
 

Attachments

Last edited:

wsucougarx

Well-known member
6,951
65
48
Location
Washington State
AM-7238 and AM-7239E

OK, what's all the fabrication all about anyways? What kind of radio you putting in your truck? The simple answer....SINCGARS. At least someday I will. In the meantime, I will get everything ready. At this time I have an AM-7238 and AM-7239E. I have the MT-6352 en route.
When I got the MT-6352 she was in pretty rough shape. She had two different green painted on her with white pen paint marks. I sanded her down, masked her, and shot her with new paint. I picked both these items up off ebay. I got the AM-7238 for $60 shipped (refurbished by the US Gov't) and the AM-7239E for $110.
 

Attachments

Last edited:

wsucougarx

Well-known member
6,951
65
48
Location
Washington State
SINCGARS Radio Mount Project

I completed final painting on the MT-6352 mount yesterday. Luckily it was a nice, cold, crisp, and very dry day. It took no time at all for the paint to dry. Last night I braved the 24 degree weather with the tail end of the flu to get everything bolted in. Tonight I took the final pics. Someday I'll find time to take decent pics while it's daylight out. I was in the dark when I was taking these pics. Thank goodness for a decent flash on the camera.
Next order of business is getting all the cables hooked up and routed.
Future projects for this truck will be under the hood. I need to service the fuel filter and service the coolant system. I think I'll wait for temperature above 50 degrees before doing anything.
Man, that AM-1739E looks huge in the pics. Believe me, it's not as big as it seems.
 

Attachments

Last edited:
Top
AdBlock Detected

We get it, advertisements are annoying!

Sure, ad-blocking software does a great job at blocking ads, but it also blocks useful features of our website like our supporting vendors. Their ads help keep Steel Soldiers going. Please consider disabling your ad blockers for the site. Thanks!

I've Disabled AdBlock
No Thanks